Table of Contents
Advertisement
Quick Links
Advertisement
Table of Contents

Summary of Contents for Steam The Ripple Maker
-
Page 2: Table Of Contents
Figure 5. 1 Plug in and Turn on the Ripple Maker Contents of the Box Figure 5.2 Wi-Fi Setup Screen Getting to Know the Parts of the Ripple Maker Figure 5.3 Registration Screen Setting Up the Ripple Maker Figure 5 4 Account Confirmation Screen 5.1. -
Page 3: Important Safety Warnings And Cautions
Always turn off and unplug the Ripple Maker from the electrical outlet before cleaning or as instructed in section 8. Do not operate the Ripple Maker if its cord or plug are damaged or if the Ripple Maker is malfunctioning. Call Customer Support for help. See section 12 for details. -
Page 4: Contents Of The Box 4
Unpacking Contents Instructions of the Box This section lists the items that are in the Ripple Maker package. Check carefully to make sure you have all items on the list. Safety Note: The weight of the product is 16 kg. -
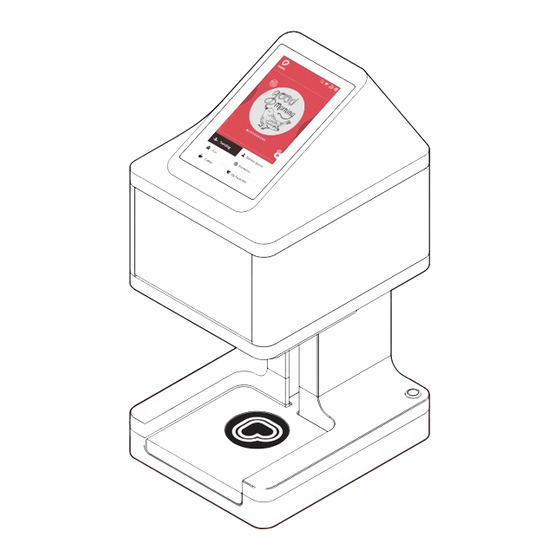
Page 5: Getting To Know The Parts Of The Ripple Maker
Getting to Know the Parts of the Ripple Maker This section illustrates the different parts of the Ripple Maker. Touch Screen Display Front Door On/Off Button Tray Plug for Power Cord Ethernet Port Wi-Fi Dongle USB Port Drip Tray Figure 4.1: Ripple Maker Front View Figure 4.2: Ripple Maker Back View... -
Page 6: Power And Internet Connection
Make sure the Ripple Maker is placed next to an Ethernet outlet or where there is good Wi-Fi signal. • Ensure that the front of the Ripple Maker is facing the barista. Be sure that the Ripple Maker is placed on a stable and strong enough surface to support the Ripple Maker. -
Page 7: Setting Up And Using The Ripple Maker User Interface
Confirm your location and ownership. registered. Switch on the Ripple Maker by pressing the On/Off button at the base of the Ripple Maker and wait for the system to boot up. Important: Never turn off your Ripple Maker unless instructed otherwise. This will deny automated maintenance procedures and will damage the Ripple Maker. -
Page 8: Figure 5.6 Home Screen
The User Agreement is displayed on screen. Tap the "START" button and start using the Please accept the agreement. Ripple Maker. Since this is your first time operating the Ripple Maker please see: Chapter 8.1 "Replacing the Pod" in order to install a new pod. Chapter 8.2.4 "Cleaning the Drip Tray"... -
Page 9: Setting Up The Content Library 7
Content Library using the web app. 6.1 Choosing content from the app.coffeeripples.com website Your content library already contains the basic themes and Ripples provided by Steam CC. You can also download more Ripples and create your own. Place the coffee cup in the center Choose a Ripple. -
Page 10: Choosing A Design And Printing
7.1 Placement and Orientation of the Coffee Cup 7.2 Choosing a Design and Printing Place the cup in the center of the circle on the tray. 7.2.1 Fast Print It is very important to use cups that are not larger than 4.25in/110mm (outer diameter) and that the handles of the cup are no higher than the lip of the cup, as shown in below. -
Page 11: Maintaining The Ripple Maker
Maintaining 7.2.2 Printing your customer's Ripples the Ripple Maker Open the Mobile queue by tapping on its tab, located at the right side of the screen, This section contains maintenance and cleaning just above the category menu. instructions. Please follow these instructions Tap the ticket number on The Mobile Queue that corresponds to the ticket number carefully in order to prevent injury or damage. - Page 12 Unpack the new over the new pod by over the new pod by the Ripple Maker. the Ripple Maker. door of the Ripple Maker. door of the Ripple Maker. securing the pod. securing the pod. wiggling it upwards and out.
-
Page 13: Cleaning The Ripple Maker
finished all lid to its proper of the above. position. Proper cleaning is necessary to ensure the functioning of the Ripple Maker. A how-to video is available at app.coffeeripples.com website, "Cleaning the Ripple Maker." 8.2.1 8.2.2 How often to clean... -
Page 14: Cleaning The Drip Tray
Gently lift the lid of 8.2.4 Cleaning the Drip Tray the Ripple Maker. The drip tray is a metal piece inside the Ripple Maker that collects drops of coffee from the pod. 8.2.3 Cleaning the Tray Turn the Ripple Maker back on. - Page 15 Unpack the new Tap DONE over the new pod by then return the Close the door of the Ripple Maker. securing the pod. wiggling it upwards and out. pod and insert it into place. lid to its proper the Ripple...
-
Page 16: Relocating/Transporting The Ripple Maker
Technical the Ripple Maker Specifications Table 10.1: Technical Specifications You may need to transport the Ripple Maker to a different place at your current location or to another distant Operating environment Operating temperature: 10° to 40° C Environmental location. This section describes how to transport the Ripple Maker for a long distance. -
Page 17: Troubleshooting
Wi-Fi dongle will work with within the tray. the Ripple Maker. That all of the power • connections are firmly Make sure that the Ripple Maker is • connected (Ripple Maker connected to your local Wi-Fi network. socket, power source socket, wall socket). - Page 18 Setting Up the Ripple Maker Quick Start Setting Up the Content Library Setting Up the Content Library Printing your Ripples Preparing to Ripple Turn of the Ripple Maker and unplug • • Replacing the Pod Replacing the Pod the power cord. •...
- Page 19 • Unplug from outlet when not in use and before cleaning. Instructions • Do not operate with a damaged cord or plug or after malfunction, or if the Ripple Maker has been damaged in any manner. • Return appliance to the nearest authorized service facility for examination, repair or adjustment. •...
- Page 20 Use of a shielded interface cable is required to comply with the Class B limits of Part 15 of FCC rules. Steam CC shall not be liable for any direct, indirect, incidental, consequential, or other damage alleged in connection with the furnishing or use of this information.
Need help?
Do you have a question about the The Ripple Maker and is the answer not in the manual?
Questions and answers