Table of Contents
Advertisement
Quick Links
"Thane", "FlavorChef" and related logos and variations are trademarks or registered trademarks,
in Canada and/or other countries, of Thane IP Limited.
© 2015 Thane IP Limited
MADE IN CHINA
Distributed by:
Thane Canada Inc.
Mississauga ON L4W 5M6, Canada
www.thane.ca
Thane USA, Inc.
Canton OH 44718, U.S.A.
www.thane.com
Thane Direct UK Ltd
London WC2A 3LH, UK
www.thane.tv
Operadora Ainoa, S.A.P.I. DE C.V.
C.P 02480, México. D.F.
www.mejorcompratv.com
Danoz Direct Pty Ltd
Alexandria NSW 2015, Australia
www.danozdirect.com.au
TVINS
211 18 Malmö, Sweden
www.tvins.com
FlavorChef™ MNL ENG R0 511207
Express Kitchen System
USER'S GUIDE
MODEL No: EP0030K
Advertisement
Table of Contents

Subscribe to Our Youtube Channel
Summary of Contents for FlavorChef EP0030K
- Page 1 Alexandria NSW 2015, Australia www.danozdirect.com.au TVINS 211 18 Malmö, Sweden www.tvins.com “Thane”, “FlavorChef” and related logos and variations are trademarks or registered trademarks, Express Kitchen System in Canada and/or other countries, of Thane IP Limited. © 2015 Thane IP Limited USER’S GUIDE...
-
Page 2: Important Safety Information
Thane™ and its affiliated companies assume no liability for personal injury or property damage resulting from the misuse of the FlavorChef™ Express Kitchen System, including the failure to comply with the instructions contained in this User’s Guide or provided by the manufacturer or distributor of the treated surface. -
Page 3: Table Of Contents
Contents Notes Safety Cautions and Warnings ............................3 FlavorQuik™ Technology ..............................5 Overview of Main Parts ................................6 Motor Housing ...................................6 Containers with Lids ................................6 Bases .....................................6 Attachments ..................................6 Parts Overview ..................................7 Assembly Overview ................................8 Assemby and Use ...................................9 Control Knob Settings ..............................9 Connecting/Disconnecting Bases ..........................9 Connecting the Master Jar to the Motor Housing....................10 Connecting Attachments ..............................10... -
Page 4: Safety Cautions And Warnings
Safety Cautions and Warnings Notes PLEASE READ THIS USER’S GUIDE COMPLETELY AND CAREFULLY. WARNING TO REDUCE THE RISK OF BURNS, ELECTROCUTION, FIRE, OR INJURY, PLEASE READ ALL INSTRUCTIONS, SAFEGUARDS, AND WARNINGS IN THIS USER’S GUIDE BEFORE USING THIS APPLIANCE. Keep this User’s Guide in a safe place for future reference. Verify that the main voltage indicated on the Rating Plate on this appliance corresponds with the voltage of your electrical outlet. - Page 5 Maintenance & Care • Never overload your FlavorChef™ unit. • Never immerse the Motor Housing in water. 34. This appliance is intended for household use only. It is designed to process normal household quantities of food and • All product parts are dishwasher safe except for the Motor Housing, Freezer Bowl, Vacuum Seal Attachment and liquids.
-
Page 6: Flavorquik™ Technology
FlavorQuik Technology ™ Vacuum Seal Bags The FlavorChef™ unit is equipped with the patented FlavorQuik™ Technology - featuring a gearing mechanism, several Optional Accessories Jars with corresponding Bases, each fitted with Blades and gears as follows: Bags are reusable • Motor Housing A 300W motor connected to a gearing mechanism that automatically configures the power output (in terms of Follow steps 1. -
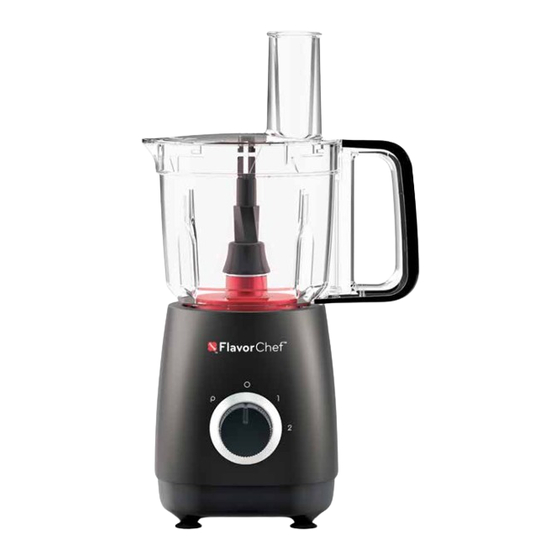
Page 7: Overview Of Main Parts
Overview of All Parts Vacuum Seal (Dark Grey) Optional Attachment The product is made up of the following main parts: Each of the bellow Bases and parts are color coded. This makes it quick and easy to con- figure parts for each particular job, e.g. chopping, slicing, grating or shredding (julienne). Motor Housing The motor housing contains the motor and is the base that all attachments are connected to. -
Page 8: Parts Overview
Ice Cream Maker Tips for Best Results • Keep the Freezer Bowl in the freezer so that you can make ice cream at any time. • For best results, the Freezer Bowl must be frozen thoroughly and for the sufficient specified amount of time (refer to table below). -
Page 9: Assembly Overview
Ice Cream Maker (Light Grey) Optional Attachment Ice Cream Base Freezer Bowl Ice Cream Paddle Ice Cream Cover Motor Housing Before using the Ice Cream Maker, place the Freezer Bowl into the freezer for at least 12 hours (for first use, the Freezer Bowl must be frozen for at least 24 hours). -
Page 10: Assemby And Use
Assemby and Use Grinding Jar Control Knob Settings (Orange) Herbs and garlic are best prepared using the Pulse function. 0 - OFF Nut spreads are best prepared initially using the Pulse function and then setting 2. P - Pulse 1 - Regular Speed 2 - High Speed Grinding Jar Grinding Base... -
Page 11: Connecting The Master Jar To The Motor Housing
Travel Mug Connecting the Master Jar to the Motor Housing (Green) Connect the Master Jar to the Motor Housing by aligning the arrow on the Master Jar with the “unlock” Start smoothies by pulsing a few times before blending on setting 2. graphic on the Motor Housing (see a. -
Page 12: Blending
Blending After Use (Green) After dicing/chipping, allow the unit to run for a few more seconds to clear the attachment of debris. 2. Turn the unit off and unplug it, then remove the Master Jar (with Dice & Chip Base) from the Motor Housing and remove the Lid from the Master Jar. -
Page 13: Chopping
Chopping 4. Gently and carefully use the grip holes to line up the Dice & Chip Attachment grooves with the protrusions in (Red) the Master Jar (see e. below). WARNING THE BLADES ARE EXCEPTIONALLY SHARP. HANDLE WITH CARE. 5. The Dice & Chip Attachment is fitted correctly when (i) the silver spindle is protruding through the central Master Jar Multi-Base Spindle (Black) -
Page 14: Dough Making
Dough Making Dice and Chip (Red) (Purple) Optional Attachment Do not exceed 300g/0.66lb of flour. For best results, use firm vegetables for dicing and chipping. When dicing tomatoes, remove the skin to expose the flesh. There will be some debris left on the Dice & Chip Attachment after use. This is normal. Pusher* Chipping Blade*... -
Page 15: Slicing/Grating/Julienne
Slicing/Grating/Julienne WARNING THE GRATING BLADE IS VERY SHARP, USE CAUTION WHEN HANDLING. (Red) Remove the Lid from the Master Jar. Grater not recommended for soft cheese. For best results, place cheese in fridge for a few hours before grating. 10. Place the Circular Disc on top of the Spindle (see c. below). 11. - Page 16 Chopping and Grating 5. Place the Circular Disc on top of the Spindle (see f. below). (Red) 6. Connect the Lid to the Master Jar (see g. below). Place the food to be processed into the Chute and using the Pusher move the food down the Chute towards For best results, chop first and then grate.
Need help?
Do you have a question about the EP0030K and is the answer not in the manual?
Questions and answers