Table of Contents
Advertisement
Advertisement
Table of Contents

Subscribe to Our Youtube Channel
Related Manuals for intensity IF COMBO DI4738

Summary of Contents for intensity IF COMBO DI4738
- Page 1 if combo INSTRUCTION MANUAL...
- Page 2 This manual is valid for the InTENSity Combo TENS and IF Stimulator This user manual is published by Current Solutions™, LLC Current Solutions™, LLC does not guarantee its contents and reserves the right to improve and amend it at any time without prior notice.
-
Page 3: Table Of Contents
4.3 Connect lead wires to device 4.4 Electrodes 4.5 Turn ON 4.6 Select the Therapeutic Mode 4.7 Steps to set a new program 4.8 Adjust Channel Intensity 4.9 Safety Lock Feature 4.10 Stop the treatment 4.11 Turn OFF 4.12 Low battery indicator 5.PROGRAM……………………………………………………….……23... -
Page 4: Safety Informatio
The parameters of device are controlled by the buttons on the front panel. The intensity level is adjustable according to the needs of patients. 1.2 Medical background EXPLANATION OF PAIN Pain is a warning system and the body’s method of telling us that... -
Page 5: Indication For Use
1.3 Indication for use InTENSity IF Combo Stimulator may be used for the Symptomatic relief of chronic intractable pain, acute post traumatic pain or acute post surgical pain. -
Page 6: Warnings, Cautions, Adverse Reactions
This device should not be used on patients with epilepsy. This device should not be used on patients with serious arterial circulatory problems in the lower limbs This device should not be used on patients with abdominal or inguinal hernia 1.5 Warnings, Cautions and Adverse Reactions WARNINGS: of a licensed physician. - Page 7 CAUTIONS: 1) Federal law (USA) restricts this device to sale by or on the order of a physician. 2) For single patient use only. 3) Keep yourself informed of the contraindications.
-
Page 9: Adverse Reactions
Note: Always use electrodes that are legally marketed and sold in the United States under 510K guidelines. If the stimulation levels are uncomfortable, reduce the stimulation Intensity to a comfortable level and contact your physician if problems persist. -
Page 10: Presentation
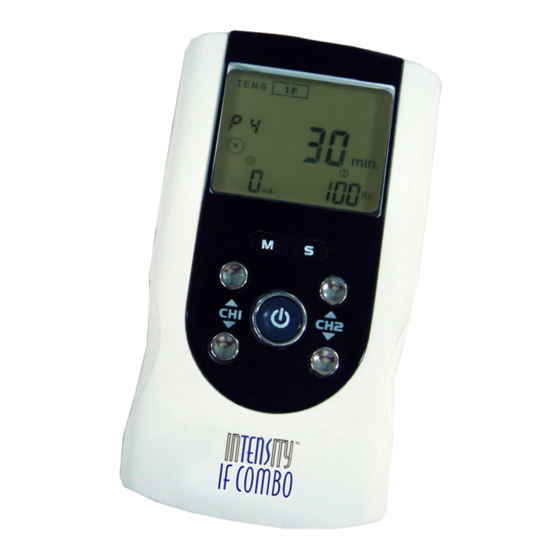
2. 3) Therapeutic mode selection (M). Stop the treatment. Exit setting mode to the user interface. 4) Increasing the output intensity of channel 1 [▲]. To set the application program and the parameter of the waveform in the setting state. -
Page 11: Lcd Display
▲]. To set the ] button and hold for ▼]. To set the 2.2 LCD display... -
Page 12: Specification
4.5×2.55×0.9 inches(L*W*H) Weight 0.28 lbs(With battery) There may be a ±5% tolerance of all setting Tolerance and ±10% tolerance of output of intensity. Adjustable, from 1 to 60 minutes or continuous, Adjustable in 1minutes each Timer step. Treatment time countdown automatically. - Page 13 Technical specifications for Transcutaneous Electrical Nerve Stimulator (TENS) mode Waveform Mono-phase square pulse wave Adjustable, 0~105mA peak at 1000 Pulse amplitude ohm Load each channel, 1mA/Step. Adjustable, from 50 to 300us Pulse Width microseconds, 10μS/step Adjustable, from 1 to 150 Hz, 1 Pulse Rate Hz/step Burst rate: Adjustable, 0.5 ~ 5Hz;...
- Page 14 Technical specifications for Interferential (IF) mode Waveform Bi-phase square pulse Pulse amplitude Adjustable, 0~70mA peak to peak at 1000 ohm Load each channel, 1mA/Step. Pulse Rate Channel 1 – Fundamental frequency: 4000 Hz fixed Channel 2 – Selectable frequency: 4001 to 4150 Hz Interference frequency: 1 to 150 Hz.
-
Page 15: The Waveforms Of The Stimulation Programs
The pulse rate of the CH1 is fixed in 4000Hz; CH2 pulse rate is automatically varied in a cycle time. Interference frequency is increased from its original setting to 60% in setting cycle time, and then decreased from 60% to its original setting in nest setting cycle time. -
Page 16: Instruction For U
Pulse Rate Modulation Interferential 4. Instruction for use 4 .1 Battery 4.1.1 Check/Replace the battery Over time, in order to ensure the functional safety of device, changing the battery is necessary. 1) Slide the battery compartment cover and open. 2) Insert the 9V battery into the battery compartment. 3) Make sure you are installing the battery properly. -
Page 17: Connect Electrodes To Lead Wires
4.1.2 Disposal of battery Spent batteries do not belong in the household waste. Dispose of the battery according to the current federal, state and local regulations. Caution: 1) Battery may be fatal if swallowed. Therefore, keep the battery and the product out of the range of children, if a battery was swallowed, consult a physician immediately. -
Page 18: Electrodes
2) The wires provided with the system insert into the jack sockets located on top of the device. 3) Holding the insulated portion of the connector, push the plug end of the wire into one of the jacks (see drawing); one or two sets of wires may be used. -
Page 19: Turn On
Caution: 1) Before applying the self-adhesive electrodes, it is recommended to wash and degrease the skin, and then dry it. 2) Do not turns on the device when the self-adhesive electrodes are not positioned on the body. 3) Never remove the self-adhesive electrodes from the skin while the device is still turns on. -
Page 20: Steps To Set A New Program
Caution: Consult your physician for your suitable therapeutic mode 4.7 Steps to Set a New Program 4.7.1 TENS Setting Press the [S]button cycle to enter the setting state. The settings can be adjusted according to the following steps: 1) Set the Therapeutic Program There are 4 programs in TENS therapeutic mode available –Burst (P1), Normal (P2), Pulse Width Modulation (P3), and Pulse Rate Modulation (P4). - Page 21 4.7.2 IF Setting Press the [S] button to enter the setting state. The settings can be adjusted according to the following steps: 1) Set the Therapeutic Program There are 4 programs in IF therapeutic mode available. The therapeutic program can be selected by pressing the [▲] and [▼] button.
-
Page 22: Adjust Channel Intensity
This is a safety feature to prevent accidental changes to your settings and to prevent accidental increases to the intensity levels. You can press either one of the [▼] buttons to unlock the device. 4.10. Stop the treatment When you have activated the treatment timer, you can press the [M] button or the [▼] button to control stop the treatment. -
Page 23: Turn Off
4.11. Turn OFF Press [ ] button and hold for approx.3 seconds to turn OFF the device. Caution: 1) If there is no operation in the panel for 2 minutes in the waiting state, the device will be turns off automatically. 2) In shutdown state, keep pressing the channel 2 [▼] first, and then press [ ]button at the same to restore factory parameter settings... -
Page 24: Tips For Skin Care
6. Cleaning and Care 6.1 Tips for skin care To avoid skin irritation, especially if you have sensitive skin, follow these suggestions: 1) Wash the area of skin where you will be placing the electrodes, using mild soap and water before applying electrodes, and after taking them off. -
Page 25: Electrodes
6.3 electrodes 1) Use the device only with the leads and electrodes provided by the manufacturer. Use only the electrode placements and stimulation settings prescribed by your physician or therapist. 2) It is recommended that, at minimum, 1.5"X1.5" self-adhering square electrodes are used at the treatment area. 3) Inspect your electrodes before every use. -
Page 26: Cleaning The Electrode Cords
4) Between uses, store the electrodes in the resealable bag in a cool dry place. Caution: 1) Do not pull on the electrode wire. Doing so may damage the wire and electrode. 2) Do not apply to broken skin. 3) The electrodes should be discarded when they are no longer adhering. -
Page 27: Troubleshooting
Lead wires 1. Verify connection is secure. Insure output firmly. 2. Turn down the intensity. Rotate lead wires in socket 90°. If still intermittent, replace lead wire. 3. If still intermittent after replacing lead wire, a component may have failed. -
Page 28: Storage
8. Storage 1) For a prolonged pause in treatment, store the device in a dry room and protect it against heat, sunshine and moisture. 2) Store the device in a cool, well-ventilated place 3) Never place any heavy objects on the device. 9. -
Page 29: Electromagnetic Compatib
10. Electromagnetic Compatibility (EMC) Tables Guidance and manufacturer’s declaration - electromagnetic emissions The device is intended for use in the electromagnetic environment specified below. The customer or the user assures that it is used in such an environment. Emissions Compliance Electromagnetic environment - guidance test The device uses RF energy only for its... - Page 30 Guidance and- manufacturer’s declaration. Electromagnetic immunity The device is intended for use in. the electromagnetic environment specified below. The customer or the user should assure that it is used in such an environment. Complia Immunity IEC 60501 Electromagnetic environment - test test level guidance...
- Page 31 1. Field strengths from fixed transmitters, such as base stations for radio (cellular/cordless) telephones and land mobile radios, amateur radio, AM and FM radio broadcast and TV broadcast cannot be predicted theoretically with accuracy. To assess the electromagnetic environment due to fixed RF transmitters, an electromagnetic site survey should be considered.
-
Page 32: Glossary Of Symblos
11. Glossary of Symbols Batch code……..01000001 Serial number……50000001 Attention: Read the operating instruction for use! Electrical devices are recyclable material and should not be disposed of with household waste after their useful life! Help us to protect the environment and save resources and take this device to the appropriate collection points. - Page 36 Manufactured for: Current Solutions 3814 Woodbury Drive Austin,TX 78704 Ph:(800)871-7858 www.currentsolutionsnow.com...
Need help?
Do you have a question about the IF COMBO DI4738 and is the answer not in the manual?
Questions and answers