Advertisement
please visit us at the sites listed below for more products to equip your gym and life.
● www.trainbyfire.com
●
www.mattersofthecart.com
Contact
If you have any questions concerning your timer or this manual please contact us at
info@trainbyfire.com
Follow us:
Facebook :
w
ww.facebook.com/trainbyfire
Twitter & Instagram : @trainbyfire
Pinterest: www.pinterest.com/trainbyfire
the C ountdown
9Digit Interval Timer
Owner's Manual
brought to you by
Model#: JI9D1R
Dimensions: 15" x 4" x 1.5"
(our parent company)
or (888) 8448184. We will be happy to get back to you.
Advertisement
Table of Contents

Summary of Contents for Train By Fire JI9D-1R
- Page 1 the C ountdown 9Digit Interval Timer Owner’s Manual brought to you by Model#: JI9D1R Dimensions: 15” x 4” x 1.5” please visit us at the sites listed below for more products to equip your gym and life. ● www.trainbyfire.com ● www.mattersofthecart.com (our parent company) Contact If you have any questions concerning your timer or this manual please contact us at info@trainbyfire.com or (888) 8448184. We will be happy to get back to you. Follow us: Facebook : ww.facebook.com/trainbyfire Twitter & Instagram : @trainbyfire Pinterest: www.pinterest.com/trainbyfire ...
- Page 2 What’s in the box: ① [15” x 4” x 1.5”] Timer (x1) ② Remote Control* ③ Wall Mounting Bracket (x2); { B olts in Clock } ④ Adapter DC5V (x1) *Remote requires CR2025 battery. Due to lithiumion shipping regulations, the battery is not included. ...
- Page 3 use of third party parts will result in a void of the warranty. ● The Interval Timer can be set either on a table/desk or mounted on a wall. Train By Fire and its ...
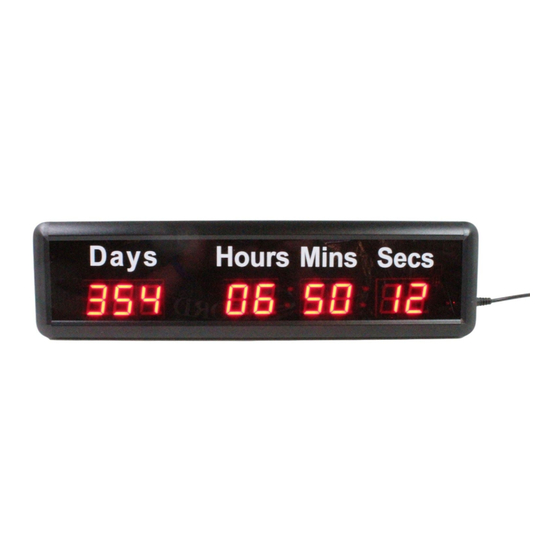
- Page 4 Main Functions & Features ① Day & Time: ● Display is DDD HH:MM:SS [DDD represents digits for number of Days; HH represents digits for Hours; MM represents digits for minutes; SS represents digits for seconds. To display 365 days, 12 hours, 59 minutes and 15 seconds in {DDD HH:MM:SS} format would look like {365 12:59:15}]. {H12} will flash when in 12H mode. ● 12H & 24H display format = 12H [To display 100 days and 2:59:15 PM would look like {100 02:59:15}. {H12} will flash when in 12H mode.] 24H [To display 100 days and 2:59:15 PM would look like {100 14:59:15}. {H24} will flash when in 24H mode.] ● Use button to toggle between 12H & 24H formats ② Count Up From (000 00:00:00) to (999 99:59:59) [Display format will be { DDD HH:MM:SS}. To display 240 days, 2 hours, 13 minutes, and 36 seconds in {DDD HH:MM:SS} format would look like {240 02:13:36}] ③ Countdown From (999 99:59:59) to (000 00:00:00) [Display format will be {DDD HH:MM:SS}. To display 100 days, 3 hours, 10 minutes and 45 seconds in {DDD HH:MM:SS format would look like {100 03:10:45}] Remote Control Buttons Listed below are the buttons on the remote control and their functions. Some buttons have dual functions and we will explain each of the functions as well as the appropriate mods to use them. ON/OFF Turn on/off the clock ① EDIT Edit programs ② CURSOR Use arrows to move through numbers in EDIT mode. ③ START Will start the current program mode you are in ④ STOP Will stop the timer in your current mode ⑤ ● If stopping in the middle of a program and you want to resume where you stopped, press START again. The Timer will pick up where you stopped. ⑥ SAVE Save data when in EDIT mode TIME TOGGLE Press button to switch between 12H and 24H formats in TIME mode ...
- Page 5 COUNTDOWN Enter into COUNTDOWN mode ⑩ BRIGHTNESS UP Makes the screen brighter every time you press ⑪ BRIGHTNESS DOWN Makes the screen darker every time you press ⑫ , , , , , , , , , NUMERIC BUTTONS Can be ⑬ used to Enter numbers while in EDIT mode of any program NOTE ABOUT BUTTONS: P lease note that if a button isn’t working in the current Mode you are in then that button has no function in that Mode. There are some buttons that have no functions at this time. Please disregard these buttons. Also, press the button with normal amount of pressure and be within 15 20ft of your timer in order to have remote and clock function properly. If button doesn’t work, it could be due to pressing too firmly, as the remote doesn’t respond well to extra pressure. Programming Instructions Example 1: 365 Day 12 Hour Countdown until in Countdown mode. In TIME mode the time will automatically be running. ① Press . Numbers will begin to blink. ② Press ③ Enter the numeric value that you want the Timer to countdown from, i.e. If you want it to ...
- Page 6 until in Countdown mode. In TIME mode the time will automatically be running. ① Press . Numbers will begin to blink. ② Press ③ Enter the numeric value that you want the Timer to count up from, i.e. If you want it to count up ...
Need help?
Do you have a question about the JI9D-1R and is the answer not in the manual?
Questions and answers