Table of Contents
Advertisement
Quick Links
Advertisement
Table of Contents

Related Manuals for Thermosense HH-250

Summary of Contents for Thermosense HH-250
- Page 1 HH-520 4-Channel Thermocouple Data Logger (Types K, J, T, E) Instruction Manual...
-
Page 2: Table Of Contents
7.4 Clearing Data Logger Records ....................11 7.5 Clearing Instant Read-out Memory ..................11 7.6 Connecting to a computer ....................... 11 8. POWER PREPARATION ....................... 11 8.1 Battery Replacement ......................11 9. TESTLINK SE-520 SOFTWARE....................12 10. MAINTENANCE .......................... 18 Thermosense Limited www.thermosense.co.uk Page 1... -
Page 3: General Description
Temperature alarm function Fast response and sampling rate 16,000 data logger records each channel Instant recall function USB PC interface with Windows software included Adjustable auto power off timer Thermosense Limited www.thermosense.co.uk Page 2... -
Page 4: Specifications
10 to 75%RH Dimensions/ Weight: 187mm(L) × 75mm(W) × 29mm(H)/ Approx. 290g Instruction manual, battery 1.5V AAA x 4 pcs, Windows Standard Accessories: software, micro USB cable, K type bead probe x 2 pcs, carrying case. Thermosense Limited www.thermosense.co.uk Page 3... -
Page 5: Symbol Definition & Button Location
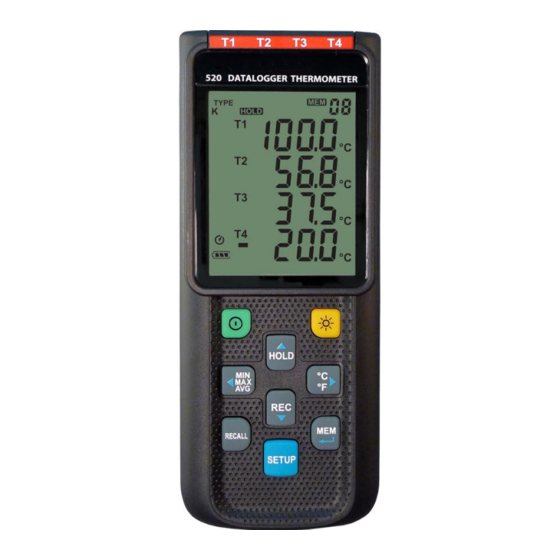
: Temperature reading : Temperature channel : Temperature subtraction mode : Temperature alarm indicator : Hi Temperature alarm indicator : Lo Temperature alarm indicator : Compensate for probe errors : Temperature measurement units : Data hold indication Thermosense Limited www.thermosense.co.uk Page 4... - Page 6 (10) SETUP Button (4) Back Light Button (11) MEM Button (Set 100 Memory) (5) MAX MIN AVG Button (12) USB Interface (6) DATA HOLD Button (13) Tilt Stand (7) °C , °F Button (14) Battery Compartment Thermosense Limited www.thermosense.co.uk Page 5...
-
Page 7: Button Instructions
” symbol lights up on the screen. Press the Press the , or button to select MEM group. The LCD shows “hour:minute:second” on the screen for 2 seconds, and then shows the readings. Press button to exit RECALL mode. Thermosense Limited www.thermosense.co.uk Page 6... -
Page 8: Max/Min/Avg Button
Press it again to exit anytime. (2) Using the button to adjust parameters or move setting items. (3) Press the button to save changes and move to next setting option. 7.2 Menu Item Fig.1 Set thermocouple type. Thermosense Limited www.thermosense.co.uk Page 7... - Page 9 HH-520 4-Channel Thermocouple Data Logger Instruction Manual Fig.2 Set interval time for data logging. Fig.3 Set offset to compensate for probe errors. Fig.4 Set alarm point. Fig.5 Set T1-T2 subtraction mode. Fig.6 Set auto power off time. Thermosense Limited www.thermosense.co.uk Page 8...
-
Page 10: Menu Description
Want to set window. (see Fig.11 or Fig.12) (1) Press the button to turn on or off. (2) When setting on mode, press the button to set Hi and Lo limit. (see Fig.13) Fig.11 Fig.12 Thermosense Limited www.thermosense.co.uk Page 9... -
Page 11: Set T1-T2 Subtraction Mode
(1) Press the button to select year, date, or time. (see Fig.19) (2) Press the button to increase / decrease value. Note: Check the clock setting after replacing batteries. If necessary, reset system clock. Fig.19 Thermosense Limited www.thermosense.co.uk Page 10... -
Page 12: Clearing Data Logger Records
Open the cover of the battery cabinet by a screwdriver. Replace the old batteries with four new UM-4 or AAA size batteries. (3) Close the battery cabinets cover and fasten the screw. Thermosense Limited www.thermosense.co.uk Page 11... -
Page 13: Testlink Se-520 Software
9.5 How to save the recorded real time data to a file? (1) Click the graph window you want to save and the graph window will become active, then choose File | Save from main menu or click from the tool bar . Thermosense Limited www.thermosense.co.uk Page 12... - Page 14 Note: If decimal separator is comma in your country, this file format will be disabled, because .CSV file also use comma to be data separator. For example 78,6 will become 78 and 6 in EXCEL ) Thermosense Limited www.thermosense.co.uk Page 13...
- Page 15 By opening the Panel Window, the user can control meter via the button in this window. View | Real-Time Graph: Open Real-Time Graph display to graph the present data. Real Time Data | Run - Start collecting real time data. Stop - Stop collecting real time data. Thermosense Limited www.thermosense.co.uk Page 14...
- Page 16 After the data was downloaded, the left hand side will show how many data sets were loaded and detail information for each data set (start data, start time, recording rate and record numbers). for example: Thermosense Limited www.thermosense.co.uk Page 15...
- Page 17 - When selected, the mouse cursor will become a " I " sign when moving to the graph, click on the graph to annotate. This is available only when " Split " option is unchecked. And all the text you make will exist with T1. Thermosense Limited www.thermosense.co.uk Page 16...
- Page 18 - Separate the four channel. - Combine the four channel. - Graph Customization - Change the Y axis extention Note: When the Split is unchecked, graph will use T1 as the Y axis display range. Thermosense Limited www.thermosense.co.uk Page 17...
-
Page 19: Maintenance
Moreover, these fumes are hazardous to health and explosive. Do not use tools with sharp edges, screwdrivers, metal brushes or anything similar to clean the device. Thermosense Limited www.thermosense.co.uk Page 18... - Page 20 Thermosense Limited 11 Eghams Court, Boston Drive, Bourne End, Bucks, SL8 5YS, UK Telephone: +44 (0)1628 531166 Fax: +44 (0)1628 531499 Email: sales@thermosense.co.uk Web: www.thermosense.co.uk...
Need help?
Do you have a question about the HH-250 and is the answer not in the manual?
Questions and answers