Advertisement
Quick Links
Advertisement

Related Manuals for Philip Stein Signature Digi Sport

Summary of Contents for Philip Stein Signature Digi Sport
- Page 1 INSTRUCTION MANUAL WARRANTY...
- Page 2 TABLE OF CONTENTS WATCH INSTRUCTIONS ······················································ Pg. 1 REPLACING YOUR PHILIP STEIN STRAP ····························· Pg. 20 REPAIR INFORMATION ························································ Pg. 21 PHILIP STEIN WARRANTY ··················································· Pg. 22 GENERAL INFORMATION ··················································· Pg. 24...
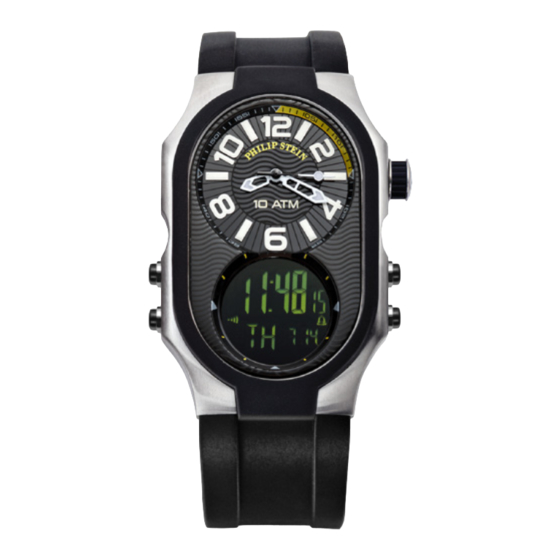
- Page 3 SIGNATURE DIGI SPORT CHRONOGRAPH INSTRUCTIONS A Setting the Time See Single Time Zone Instructions on Pg. 2 B Button & Function * [M] Mode Button * [S/S] Start/Stop Button * [EL] Electro Light Button * [L/R] Lap/Reset Button [EL] [S/S]...
- Page 4 10 LAP CHRONO MULTI BUTTON AND ITS FUNCTION FUNCTION WATCH Mode Button (M) • To select among the Current Time, Daily Alarm, Pacer, Chronograph, Time, and Dual Time Mode. • To select setting display. Start/Stop Button (S/S) • To select among the setting items during setting display.
- Page 5 POWER SAVING MODE Power Saving Mode • This Watch includes a power saving function. • The user can turn off the LCD display temporarily if the Watch will not be in use for a long period of time, allowing the battery to last longer.
- Page 6 MAJOR FUNCTION MODES...
- Page 7 CURRENT TIME MODE – CURRENT TIME DISPLAY Current Time Display • When the Current Time Mode is selected the Watch will show the following items on the display: - The day of week and date are exhibited on the 1st row of the display. - The current time (hour, minute, second) is exhibited on the second row of the display.
- Page 8 CURRENT TIME MODE – SETTING THE CURRENT TIME How to Set the Current Time • To select the setting display hold down the (M) button for 2 seconds in the Current Time Mode. The “Second” digits will start flashing. • In setting display, press the (S/S) button to move the flashing following the adjacent diagram to select among different settings •...
- Page 9 DAILY ALARM MODE – DAILY ALARM MODE Daily Alarm Mode • This watch includes a daily alarm function for the current time. • When the daily alarm is ON, the Watch will beep for 20 seconds at the alarm time every day. Daily Alarm Display •...
- Page 10 DAILY ALARM MODE – SETTING THE DAILY ALARM How to Set the Daily Alarm • To select the setting display, hold down the (M) button for 2 seconds in the Daily Alarm Mode, and then the “minute” digits will start flashing. •...
- Page 11 PACER MODE – PACER DISPLAY Pacer Mode • This watch includes a pacer function which generates regular beeps at a pre-defined rate. This pre-defined rate can be set within a range from 30 to 180 beats per minute (bpm). • The pacer will sound the beeps within a minute for a higher bpm rate (e.g.
- Page 12 PACER MODE – SETTING THE PACER BEEPING RATE To Set the Pacer Beeping Rate • To set the setting display hold down the (M) button for 2 seconds in the Pacer Display and the beeping rate digits will start flashing. • In the setting display press the (L/R)button to change the number;...
- Page 13 PACER MODE – USING THE WATCH AS A PACER WATCH How to Use the Watch as a Pacer Watch • To use the watch as a pacer watch follow the steps below: • When the pacer display is selected, press the (L/R) to turn on the pacer function.
- Page 14 CHRONOGRAPH MODE Chronograph Mode • This watch includes a stop watch function which measures: - Elapsed time, accumulative elapsed time (multi- phased elapsed time) and Lap time (getting elapsed time without stopping the counting). • The measuring capacity of the Chronograph: - Measuring unit: 1/100 second, - Measuring range: 9 hours, 59 minutes, and 59.99 second...
- Page 15 CHRONOGRAPH MODE How to Measure Elapsed Time • During the “All Zero” Display, press the (S/S) button once to start the counting, and press the (S/S) button again to stop the counting. • The elapsed time between the above 2 key-stokes will be exhibited on the 1st row of the display.
- Page 16 COUNTDOWN TIMER MODE Countdown Timer Mode • This Watch includes a countdown timer function with timekeeping for the elapse of a fixed period of time (target time.) • When a target time is set for the timer, the Watch will start running from the target time to zero.
- Page 17 COUNTDOWN TIMER MODE How to Set the Countdown Timer • To select the setting display, hold down the (M) button for 2 seconds in the Countdown Timer Mode and then the “Minute” digits start flashing on the display. • In setting display, press the (S/S) button to move the flashing following the adjacent diagram to select among different settings.
- Page 18 COUNTDOWN TIMER MODE To Use the Timer • Once the target time has been set and loaded, (e.g. 30 minutes) press the (S/S) button to start the measurement (the digits will start running); Press the (S/S) button once again to stop the measurement (the digits will stop running.) •...
- Page 19 DUAL TIME MODE Dual Time Mode • This Watch includes a dual time which shows the current time of the second time zone. • The second digits and the display format (12 or 24 hour) of the Dual Time Mode are the same of the one as the Current Time Mode.
- Page 20 DUAL TIME MODE To Set the Dual Time • To select the setting display hold down the (M) button for 2 seconds in the Dual Time Mode, and then the “minute” digits will start flashing. • In the setting display, press the (S/S) button to select the flashing (setting item) as shown in the diagram.
- Page 21 SPECIFICATIONS Current Time Mode Countdown Timer • Time System: AM, PM, Hour, • Resolution: 1 second Minute, Second • Measuring Range: 23 hours 59 • Time Format: 12-hour or 24-hour minutes format • Time sounds: Beep once at 10, • Calendar: Month, Date, and 5, 1 minute(s) and 5, 4, 3, 2, 1 second(s).
- Page 22 REPLACING YOUR PHILIP STEIN STRAP 1. On the back of the strap, 2. Gently pull strap away from slide the embedded lever to the watch case. Reverse these the right. steps to attach a new strap.
- Page 23 REPAIR INFORMATION In the event you need to have your Philip Stein timepiece serviced, we have a full list of Authorized Repair Centers (ARC) in your area. Please visit our website at www.philipstein.com, email service@philipstein.com, or contact our customer service department...
- Page 24 Straps or Bracelets; 3) Watch Crystals; 4) Damage resulting from normal wear, accident, misuse, abuse, lack of proper maintenance, lack of reasonable care, damage during shipment, or any other matter beyond the direct control of Philip Stein; 5) Repair services performed by unauthorized repair facilities. No responsibility is assumed for any special,...
- Page 25 This card should be completed in its entirety at the time of purchase by an Authorized Philip Stein dealer. This warranty is accepted by Philip Stein, and will be honored by specific warranty repair facilities, provided that: 1) The Warranty Card has been signed, stamped, and dated at the time of purchase from an Authorized Philip Stein dealer;...
- Page 26 Exposure to various conditions, including the oils and salts our bodies produce, may cause these gaskets and seals to deteriorate. It is recommended that these items be checked by Philip stein authorized repair centers each year as a precautionary step.
- Page 27 WATER RESISTANCE Philip stein timepieces with a rating of 3 ATM water resistance offer basic protection from accidental contact with water, such as being caught in the rain or washing your hands. Philip stein timepieces that are rated 5 ATM water resistance are protected from water damage during accidental contact, such as when washing hands, or even while showering;...
- Page 28 Philip Stein timepieces feature high quality quartz movements. Quartz movements require routine servicing in order to maintain accuracy. Maintenance should be performed every three to five years, depending on model of watch. Please contact your local Philip Stein authorized repair center for more information.
- Page 29 FULL SAPPHIRE CRYSTALS Prestige Collection timepieces feature double curved sapphire crystals with anti-reflecting coatings on the top and bottom of the crystal. The anti-reflective coating will allow you to view your watch dial more easily, without glare from lighting or reflection from the dial. STRAPS AND BRACELETS We recommend surface cleaning your strap and bracelets using warm water and mild soap with a soft brush.
- Page 30 www.PhilipStein.com V 12.15...
Need help?
Do you have a question about the Signature Digi Sport and is the answer not in the manual?
Questions and answers