Table of Contents
Advertisement
Quick Links
Advertisement
Table of Contents

Related Manuals for NIOX MINO


Summary of Contents for NIOX MINO
- Page 1 E N G L I S H NIOX MINO ® User Manual...
- Page 2 Ambient temperature: +16 to 30°C Humidity: 20 to 60% RH (non-condensing) • Mobile phones and cordless phones might interfere with the instrument and should therefore be kept away from the instrument. Interference could make it impossible to perform a measurement. • When within the specified operating conditions it is recommended to keep NIOX MINO with installed Sensor connected to a power outlet ® whenever possible. • It is recommended to allow a new Sensor to be connected for two hours before the first measurement is done. • It is recommended not to use NIOX MINO in the proximity of areas where volatile substances such as organic fluids or disinfectants are being used. Special attention should be paid to aerosols and disinfection baths (either open vessels or ultrasonic baths). • Always use a NIOX MINO Bag (closed) for transportation and storage of NIOX MINO when it is disconnected from the power outlet. (The NIOX MINO Bag is sold separately.) • Shelf-life - NIOX MINO instrument: Minimum 3 years at time of delivery, or 3,000 measurements. NIOX MINO Sensor: Maximum 12 months after opening package and mounted in NIOX MINO, whichever comes first. Note! This manual is intended for medical care personnel and for use when teaching patients how to use the NIOX MINO instrument.
-
Page 3: Table Of Contents
Time and date ........... 8 Sound volume ........... 8 Top light intensity ..........8 Bluetooth on/off ..........8 QC on/off ............8 Information menu ..........9 Turn off NIOX MINO ........9 ® General care ........... 10 Preventive inspections ........10 Change Sensor ..........10 Change NO scrubber ........10 Disposal of used/expired products . -
Page 4: Warning
FeNO measurements should be used as part disinfectants are being used. Special attention of the regular assessment and monitoring of should be paid to aerosols and disinfection asthma patients to improve the patient’s asthma baths (either open vessels or ultrasonic baths). management. NIOX MINO should be used • NIOX MINO should not be used adjacent to or as directed in the NIOX MINO User Manual. stacked with other equipment. NIOX MINO may not be used with infants or by • The NIOX MINO Sensor contains chemicals children approximately under the age of 4, as that could be harmful if swallowed. -
Page 5: Presentation
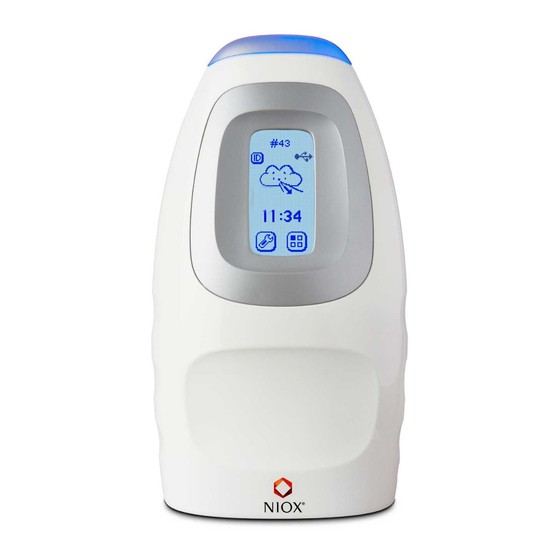
® Top light Disposable patient filter that must be exchanged before each measurement session and patient Display NO scrubber, (page 10) Power supply unit Optional PC connection. Cable (USB) or wireless (Bluetooth) USB connector Strap holder for NIOX Panel PC based program NIOX MINO Hand that allows the patient to follow Strap (optional NIOX MINO Sensor, the measurement on a PC accessory) (page 10) screen, see page 18. Number of remaining Main screen measurements for mounted Sensor, or Patient ID (optional) Bluetooth activated, or Set ID USB cable connected... -
Page 6: Installation And Set-Up
Installation and set-up Caution! 7. Wait for the instrument Be careful when opening the Sensor can. to start up and press the The inside of the opening has sharp edges. Forward button Do not touch or clean the white Sensor membrane 1. Insert the Sensor into the compartment at the base of the instrument 8. Reminder to insert a new NO scrubber. Press the Forward button 2. Turn the orange swivel until locked 9. Select OTHER on the display 3. Spread the latches apart, one at a time, Note! (Optionally: Use the red This screen is only... -
Page 7: Measurement
Enter patient ID (optional) Stabilization of the instrument normally may take up to 30 minutes following connection Note! of the power supply unit to the power outlet. If Patient ID is used, it has to be entered However, it is recommended to allow a new before each measurement (even if it is the NIOX MINO Sensor to be connected for two ® same patient). hours before the first measurement is done. Input a patient specific ID number, up to 10 digits. 1. Select the ID button on the main screen 2. Input the patient specific... -
Page 8: Perform Feno Measurement
Make sure that the instrument is ready for measurement (activate by pressing the display if in sleep mode) Important! Always attach a new patient filter for each new patient Choose one of three options in order to follow the measurement Listen to the sound Look at If the optional PC based NIOX signals and view the top the display Panel is used, look at the PC light. using a screen. (see page 18) mirror. 1. Empty lungs 2. Inhale deeply through... -
Page 9: View Stored Results
Mode screen Ambient NO measurement 8. Use the Forward button to advance Note! to the next screen A completed ambient NO measurement is 9. The exhalation too strong pressure counted as one measurement for the Sensor screen is shown and NIOX MINO ® 1. Attach a new patient filter 10. Use the Forward button to advance to the next screen 2. Select Mode 11. The wait for result screen is shown (static view) 3. Select Ambient measurement 4. Wait for result... -
Page 10: Change Settings
1. Select Settings 4. Use the buttons to deactivate or activate Bluetooth 2. Select Sound and Light 5. Select OK to accept the changes 3. The sound volume setting is QC on/off shown Note! An optional External Quality Control (QC) procedure is available for NIOX MINO ® Refer to the NIOX MINO External Quality Control user manual. Contact your local 4. Use the plus and minus buttons to Circassia representative or Circassia set the sound volume Technical Support for further information. 5. Select OK to accept the changes Top light intensity 1. Select Settings 2. Select Sound and Light... -
Page 11: Information Menu
Information menu Turn off NIOX MINO ® Note! 1. Select Settings When within the specified operating conditions (see page 15) it is recommended to keep NIOX MINO with installed Sensor 2. Select Information menu connected to a power outlet whenever possible. 3. The information screen shows: 1. Pull out the power supply unit connector from A. Number of remaining sensor NIOX MINO measurements Moving NIOX MINO B. Sensor expiration date The instrument can be moved to another power C. Sensor serial No. outlet with optimized initiating startup. D. Number of remaining instrument measurements Note! E. Instrument expiration date... -
Page 12: General Care
(Optionally: Use the red tool delivered with the Preventive inspections instrument to spread the Before each measurement, visually inspect: latches apart) • that NIOX MINO is not damaged ... and carefully pull out the cover • that the Sensor is in place • that a NIOX Filter is attached • that the Power supply cord is undamaged and correctly connected to the instrument and to the power outlet. 2. Remove the used If any item is missing or damaged, contact your NO scrubber from the local Circassia representative or Circassia AB. cover Change Sensor... -
Page 13: Disposal Of Used/Expired Products
9. Select OK prior to an inhalation - Stop the procedure immediately when this warning appears. Wait until the main menu Disposal of used/expired products screen is displayed and repeat the inhalation with a stronger • Used or expired NIOX MINO Sensors should be ® inhalation force. recycled according to the local recycling program for electronic equipment. Note that there is a NO scrubber reminder. LiMnO battery inside the Sensor unit*. The symbol is shown at first • An expired NIOX MINO should be recycled,... -
Page 14: Alert Codes
Code Action Warning Action Select return and repeat the Instrument almost expired – measurement and do not breathe through Order a new instrument. the patient filter during analysis. The symbol is shown 4 Wrong passcode for NO scrubber months before the exchange. instrument expires or when 10% of the measurements are Instruments alerts remaining. The instrument will Check that the ambient temperature is not work after the indicated within specification. If necessary, shut date, or after the indicated the instrument down, move it to another number of measurements. location and restart the instrument. It is still possible to view measurements stored in Remove any sources of disturbance the instrument memory and (such as cordless/mobile telephones, download data to a PC. or gas emitting appliances). When the instrument is ready try to repeat the Make sure that the ambient measurement. If the alert persists, unplug temperature is between +16... -
Page 15: Technical Data
Technical data Display buttons and symbols Button Description Button Description Shift to keypad 0-4 Enter patient ID Shift to keypad 5-9 Measurement modes Bluetooth on Settings Bluetooth off QC settings Standard 10 second exhalation US time and date settings FeNO measurement Special 6 second exhalation FeNO ISO time and date settings measurement (research appl.) Ambient NO measurement Alert info Nasal measurement (research application) Sound and top light Stored measurement results Sound Nasal flow 2 ml/s (research application) Top light Nasal flow 5 ml/s... - Page 16 Symbol Description Symbol Description Bluetooth activated Wait USB cable connected Sleep mode Wait, time Standard FeNO measurement Wait for temperature stabilization Special 6s FeNO measurement (research application) Nasal measurement Wait for Sensor stabilization (research application) Ambient NO measurement Attach nasal olive to nostril (research application) Insert Sensor NO scrubber NO scrubber General warning Instrument expiration warning Sensor warning Temperature warning NO scrubber warning...
-
Page 17: Symbols Explanation
Noise level (stand by) Durability - period after opening < 35 dBA, at a distance of 1 m Hazardous material Shelf-life NIOX MINO instrument: Minimum 3 years at time ® Class II equipment of delivery, or 3,000 measurements. NIOX MINO Sensor: Maximum 12 months when installed in NIOX MINO or expiration date as stated Backplate on the Sensor, whichever comes first. NIOX MINO ® Always use the NIOX MINO Bag (closed) for Article No 09-1000 Circassia AB transportation and storage of NIOX MINO Hansellisgatan 13, SE-754 50, Uppsala, Sweden www.circassia.com... -
Page 18: Exhaled No - Performance Data
Linearity Relative humidity range: 10 to 100%, including Squared correlation coefficient r ≥ 0.998, condensation. slope 0.95 -1.05, intercept ±3 ppb. Temperature range: -20 to +60°C Determination based on the pooled regression Atmospheric pressure range: 500 to 1060 hPa analysis from 10 instruments using standard gas NIOX MINO Sensor (transport and storage in reference samples at 7 different concentration original package) levels covering the operating measurement range. Relative humidity range: 10 to 100%, including Precision condensation. < 3 ppb of measured value < 30 ppb, Temperature range: -20 to +60°C < 10% of measured value ≥ 30 ppb. Recommended temperature range: +2 to +25°C Expressed as one standard deviation for replicate... -
Page 19: Niox Mino
® or 03-2100.) ** NIOX Filter and accessories Disposable filter to be changed for every patient. Bacterial, viral filter according to Warning! Medical Device Directive Class IIa. When selecting an accessory for your NIOX MINO product please keep in mind that an accessory not recommended by Circassia AB may result in loss of performance, damage to your NIOX MINO product, fire, electric shock, injury or damage to other property. The product warranty does not cover product failure or damage resulting from use with non-approved accessories. Circassia AB takes no responsibility for health and safety problems or other problems caused by the use of accessories not approved by Circassia. -
Page 20: Connect Niox Mino ® To A Pc Using Usb
• The connected PC should be placed out of reach from the patient. Do not, simultaneously, touch the connected PC and the patient. 1. Connect the USB cable from the instrument to the PC USB cable from PC 2. The USB icon is shown on the NIOX MINO display to indicate that a USB connection is established Connect NIOX MINO to a PC using Bluetooth 1. Select Settings 2. Select Bluetooth 3. The Bluetooth setting is shown 4. Use the button to activate Bluetooth 5. Select OK to accept the changes 6. Follow the instructions delivered with the PC or from the Bluetooth device manufacturer for how to set up a Blutetooth connection: •... -
Page 21: Special 6S Feno Measurement
• The NIOX MINO Sensor is sensitive to changes in ambient temperature and humidity. • Be careful when opening the Sensor can. The inside of the opening has sharp edges. Do not touch or clean the white Sensor membrane. •Best performance is achieved if the ambient conditions are stable. Refer to the "Operating conditions" section. Keep the instrument away from windows, sunshine, radiators, stove or open fire in order to avoid unstable conditions. When transporting the instrument from one location to another, a prolonged stabilization period before measurement might be required. Refer to the recommended transportation conditions in the “Transport and Storage” section. Always use a NIOX MINO Bag for transportation. Keep the NIOX MINO with mounted Sensor connected to the power outlet whenever possible. •NIOX MINO has been tested and found to comply with the limits for medical devices according EN/IEC 60601-1 Safety requirements for medical electrical systems and electromagnetic compatibility. These limits are designed to provide protection against harmful interference in a typical medical installation. However, because of the increased use of radio-frequency transmitting equipment and other sources of electrical noise emitters in the health-care and... -
Page 22: Clinical Documentation
Circassia, as a medical device manufacturer, mobile radios, amateur radio, AM and FM radio must have a system in place to report to health broadcast and TV broadcast, it is possible that authorities, any adverse incidents that have high levels of such interferences due to close occurred with its medical products, a so-called proximity or strength of a source, may result Vigilance system. in disruption of performance of the device. If abnormal performance is observed, it may be The purpose of the Vigilance system is to ensure necessary to reorient or relocate NIOX MINO. the health and safety of patients, users and others using medical products by reducing the •A PC connected to the USB connector has to be likelihood of the same type of adverse incident certified for one of the standards IEC 60601-1, being repeated. This is achieved by immediate IEC 61010-1, IEC 60950 or comparable with notification of incidents to enable corrective and safety extra low voltage on the USB ports. preventive actions. •The connected PC should be placed out of reach An adverse incident is defined as: Any malfunction from the patient. Do not, simultaneously, touch... -
Page 23: Guidance And Manufacturer's Declaration
NIOX MINO. Warning! NIOX MINO should not be used adjacent to or stacked with other equipment. Adjacent or stacked use together with NIOX Nitric ® Oxide Monitoring System has been tested by Circassia and proven as acceptable. The technical description on the electromagnetic immunity test levels and electromagnetic environment guidance can be found on www.niox.com. - Page 24 A N E W D I M E N S I O N I N A S T H M A CA R E Circassia AB, an ISO 13485 certified company Circassia AB, Hansellisgatan 13, SE-754 50 Uppsala, Sweden Phone: +46 8 629 07 80, Fax: +46 8 629 07 81, E-mail: nioxtechsupport@circassia.com www.niox.com NIOX MINO is CE marked according to European In Vitro Diagnostic Device Directive 98/79/EC and is cleared 510(k) by FDA, k101034, (US). ® Copyright 2017 Circassia AB, Uppsala, Sweden. ©...