Table of Contents
Advertisement
Quick Links
Advertisement
Table of Contents

Summary of Contents for Nitgen eNCard-i
- Page 1 User Guide Version eng-1.03 Copyright 2000 By NITGEN Co., Ltd.
-
Page 2: Revison History
User guide <Revison History> Version Date Description Firmware Version 1.03 2016-06-27 Initial Release V1.00.000-013 NITGEN Co., Ltd. / (Bangi-dong) 6 Wiryeseong-daero, Songpa-gu, Seoul, 138-827, Korea Tel: 02-6488-3052, Fax: 02-6488-3098, E-Mail:kky8506@unioncomm.co.kr... -
Page 3: Glossary
User guide < Glossary> Admin, Administrator - A user who can enter into the terminal menu mode, he/she can register/modify/delete terminal users and change the operating environment by changing settings. - If there is no administrator for a terminal, anyone can change the settings. In this regard, it is recommended to register at least one administrator. -
Page 4: Table Of Contents
User guide Contents <Revison History> ....................2 < Glossary> ....................... 3 Contents ........................4 1. Before use ......................6 1.1. Safety precautions ....................6 1.2. Specific names of the terminal ................7 1.3. Normal Window Display ..................8 1.3.1. Icons ....................... 8 1.3.2. - Page 5 User guide 3.7.4. Terminal Lock ....................61 3.7.5. Terminal Wiegand ..................62 3.7.6. Terminal External ..................63 3.8. Display settings ....................65 3.8.1. Theme ......................65 3.8.2. Camera ......................66 3.8.2.1 Camera Flash Option .................. 66 3.8.3. Language ..................... 67 3.8.4.
-
Page 6: Before Use
- If the above cautions are ignored, it may result in property loss or human injury. ※ Under no circumstances will NITGEN Co., Ltd. be responsible for accidents or damages caused by inappropriate use of the product without referring to the user manual. -
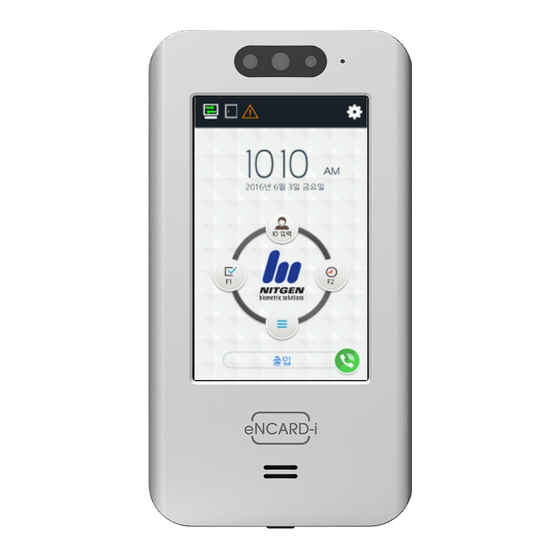
Page 7: Specific Names Of The Terminal
User guide 1.2. Specific names of the terminal Day-Light Sensor Camera Camera Flash Microphone Touch LCD Card input Speaker NITGEN Co., Ltd. / (Bangi-dong) 6 Wiryeseong-daero, Songpa-gu, Seoul, 138-827, Korea Tel: 02-6488-3052, Fax: 02-6488-3098, E-Mail:kky8506@unioncomm.co.kr... -
Page 8: Normal Window Display
User guide 1.3. Normal Window Display Status Icons See below Status Touch Admin button Present time ID input button Entrance mode selection button (Indication of the state of the entrance) Extended Mode BackGround Image 1.3.1. Icons None : Normal... - Page 9 User guide : WiFi Dongle Connected to device – not connected to network WiFi Connection State : WiFi Dongle Connected and successfully connected to AP NITGEN Co., Ltd. / (Bangi-dong) 6 Wiryeseong-daero, Songpa-gu, Seoul, 138-827, Korea Tel: 02-6488-3052, Fax: 02-6488-3098, E-Mail:kky8506@unioncomm.co.kr...
-
Page 10: Window Messaging
User guide 1.3.2. Window Messaging - Standard window - Screen Saver window All Function Keys disabled - No Status Text/ Status Text Background - No Extended Key NITGEN Co., Ltd. / (Bangi-dong) 6 Wiryeseong-daero, Songpa-gu, Seoul, 138-827, Korea Tel: 02-6488-3052, Fax: 02-6488-3098, E-Mail:kky8506@unioncomm.co.kr... - Page 11 User guide VoiP Function VoIP enabled, not registered. VoIP enabled, registered on iPBX network Select Green Icon to access VoIP call menu. NITGEN Co., Ltd. / (Bangi-dong) 6 Wiryeseong-daero, Songpa-gu, Seoul, 138-827, Korea Tel: 02-6488-3052, Fax: 02-6488-3098, E-Mail:kky8506@unioncomm.co.kr...
- Page 12 User guide Touch the ‘status touch area’ along the top of the display to see detail status information. See 1.3 Main window display. This will appear for 10 seconds. Top pop up is a ‘custom user message’.In UNIS user management you can make a custom message for every user during the users authentication period.
- Page 13 User guide - When authorization is failed. - When unregistered user ID is entered. - When unregistered card is entered - Passback error when using anti-passback function. - When a user tried the authorization more than twice in one meal time when using as meal personnel management...
- Page 14 User guide - Registration without authorization right or authorization attempt when the entrance is not permitted. - When the user is designated in the blacklist - When the terminal is set locked - When it is not the meal time when set in the meal personnel management.
- Page 15 User guide - Waiting for User ID Input If more than 2 function keys are enabled from the function key setting menu, in administrator mode, the button will appear on the main window. If this button is selected the extended function keys can be seen.
- Page 16 User guide - Waiting for Password Input - Waiting for Card -When the terminal program is being upgraded (In this state, you should not turn off the terminal) NITGEN Co., Ltd. / (Bangi-dong) 6 Wiryeseong-daero, Songpa-gu, Seoul, 138-827, Korea...
-
Page 17: Voices In The Operation
User guide 1.4. Voices in the operation Operation type Voice When the authorization was You are authorized. successful When the authorization was Please try again. failed. Waiting for Card Please enter your card ID Input Enter your ID 1.5. Beep or sound effect in the operation... -
Page 18: Product Introduction
User guide 2. Product introduction 2.1. Product characteristics Multi-Modal product with card, password or mobile key authentication methods. Face Detection requires the current authenticating user to present their face during card, password or Mobile Key authentication. This requires a user to be in front of the card reader so the device can take a picture of the person who authenticated. -
Page 19: Product Components
User guide 2.2. Product components 2.2.1. Stand-alone (entrance) DC12V Adapter Electric lock (Lock+, Lock-, Monitor) NITGEN Co., Ltd. / (Bangi-dong) 6 Wiryeseong-daero, Songpa-gu, Seoul, 138-827, Korea Tel: 02-6488-3052, Fax: 02-6488-3098, E-Mail:kky8506@unioncomm.co.kr... -
Page 20: Connected With Pc Server
User guide 2.2.2. Connected with PC server (Entrance, attendance, meal personnel management) TCP/IP TCP/IP Authorization TCP/IP server (static IP) database (MSSQL) Internet / WAN / LAN Remote management program TCP/IP (user and terminal setting management) NITGEN Co., Ltd. / (Bangi-dong) 6 Wiryeseong-daero, Songpa-gu, Seoul, 138-827, Korea Tel: 02-6488-3052, Fax: 02-6488-3098, E-Mail:kky8506@unioncomm.co.kr... -
Page 21: Product Specification
User guide 2.3. Product specification Types SPEC REMARK 1GHz Single Core CPU 4.0 inch Touch LCD(480*800) eMMc 8G Bytes Flash MEMORY 512mb RAM (USB port is External USB support Data backup / FW upgrade service port.) Camera Still Image Color (320x480) -
Page 22: Checks Before Setting The Environment
User guide 3.1. Checks before setting the environment 3.1.1. Entering the admin menu If you press the [ ] icon at the main window, you can enter the administrator menu as follows. You can enter the subdivision menu by selecting each button. -
Page 23: Administrator Authorization
User guide 3.1.2. Administrator authorization If the administrator is registered, the following administrator authorization window appears first. ▶Administrator authorization If you enter the administrator ID, the administrator authorization is fulfilled along with the authorization method of the administrator such as card, or password. -
Page 24: How To Save The Set Values
User guide server network information will be displayed. You can now connect your card reader terminal directly to your PC. Setup your PC network card with the same Server Gateway settings. After successfully connect with UNIS you change/delete administer user needed. -
Page 25: Menu Composition
User guide 3.2. Menu composition 1.User 1. Add management 2. Modify 3. Delete 4. Delete All 5. View 2. Network Terminal IP address Static IP / DHCP ▶Terminal IP address ▶Subnet mask ▶Gateway DNS server Server IP address ▶Server IP address ▶Port... - Page 26 User guide 4. Date / time ▶Time Sync type ▶Display format ▶Date Setting ▶Time Setting 6. Database ▶ Delete all Users ▶ Clear Settings ▶ Clear Log Data ▶ Clear Picture Logs ▶ Factory Initialize 5.Terminal 1. Sound ▶Voice volume setting ▶Beep volume...
- Page 27 User guide 3. Language ▶Language 4. LCD option ▶Screen saver setting ▶User display option ▶Touchscreen recalibrate 5. Message Setting ▶Broadcast message display period On Time (milliseconds) Off Time (milliseconds) ▶Display Result Window Period Display time (milliseconds) 7.Terminal 1. System ▶System information...
-
Page 28: Adding User
User guide The number of all the users is shown at the top of screen including administrators. Select [Add] button to add the new user, [Modify] button to modify the user, [Delete] button to delete the specific user, [Delete All] button to delete all the users, and [View] button to inquire the registered user list. -
Page 29: Photo Registration
User guide The icons in the left side mean as follows. :Password Registration (X: none, O: Registered) : Card Registration (X: none,1~5) : User ID to be registered User Type: This selection will NOT appear until a card or password is registered for the user. -
Page 30: Password Registration
User guide Take a picture by selecting [ ] button at the [Add user] screen. Keep selecting the picture image until you are satisfied with the current picture that has been taken. 3.3.1.5. Password registration NITGEN Co., Ltd. / (Bangi-dong) 6 Wiryeseong-daero, Songpa-gu, Seoul, 138-827, Korea Tel: 02-6488-3052, Fax: 02-6488-3098, E-Mail:kky8506@unioncomm.co.kr... -
Page 31: Card Registration
User guide Enter a password up to 8 digits in length. Once you are finished select the OK button, after a confirmation window will appear. Enter the same digits to confirm your password is correct. Select the OK button to continue. - Page 32 User guide Select the Card Icon to register a card. A popup message will appear waiting for you to scan your card. If successful the card number message will appear indicating successful. You can register up to 5 cards per user. If a same card number is attempted to register again, an error message will occur.
-
Page 33: Authorization Method
User guide 3.3.1.8. Authorization method Select the Auth Type icon to change the authentication type of the user. If only card is registered, only a card icon will appear the same as password. If both are registered you can select a combination of both types using OR and AND. -
Page 34: Save
User guide : card only 3.3.1.9. Save Select the [Save] button to save all user data when completed or select [Cancel] or [BACK] button to return, the user is not saved. LCD messages which can appear during the registration procedure. - Page 35 User guide The following window appears if you select [User Settings]->[Delete] at the main menu. Input the user ID to be deleted and select [OK] button. Select [BACK] button to cancel and return. If you entered an invalid/unregistered ID, an error message will appear.
-
Page 36: Modify User
User guide When unregistered ID was entered When user is deleted successfully. 3.3.3. Modify User NITGEN Co., Ltd. / (Bangi-dong) 6 Wiryeseong-daero, Songpa-gu, Seoul, 138-827, Korea Tel: 02-6488-3052, Fax: 02-6488-3098, E-Mail:kky8506@unioncomm.co.kr... -
Page 37: Delete All Users
User guide The following window appears if you select the [User Setting] -> [Modify] in the main menu. Input the user ID to be modified and Select [OK] button. Select [BACK] button to cancel and return. If you entered an invalid/unregistered ID, an error message will appear. -
Page 38: View
User guide Confirmation Window. Select YES to continue to delete all users Select NO to cancel the deletion. 3.3.5. View If you select the [User management] -> [View] from the main menu, all the registered users can be viewed. User view area will show you a summary list of the users. User name, ID, Card number and authentication type will appear for each user. - Page 39 User guide Select this area to toggle User’s Delete status Select this area to select the user for modification Slide up or down in the RED box area to view more or less users NITGEN Co., Ltd. / (Bangi-dong) 6 Wiryeseong-daero, Songpa-gu, Seoul, 138-827, Korea...
- Page 40 User guide The maximum amount of users displayed is 50. You can slide up or down in the box area (see above) to move up and down the list. If more than 50 users (maximum display) a forward icon will appear.
-
Page 41: Network Settings
User guide 3.4. Network Settings The networks settings area allows you to setup IP addresses, gateways, subnet mask, DHCP or static settings, Terminal ID Number or wireless settings. When selecting DHCP ensure that your network has a properly enabled DHCP server available. Also you should give time for the terminal to acquire the DHCP address;... -
Page 42: Application
User guide ▶ [Terminal ID]: The terminal ID number uniquely identifies the terminal on the server program network. For every terminal on the server network you should program a different terminal number. This value should be 1-8 digits in length ▶... -
Page 43: Application Mode
User guide 3.5.1. Application mode If you select the [Application] in the main menu, the following window appears. In the application mode, you can select the [Access Control/ Attendance management/ Meal management] according to the purpose. 3.5.1.1. Modes It is the screen appearing when you select the Access. - Page 44 User guide Meal Management It is the screen appearing when selecting the meal management. You can set the time period of each meal type. And if the setting is not needed, set ‘00:00-00:00’. ▶Allow duplicate: If it is unchecked (...
-
Page 45: Function Keys
User guide i.e , if Period mode = Leaving mode, Function key -> Enter mode is pressed, after 15 seconds the mode will change back to Leaving mode. The time periods should not be overlapped, but if they are overlapped, the application order is Attend->Leave->Out->In->Access. -
Page 46: System
User guide 3.6. System 3.6.1. System The following window appears if you select the [System] -> [System] in the main menu. ▶ User ID Length The user ID length can be 2 to 8 digits in length. The user ID length will be the length of the user ID required to authenticate. -
Page 47: Mobile Key
User guide four digit code from 0-99999999. If the code is not entered when this checkbox is enabled authentication will be denied. 3.6.2. Mobile Key The following window appears if you select the [System] -> [Mobile] in the main menu. - Page 48 User guide If mobile key is disabled, all mobile options will not be visible. Confirm Bluetooth Registration Select YES Waiting Bluetooth Registration Administrator Mobile App requires login before continuing. NITGEN Co., Ltd. / (Bangi-dong) 6 Wiryeseong-daero, Songpa-gu, Seoul, 138-827, Korea...
-
Page 49: Face Detection
User guide After Administrator Mobile App enters a terminal ID, the registration process is complete. 3.6.3. Face Detection This feature is for detection of a face only; the terminal will not recognize a specific user’s NITGEN Co., Ltd. / (Bangi-dong) 6 Wiryeseong-daero, Songpa-gu, Seoul, 138-827, Korea Tel: 02-6488-3052, Fax: 02-6488-3098, E-Mail:kky8506@unioncomm.co.kr... - Page 50 User guide face with this function. This feature can be used for all card users, all mobile users or all password users. After a card, mobile key or password is presented, the terminal will wait up to 10 seconds for a face to appear in front of the camera.
-
Page 51: Time/Date
User guide 3.6.5. Time/Date If you select the [System] -> [Date/Time] in the main menu, the following window appears. ▶ Time Sync: This is how terminal time/date is updated. - Auto/Server – updated from the server. No need to set Date/Time below. -
Page 52: Database
User guide hour) For example current time is 11:14:00pm, enter ‘2’ ‘3’ ’1’ ’4’ ‘0’ ’0’ and then press OK when finished. If a number is invalid or there is no entry, pressing OK will do nothing. Select the [OK] button to save the value or select [BACK] button to cancel and return. -
Page 53: Database Confirmation
User guide 3.6.6.1. Database Confirmation A confirmation window will appear after selecting one of ▶ the selections from above. Select YES to continue to delete or NO to cancel. Note: A backup of the user, system settings, pictures or logs should be done before erasing the data. -
Page 54: Terminal Settings
User guide 3.7. Terminal settings 3.7.1. Sounds If you select the [Terminal] -> [Sound] in the main menu, the following window appears. ▶Voice volume Scroll from side to side in to select the appropriate voice setting. A voice will be played after releasing the selector to determine the volume. -
Page 55: Terminal Option
User guide 3.7.2. Terminal option If you select the [Terminal]->[Terminal option] in the main menu, the following window appears. ▶ Card Reader If you scan/touch your card to the terminal, the terminal will beep and display the card number. The card number depends on the card format selected from the Card Format option below. - Page 56 User guide ▶Card format Card format determines how the card data is converted once it is read from the terminal. Note: If you change the card format, you must re-register all card users in the device. When registering a user in the terminal, this value should be set, considered first.
-
Page 57: Terminal Input
User guide 3.7.3. Terminal Input If you select the [Terminal] -> [Input] in the main menu, the following window appears. The Terminal has the ability to monitor the physical lock and/or door state when the door is open and closed, or terminal can be used to monitor status of another external device. -
Page 58: Terminal Lock
User guide Fire Monitor (NC/NO) – If you have an external device that has a fire output, the terminal will monitor when the device detects a fire alarm. The terminal will show a fire icon and give an audible warning tone; if any doors are connected to the terminal the terminal will open the doors. -
Page 59: Terminal Wiegand
User guide ▶ Default Setting: Same as the window on the left. ▶Lock 1 and Lock 2 Open Time (milliseconds) Lock activation times can be programmed from 300ms to 999999ms. (maximum is 99.999=100 seconds) Lock 1 and Lock 2 Options ... - Page 60 User guide If you select the [Terminal]->[External device] in the main menu, the following window appears. ▶ Default Setting: Same as the window on the left. ▶Site code It sets the sitecode value sent in Wiegand output below. When the authorization is successful, the data of the following format is sent to the Wiegand port of the terminal.
-
Page 61: Terminal External
User guide 3.7.6. Terminal External If you select the [Terminal]->[External device] in the main menu, the following window appears. ▶ Default Setting: Same as the window on the left. See Installation Guide Section 11 for connecting a serial printer. - Page 62 User guide Select the [OK] button to save the value or select [BACK] button to cancel and return. NITGEN Co., Ltd. / (Bangi-dong) 6 Wiryeseong-daero, Songpa-gu, Seoul, 138-827, Korea Tel: 02-6488-3052, Fax: 02-6488-3098, E-Mail:kky8506@unioncomm.co.kr...
-
Page 63: Display Settings
User guide 3.8. Display settings 3.8.1. Theme If you select [Display] -> [Theme] in the main menu, the following window appears. ▶ Default Setting: Same as the window on the left. ▶The main background. Main background is displayed on the main window or when screen saver mode is enabled. -
Page 64: Camera
User guide 3.8.2. Camera If you select the [Display] -> [Camera] in the main menu, the following window appears. ▶ Default Setting: Same as the window on the left ▶Display option - None ( no user picture is shown on result... -
Page 65: Language
User guide If you select the [Display]->[Language] in the main menu, the following window appears. ▶Default Setting: ‘English’ ▶Language If you change the language and select ‘OK’ button, the voice message and language are changed to the set language. -
Page 66: Message Time Settings
User guide you through the instructions. Select the [OK] button to save the value or select [BACK] button to cancel and return. 3.8.5. Message time settings If you select the [Display]->[Message time setting] in the main menu, the following window appears. -
Page 67: Terminal Information
User guide 3.9. Terminal information 3.9.1. System information If you select the [Terminal info] -> [System] in the main menu, the following window appears. ▶System info The hardware and firmware version of the terminal is shown. Card Reader status... -
Page 68: Terminal Information
User guide 3.9.2. Terminal information If you select the [Terminal information] -> [Terminal] in the main menu, the following window appears. ▶Terminal information Displaying basic information about terminal setup Select another selection on the left side or CLOSE, BACK button to return to previous window. -
Page 69: User Information
User guide If you select the [Terminal information]->[Network] in the main menu, the following window appears ▶Network information Displaying basic information about network information. Select another selection on the left side or CLOSE, BACK button to return to previous window. - Page 70 User guide If you select the [Terminal information]->[User] in the main menu, the following window appears. ▶User information - Registered Users: The number of users registered (including administrator) -Administrator Users: The number of the administrators registered. - Card: The number of cards registered...
-
Page 71: Log Information
User guide 3.9.5. Log information If you select the [Terminal information] -> [Log] in the main menu, the following window appears. ▶Log Event Log: The number of logs saved in the terminal User Pictures: Number of registered user pictures... -
Page 72: About
User guide 3.9.6. About If you select the [Terminal information] -> [About] in the main menu, the following window appears. ▶About Display legal information about software and firmware Select the text area and scroll up or down to view more Select another selection on the left side or CLOSE, BACK button to return to previous window. -
Page 73: Sd Usb (Usb Port Is Service Port.)
User guide 3.10. SD USB (USB port is service port.) SD (Storage Device) USB on-The-Go function is supported in the card reader terminal. You will need a cable as shown below. USB storage function will allow you to import and export files to and from the terminal. - Page 74 User guide NITGEN Co., Ltd. / (Bangi-dong) 6 Wiryeseong-daero, Songpa-gu, Seoul, 138-827, Korea Tel: 02-6488-3052, Fax: 02-6488-3098, E-Mail:kky8506@unioncomm.co.kr...
- Page 75 User guide Filenames maybe in the format. (XXXXXXXX_YYYYMMDDHHMM_ logdata.tar.gz) (XXXXXXXX_YYYYMMDDHHMM.csv) (XXXXXXXX_YYYYMMDDHHMM_ piclogdata.tar.gz) XXXXXXXX = terminal ID YYYYDDMMDDHHMM – Year, Month, Date and Time of export. Note: .tar.gz are tarballed compressed zipped files. If you are using windows PC you may need to download a utility program to extract the files.
- Page 76 User guide when exporting log picture data to the USB device. i.e - 00000008_piclogdata.tar.gz * USB port is service port. ‘CR/unisuser’ directory – This directory is created by the card reader terminal when selecting Export User Data. Files in this directory will be named 0000.dat~9999.dat.
- Page 77 User guide If you select the [SD USB] from the admin menu, the following screen appears. (USB port is service port.) No USB device Connected USB Device Connected with brand name USB Function(USB port is service port.) Import is used to importing user data or system options from another device.
-
Page 78: Language Translations/Customizing Text Items
User guide 3.11. Language Translations/Customizing Text Items Mostly all text on the user interface can be changed or customized to your customer’s choice. Language must be in the ISO639 format naming is required. xx_YY – xx = Language YY = Region/Country... - Page 79 User guide Note: Some languages not on the list above require special fonts to be imported. You must contact your sales representative if you wish use use a language not supported on the list. Note: When upgrade firmware ‘resources_xxxxx.umgz’...
-
Page 80: How To Use Terminal
User guide 4. How to use terminal The background image and composition of the main window can be changed according to the administrator’s setting. In addition, if the administrator set the screen saver time, the LCD screen will show only the background image with the time and date. Entering a card, touching the screen will change back to the main window. -
Page 81: Id Input
User guide In the access mode selection screen, as shown in the left, select the preferable access mode button, which the screen will move to the selected access mode. 4.2. ID input If you select the [ID input] button on the main window, the following ID input window appears. -
Page 82: Authorization
User guide 4.3. Authorization 4.3.3. Card authorization Touch/Scan the card on the area of the card reader as shown in <Fig. 4-1> 4.3.4. Password authorization Input your ID by selecting [ID input] button as follows and input password when the password input window appears. - Page 83 User guide FCC Information This device complies with part 15 of the FCC Results. Operation is subject to the following two conditions : (1) This Device may not cause harmful interface, and (2) This device must accept any interference received, including interference that may cause undesired operation.
Need help?
Do you have a question about the eNCard-i and is the answer not in the manual?
Questions and answers