
Summary of Contents for Tchibo 308 950
- Page 1 Radio- Controlled Alarm Clock Instructions for use and guarantee Tchibo GmbH D-22290 Hamburg · 76889BB57XIV · 2014-05...
- Page 2 We hope you will be entirely satisfied with your purchase. Your Tchibo Team www.tchibo.de/instructions (Please enter the product number in the box labelled “Bedienungsanlei- tungssuche” and click on “Suchen”.)
-
Page 3: Table Of Contents
Contents Safety warnings Information regar- ding the location At a glance and possible sources of interfe- Buttons and rence functions General functions How a radio- Illuminating the dis- controlled alarm play clock works Changing between Prior to first use the local time of day Inserting/replacing and time of day of a batteries... - Page 4 Changing the Setting the time of language for the day of the week Setting the date Selecting display 27 Setting the time of format day for a different Switching between time zone summer and winter time 28 World time zones Restoring the 29 Technical specifica- settings...
-
Page 5: Safety Warnings
Safety warnings Read the safety warnings carefully and only use the product as described in these instruc- tions to avoid accidental injury or damage. Keep this manual for future reference. If you pass this product on to someone else, remember give them these instructions. Intended use The radio-controlled alarm clock is intended for private use and is not suitable for commer-... - Page 6 • Keep all packaging material away from children. There is a risk of suffocation! WARNING – risk of injury • If a battery has leaked, avoid contact with skin, eyes and mucous membranes. If neces- sary, rinse the affected areas with clear water and consult a doctor immediately.
- Page 7 • Always replace all the batteries at the same time. Do not use different types or brands of batteries or batteries with different capaci- ties. • When inserting the batteries, ensure correct polarity (+/–). • Do not use rechargeable batteries as these do not provide the required voltage.
-
Page 8: At A Glance
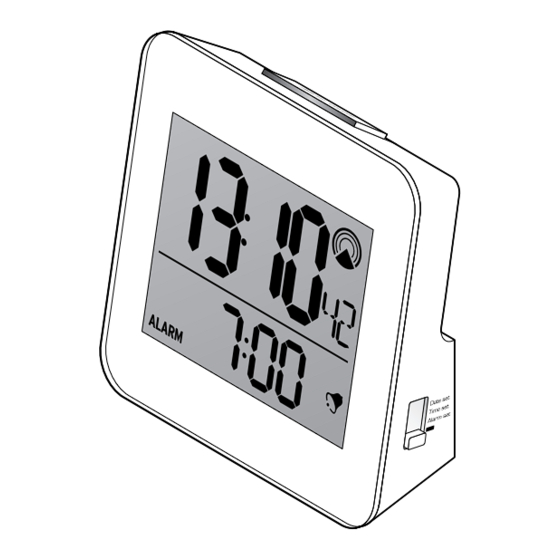
At a glance 12-hour display Snooze symbol Reception indicator Time of day display Day display Battery indicator Month Alarm time display Alarm symbol... - Page 9 Alarm on/off Snooze/Light Switch: Date set Time set Alarm set (Lock) Battery compartment Batteries: 2 batteries LR03, 1.5 V...
-
Page 10: Buttons And Functions
Buttons and functions Alarm on/off Switch the alarm on and off Switch display Snooze/Light Interrupt alarm Switch display light on Adjust values upwards Adjust values downwards Date Set Set the date Time Set Set the time Alarm Set Set alarm time Lock Lock settings... -
Page 11: How A Radio-Controlled Alarm Clock Works
How a radio-controlled alarm clock works The exact time is received from the official German transmitter DCF77. The transmitter is located in Mainflingen, near Frankfurt on Main. The signal is transmitted on long wave at 77.5 kHz in a radius of approx. 1,500 km (900 miles). -
Page 12: Prior To First Use
Prior to first use Remove the protective film from the display. Inserting/replacing batteries 1. Slide the battery com- partment lid downwards and lift it up. 2. Insert batteries or replace batteries. Ensure correct posi- tioning of the poles (+/–). - Page 13 All display indicators appear briefly and the alarm clock switches to reception. The radio reception symbol flashes in the upper right of the display. 3. Replace the battery compartment lid and slide it upwards as far as it will go. You should hear and feel it click into place.
-
Page 14: Radio Signal Recep
Radio signal reception The alarm clock attempts to receive the radio signal for several minutes. If it does not receive an adequate signal during this time, the reception indicator will switch itself off and the clock will start running from the time of day set so far. -
Page 15: Reception Indicators And Their Meaning
Reception indicators and their meaning The quality of the last signal received was satisfactory, and the time of day has been synchronised with the recep- tion signal. Weak radio signal. Reception of the transmitter was not possible or the time of day was set manually and not synchronised with the transmitter. - Page 16 Please note: • If adequate reception is not possible, the reception indicator in the display will switch off after a few minutes and the time will con- tinue to run normally as set before. • If reception is adequate, the clock will be set to DCF77 time.
-
Page 17: Information Regar
Information regarding the location and possible sources of interference • We recommend placing the alarm clock near to a window. • Do not place the alarm clock on or near metal surfaces. • Allow a distance of at least two metres from sources of interference, for example televi- sion sets, computers, etc. -
Page 18: General Functions
General functions Illuminating the display To be able to read the display in the dark, briefly press Snooze/Light. The display will be lit for about 5 seconds. Changing between the local time of day and time of day of a different time zone The alarm clock normally displays the local time of day. -
Page 19: Switching Between The Day Of The Week And Seconds Display
To set the time of day of a different time zone, proceed as described in the section “Setting the time of day to a different time zone”. Switching between the day of the week and seconds display The alarm clock normally displays the seconds. Briefly press The day of the week will be displayed. -
Page 20: Switching Between Date And Alarm Time
Switching between date and alarm time The alarm clock normally displays the current date. Briefly press the Alarm on/off button to have the set alarm time displayed. The alarm time is shown on the display and alarm is activated. The selected display is shown continuously. Changing the language for the day of the week Keep the... - Page 21 The abbreviations for the languages appear in the sequence: DE (German) > Fr (French) > IT (Italian) > SP (Spanish) > DU (Dutch) > SW (Swedish) > En (English). Selecting display format The time of day can be displayed in 12 or 24- hour format.
- Page 22 Switching between summer and winter time The clock switches automatically from summer to winter time and vice versa. If the alarm clock is in summer time mode, this is indicated in the lower right of the display by (summer time). Restoring the settings If the alarm clock shows a time that is obvious- ly incorrect, you can reset it to the default set-...
-
Page 23: Setting The Alarm
Setting the alarm Slide the switch to Alarm set. The alarm time flashes in the display. 2. Use the button to set the alarm time. For quick setting keep the respective button pressed. 3. Slide the switch to (lock) to save your setting. - Page 24 Press the Alarm on/off button again to deacti- vate the alarm. The current date is shown on the display and alarm is deactivated. You can be woken either by a one-time alarm or a repeated alarm (Snooze function). Press the Alarm on/off button to deactive the alarm.
- Page 25 Setting the time of day and date manually If you are within transmission range, the clock will automatically set itself to the time of day and the current date received as soon as there is sufficient reception. However, you can also set the time of day and date manually.
- Page 26 3. Slide the switch to (lock) to save your setting. Setting the date Slide the switch to Date set. The current date flashes in the display. 2. Use the button to set the date. For quick setting keep the respective button pressed.
- Page 27 Setting the time of day for a different time zone Press the button for approx. 3 seconds until appears in the display. 2. Slide the switch to Time set. The time difference is shown in the display. 3. Use the button to set the time difference.
- Page 28 World time zones Time difference City Los Angeles Denver Chicago, Mexico City New York, Toronto Rio de Janeiro, Buenos Aires London Paris, Rome, Berlin, Hamburg Cairo, Helsinki, Johannesburg Moskow Dubai Carachi Bangkok Hong Kong, Singapore Tokyo, Osaka, Seoul Sydney...
-
Page 29: Technical Specifications
DCF on 77.5 kHz Antenna: internal ferrite antenna Transmitter range: approx. 1,500 km radius of Frankfurt on Main Setting time: approx. 3 to 5 minutes (with good reception) Winter/summer time: changes automatically Made exclusively for: Tchibo GmbH, Überseering 18, 22297 Hamburg, Germany... - Page 30 Disposal The alarm clock, its packaging and the sup- plied batteries have been manufactured from valuable materials that can be recycled. Recycling reduces the amount of refuse and helps to preserve the environment. Dispose of the packaging at a recycling point that sorts materials by type.
- Page 31 Regular batteries and rechargeable batteries must not be disposed of along with household refuse! You are legally bound to dispose of flat bat- teries or rechargeable batteries at a local authority collection point or to return them to a battery retailer.
- Page 32 Declaration of Conformity...
- Page 34 We will remedy all defects in workmanship or materials within the guarantee period. In order for the guarantee to be granted, all warranty claims must be accompanied by proof of pur- chase from Tchibo or from an authorised Tchibo distribution partner.
- Page 35 Damage due to improper use, as well as worn parts and consumables, are not covered by the guarantee. Please have the product number at hand in case of any queries. This guarantee does not restrict statutory warranty rights. Product number: EN 308 950...
- Page 36 Product number: EN 308 950...
Need help?
Do you have a question about the 308 950 and is the answer not in the manual?
Questions and answers
I have a 287783 clock and I live in the United states.I cannot fiqure out how to set the clock. Photos attached