Table of Contents
Advertisement
Advertisement
Table of Contents

Summary of Contents for ScripAbility ScripTalk Station
- Page 1 Pharmacy Quick Start Guide...
-
Page 2: Table Of Contents
Table of Contents Introduction & Software Installation ScripTalk Station Overview What You Received Installing the Pharmacy Software Station Connection & Set-Up Connecting & Powering the Station Open the ScripTalk Software Set the Port ID Default Settings Label Data & Programming... -
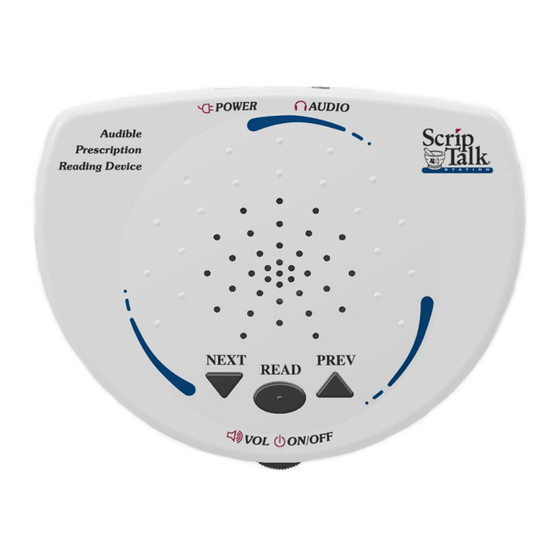
Page 3: Scriptalk Station Overview
In the pharmacy, a pharmacist will key all prescription label information into the ScripAbility software. That data is then transmitted from the ScripTalk device to an RFID label that is affixed to the patient's prescription container. -
Page 4: Installing The Pharmacy Software
· If you are running anti-virus software, be sure to pause or disable it during the following installation steps. Load the provided CD into your PC. The ScripAbility software program files are pre-loaded. If autoplay does not begin installation, go to Computer and double click on the CD-ROM drive that contains the ScripAbility CD . - Page 5 You can change the Destination Folder if desired. The default is C:\Program Files(x86)\ScripAbility\. Click [Next]. Leave the ScripAbility and Pololu Driver boxes checked. Click [Install]. Please wait while your system is scanned. This may take a few minutes. Click [OK]...
- Page 6 The Pololu Driver Installer dialogue box will appear. Click [Next]. Windows Security will ask for permission to install the device software. Click [Install]. To complete installation, click [Finish].
- Page 7 When the installation is complete, click [Next]. Leave the boxes checked to create icons, and click [Close]. Reboot, if required, to finish installation.
-
Page 8: Connecting & Powering The Station
Connecting & Powering the Station Connect the ScripTalk USB cord to your pharmacy computer. Connect the AC adapter to the unit via the port on the back edge of the programmer. Then, plug the adapter into a power source. Turn the device on. Wait while Windows installs the device driver software. -
Page 9: Open The Scriptalk Software
Open the ScripTalk Software The ScripAbility software is now installed on your computer desktop. Double click the [ScripAbility Icon] on your computer desktop to open the program. It will begin with a blank template. Open File>Settings option in software. Be sure that the... -
Page 10: Set The Port Id
Set the Port ID Click the ScripTalk Station [Configure] button. This will open the USB Settings options. Communication type should be USB. Click the [Gear Icon] button. This will open the USB settings dialogue. A COM number will be populated. Click [Apply]. -
Page 11: Default Settings
Default Settings The data fields are loaded in default order (Patient Name, Medication, Instructions, Quantity, Fill Date, Use By Date, # of Refills, Prescriber, Pharmacy Name, Pharmacy Phone, Rx#, Warnings, Other Information). To change the order the data is spoken in, drag and drop data fields to desired order. -
Page 12: Entering Prescription Data
Entering Prescription Data Enter label information in each field as you want it to be spoken. Note: Enter NDC#. Warnings will be populated automatically. Press the Auto-Fill Button to automatically fill the drug name Enter prescriber’s name as First and Last name. -
Page 13: Editing Warnings
Editing Warnings You can edit prescription warnings, if needed. Individual and/or additional warnings may be selected. To do this, click [Set Warnings]. Highlight the warning you wish to add, then click [Add]. To remove a selected warning, highlight the warning number in the box on the right, and click [Remove]. -
Page 14: Programming The Label
Programming the Label Attach a Talking Label to the prescription container, along with the pharmacy printed label. (We recommend placing the RFID tag on the bottom of the container when possible. If it is not possible, place the RFID label near the printed label.) Note: When issuing a compliance pack (or other prescription with high metallic content... - Page 15 Place the prescription container on the top of the ScripTalk Station programming unit. Click [Program]. A pop-up window will appear.
- Page 16 Making sure the unit is turned on, press [NEXT] and [PREVIOUS] simultaneously (about two seconds) until you hear a beep. Watch for two green checkmarks. This confirms that the label data has been written and verified.
-
Page 17: Verifying The Label
Verifying the Label Press [READ] once. Place the prescription container on the top of the ScripTalk unit. Remember: You can remove the label and container once the reader begins to speak the information. The station will not keep the information in its memory after 15 seconds of inactivity. - Page 18 If the label information is correct, press [Save], [Archive], or [Delete]. This will save the label information by prescription [Save]: number to the Prescriptions to Program list. It will clear the data fields. This will delete the file. [Delete]: It will clear the data fields. This will save the label information by prescription [Archive]: number to the Archive Folder.
-
Page 19: Correction Of Pronunciations
Correction of Pronunciations If you encounter a word or name that is not being pronounced correctly, you may enter a correction in the Dictionary. Open the Dictionary tab. Click [Add]. Enter the word that is being mispronounced in the Entry field. Then enter the phonetic spelling in the Replacement Field. -
Page 20: Enrolling A Patient In Scriptalk
Enrolling a Patient in ScripTalk A patient may enroll in the ScripTalk program by talking with a member of your pharmacy staff. Please complete the Patient Approval Form (included in start-up kit) with your pharmacy and patient information and fax to En-Vision America at 309-938-4948. Once the patient is enrolled and confirmed, ScripTalk Patient Approval Form... -
Page 21: Faqs
Q: How long will it take for my patients to receive the ScripTalk device after the order has been placed? A: The ScripTalk Station Reader is shipped via Free Matter for the Blind. After patient enrollment and address information has been verified by En-Vision America, it will take on average five to seven business days to reach the patient. -
Page 22: Ordering Scriptalk Labels
Ordering ScripTalk Labels To reorder ScripTalk labels: Contact En-Vision America at 800-890-1180. Labels come in quantities of 250. Other supplies are also available: Hang Tags ScripTalk Brochures ScripTalk Take-Away Boards & Refills Contact & Support Numbers Website Address: http://www.envisionamerica.com Patient Confirmation Fax: 309-938-4948 ScripTalk Software/Hardware Support: 800-890-1180... -
Page 23: Troubleshooting
Troubleshooting Make sure that ScripTalk Station is checked in the Settings page. If the ScripAbility software is unable to communicate with the ScripTalk unit, check to make sure that the cable is connected between the unit and the computer via USB. Also, verify that the ScripTalk unit is turned on and has power. - Page 24 Check to see that the unit is set to the correct Port ID. Click on File> Settings, then click ScripTalk Station [Configure]. Click the [Gear Icon] button. Click [Find Port] and then click [Apply]. If you get the following error when programming a label, be sure that...
- Page 25 THANK YOU FOR HELPING PEOPLE LIVE BETTER LIVES! 1-800-890-1180 ScripAbility.com Abilit y Like us on Facebook! ™ facebook.com/ScripAbility Since 1996, Envision America has been a pioneer in the assistive technology industry offering life-changing solutions for the blind and visually impaired.
Need help?
Do you have a question about the ScripTalk Station and is the answer not in the manual?
Questions and answers