Table of Contents
Advertisement
Advertisement
Table of Contents

Related Manuals for Kaito KA600L


Summary of Contents for Kaito KA600L
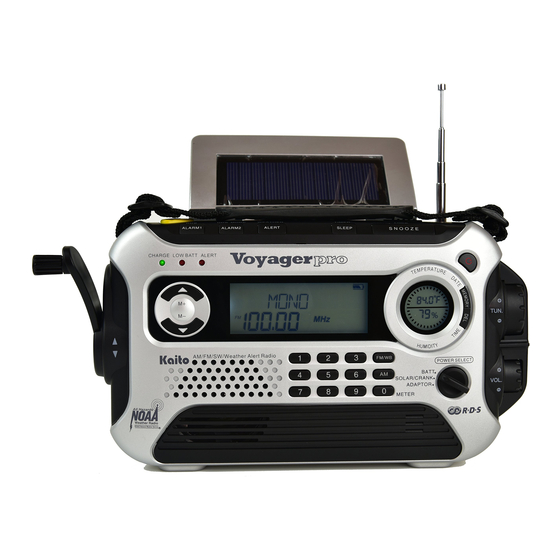
- Page 1 KA600L FM/AM/SW/LW/WEATHER MULTI-BAND RECEIVER DYNAMO & SOLAR POWER SUPPLY WITH FLASHLIGHT & READING LIGHT TEMPERATURE AND HUMIDITY INDICATOR OPERATION MANUAL VOICE ALERT SIREN NOAA COUNTY SINGLE MULTIPLE ENABLE DISABLE BATT SOLAR/CRANK ADAPTOR METER...
- Page 2 KEY FEATURES Thank You: Thank you for purchasing the KA600L multi-band receiver. Please read the manual thoroughly before operating and keep this book in a safe place for future reference. FM Band: 87.0-108.0MHZ AM (10K): 520-1710KHz AM (9K): 522-1710KHz 2300-23000KHz...
-
Page 3: Table Of Contents
INDEX INDEX LOCATION OF CONTROL........1 SET THE CLOCK............ 20 POWER ON AND POWER OFF HUMIDITY and TEMPERATURE DISPLAY....21 Power On and Power Off........4 USING FLASHLIGHT..........21 Sleep Timer............. 4 USING READING LIGHT......... 21 Alarm On and Alarm Off........5 KEY LOCK FUNCTION.......... -
Page 4: Location Of Control
LOCATION OF CONTROLS LOCATION OF CONTROLS REAR LINE IN LINE IN FRONT 28 24 29 30 15 14 13 <LOW BATT> Light Telescopic Antenna <CHARGE> Light Battery Compartment M+/M- Button <CHARGE> Switch Speaker <DC IN 5V> Port Numeric Button <CHARGE OUT> <AM>... -
Page 5: Power On And Power Off
LOCATION OF CONTROLS POWER ON/POWER OFF LEFT Power On and Power Off 1.Rotate the <POWER SELECT> to the valid charging position. SOLAR/CRANK/BATT..:Lithium battery Flashlight ADAPTOR. : Adapter Crank Handle 2.In the unit off mode, press the button <POWER> to turn on the unit, press the button <POWER>... - Page 6 POWER ON/POWER OFF POWER ON/POWER OFF Example:Set the ALARM1 on at 8:05, and alarm off NOTE:If the unit turn on by pressing the button<POWER>,you can also select the sleep timer by pressing the button <SLEEP> shortly to after 15 minutes. select your desired sleep timer.
-
Page 7: Radio Operation
RADIO OPERATION RADIO OPERATION Frequency Diagram: Activate and Cancel the Alarm Function In the unit off mode, press the button <ALARM1> or <ALARM2> shortly with the icon " " flashing in the display, FM:87-108MHz the alarm function is activated. Press the button <ALARM1> AM(10K):520-1710KHz AM(9K):522-1710KHz or <ALARM2>... -
Page 8: Select Am Step
TUNING INTO STATIONS RADIO OPERATION Select AM Step 9K/10K Auto Scan Tuning In the unit off mode, press and hold the button <AM> 1. Turn on the unit and select the band. about 5 seconds with the step 9K or 10K appearing in the display. -
Page 9: Auto Tuning Storage
TUNING IN STATIONS TUNING INTO STATIONS Auto Tuning Storage (ATS) Example1: Input FM 95.80MHz 1. Select the band. ENABLE DISABLE 2. Adjust the volume. MONO 3. Press and hold the < MEMORY > button until frequency 95 80 starts auto tuning, then release the button, the unit will store the station while scanning the strong signal. -
Page 10: Listening To Preset Station
TUNING INTO STATIONS TUNING INTO STATIONS Listening to Preset Stations Manual Tuning Storage 1.Press the <MEMORY> button quickly to enter the (1) Manual memory mode with "M" and the preset memory 1. Select the band. address flashes, then press the <M+> or <M-> button 2. -
Page 11: Delete Preset Stations
DELETE PRESET STATIONS FM RDS FM RDS Delete A Preset Station 1. Select a strong signal station of FM. 1.Select the band. 2. Press the <RDS> button quickly with the icon " " in 2.Press the <M+> or <M-> quickly to select the address the display. -
Page 12: Weather Reception
WEATHER RECEPTION WEATHER RECEPTION Weather Band Channel Frequencies Listening to the Weather Report 1.Press the <FM/WB> button quickly to enter the CHANNEL FREQUENCY(MHz) weather reception mode. 162.400 2.Rotate the <TUN.> knob to select the local frequency 162.425 position. Then you can listen to the weather report. 162.450 162.475 162.500... -
Page 13: Set The Date
SET THE DATE SET THE CLOCK Adjust the date Adjust the clock 1.In the unit off mode, press and hold the <MEMORY> 1.In the unit off mode, press and hold the <DEL> button button(about 2 seconds) with the year flashes. Then (about 2 seconds) with the hour flashes. -
Page 14: Humidity And Temperature Display
RADIO OPERATION RADIO OPERATION Humidity and Temperature Display Key Lock Function There is the humidity and temperature indicator in the Press and hold the <SNOOZE> button(about 2 right side of the unit, the upper indicator displays seconds)with the icon " "... -
Page 15: Power Supply
POWER SUPPLY POWER SUPPLY NOTES: LithiumBattery (1)Please don't mix the used battery with the new one. (1)Remove the battery compartment's cover by pushing (2)If you don' t use the unit for a long period, please remove the lithium the cover in the direction of the arrow. battery lest battery corrosion. -
Page 16: Adapter
POWER SUPPLY CHARGING LITHIUM BATTERY Adapter There are four ways to charge the lithium battery: crank charg ing, solar charging, external adapter (1)Plug one port of the adapter(not provided) into the AC socket and plug the other port into the <DC IN 6V> jack. charging and PC charging. -
Page 17: Solar Charging
CHARGING GADGETS CHARGING LITHIUM BATTERY Charging via PC External AC (AC Adapter Optional) You can charge the lithium battery either in radio on or 1.Plug one port of the included micro USB cable into the off mode. USB jack of the PC and the other port into the "DC IN 5V" jack of the radio. -
Page 18: Precautions
PRECAUTIONS SPECIFICATION Do not expose the radio to rain or humid environment. 1. Frequency Do not expose the radio to extreme strong sunlight, 87.0 - 108.0 MHz close to heat sources, or leave it in a place with AM(10K) 520 - 1710 KHz excessive dust.
Need help?
Do you have a question about the KA600L and is the answer not in the manual?
Questions and answers