
Summary of Contents for ADT Pulse HS101ADT-1ADNAS
-
Page 1: Installation Guide
ADT Pulse Interactive Solutions Touch Screen Installation Guide Model: HS101ADT-1ADNAS... - Page 2 www.ADT.com License information available at or by calling 800.ADT.ASAP. CA ACO7155, 974443; PPO17232; FL EF0001121; LA F1639, F1407, F1640; MA 172C; NY 12000305615; PA 090797; MS 15019511 ©2012 ADT LLC dba ADT Security Services. All rights reserved. ADT, the ADT logo, 800.ADT.ASAP and the product/service names listed in this document are marks and/or registered marks.
- Page 3 ADT Pulse Interactive Solutions Touch Screen Installation Guide Package Contents – Touch Screen Model HS101ADT- 1ADNAS Touch Screen 12V Power Adapter USB Adapter Installation Guide...
-
Page 4: Hardware Features
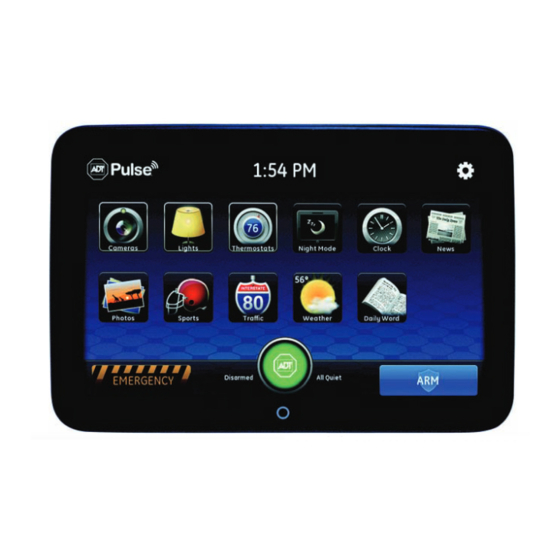
ADT Pulse Interactive Solutions Touch Screen Installation Guide Hardware Features The Touch Screen includes a Stand, Home button, and controls shown here and described below. 1. Stand 2. Home button 3. 12V power port 4. USB port... - Page 5 ADT Pulse Interactive Solutions Touch Screen Installation Guide Hardware Features (continued) 1. Stand. Open the stand to put the Touch Screen in an upright position. 2. Home button. The white circle on the front of the Touch Screen is the Home button. Tap the Home button at any time to perform the following actions.
- Page 6 ADT Pulse Interactive Solutions Touch Screen Installation Guide Configuring the Touch Screen for Installation to the ADT Pulse System 1. Plug the USB adapter into the USB port located on the back of the Touch Screen. 2. With an Ethernet cable, connect the USB adapter to the gateway...
- Page 7 ADT Pulse Interactive Solutions Touch Screen Installation Guide 3. Plug the 12V power adapter into the 12V power port.
- Page 8 ADT Pulse Interactive Solutions Touch Screen Installation Guide Enrolling the Touch Screen to Your ADT Pulse System 1. Open your web browser. In the address bar, type: https://portal.adtpulse.com 2. Type your Username and Password, and then click the Sign In button.
- Page 9 ADT Pulse Interactive Solutions Touch Screen Installation Guide 3. Click the System tab, then click the Manage Devices button. Welcome, Wednesday, Nov 30 Sign Out Summary History Alerts Automations Schedules System Help System D e v i c e s...
- Page 10 ADT Pulse Interactive Solutions Touch Screen Installation Guide 4. In the Manage Devices Assistant window, click Touch Screens. Manage Devices Assistant Help Touch Screens Click here to add touch screens. Cameras Click here to add wired and wireless cameras. Lights, Thermostats & more Click here to add Z-Wave™...
- Page 11 Assistant This assistant will guide you through the steps to add a Touch Screen. Step One Select Model Note: Only approved devices are supported to work with your ADT Pulse system. Non-approved devices may not perform as expected. Step Two...
- Page 12 ADT Pulse Interactive Solutions Touch Screen Installation Guide 6. Type a Name for your Touch Screen in the space provided. Type the MAC ID in the space provided. The MAC ID is located inside the back of the Touch Screen and has to contain 12 characters, either numbers or the letters A–F.
- Page 13 ADT Pulse Interactive Solutions Touch Screen Installation Guide Note: The placement of the MAC ID label may differ from the MAC ID location depicted in Step Two of the Touch Screen Assistant. 7. Click Continue. Step Two Touch Screen Name Device Assistant Enter a name for your Touch Screen.
- Page 14 ADT Pulse Interactive Solutions Touch Screen Installation Guide 8. If you have not done so already, connect the Touch Screen to the gateway using an Ethernet cable. Then connect the Touch Screen’s power supply to the Touch Screen and to an electrical outlet.
- Page 15 ADT Pulse Interactive Solutions Touch Screen Installation Guide Wait while the Touch Screen is added to your system. Note: Adding the Touch Screen can take up to one to two minutes. Step Four Touch Screen Adding Device Assistant We are adding your touch screen. This may take a few seconds.
- Page 16 ADT Pulse Interactive Solutions Touch Screen Installation Guide 9. If you want to add an additional Touch Screen, click the Add Another button. Otherwise, click the Finish button to return to the ADT Pulse web portal. Step Five Touch Screen...
- Page 17 ADT Pulse Interactive Solutions Touch Screen Installation Guide 10. Disconnect the Ethernet cable from the USB adapter. 11. Disconnect the USB adapter from the Touch Screen. Move the Touch Screen and power supply to your desired location. 12. Once you move the Touch Screen to your desired location, it may take up to 5 minutes to connect to the system.
-
Page 18: Troubleshooting
ADT Pulse Interactive Solutions Touch Screen Installation Guide Troubleshooting 1. Dark Screen The screen is blank (dark) • Reason. The Touch Screen is set to night mode. • Resolution. Touch the screen to change the mode. The screen is dark except the logo, time, and a message that security information is not available from this device •... - Page 19 ADT Pulse Interactive Solutions Touch Screen Installation Guide • A 2.4 GHz baby monitor is nearby. • The Touch Screen is too far from the gateway. Resolution. • The Touch Screen must be within 50 feet of the Gateway. •...
-
Page 20: Compliance Notification
ADT Pulse Interactive Solutions Touch Screen Installation Guide Compliance Notification Regulatory Compliance Information Note: This section includes user requirements for operating this product in accordance with National laws for usage of radio spectrum and operation of radio devices. Failure of the end-user to comply with the applicable requirements may result in unlawful operation and adverse action against the end-user by the applicable National regulatory authority. -
Page 21: Fcc Declaration Of Conformity
FCC Declaration of Conformity We, NETGEAR, Inc., 350 East Plumeria Drive, San Jose, CA 95134, declare under our sole responsibility that the ADT Pulse HS101ADT- 1ADNAS Touch Screen complies with Part 15 Subpart B of FCC CFR47 Rules. Operation is subject to the following two conditions: •... -
Page 22: Canadian Department Of Communications Radio Interference Regulations
Canadian Department of Communications Radio Interference Regulations This digital apparatus (ADT Pulse HS101ADT-1ADNAS Touch Screen) does not exceed the Class B limits for radio-noise emissions from digital apparatus as set out in the Radio Interference Regulations of the Canadian Department of Communications. -
Page 23: Industry Canada
ADT Pulse Interactive Solutions Touch Screen Installation Guide Industry Canada This device complies with RSS-210 of the Industry Canada Rules. Operation is subject to the following two conditions: (1) This device may not cause harmful interference, and (2) this device must accept any interference received, including interference that may cause undesired operation. - Page 24 ADT Pulse Interactive Solutions Touch Screen Installation Guide installé et utilisé avec un minimum de 20 cm de distance entre la source de rayonnement et votre corps. Interference Reduction Table The table below shows the recommended minimum distance between NETGEAR equipment and household appliances to reduce interference (in feet and meters).
-
Page 25: Declarations Of Conformity
Declarations of Conformity For complete DoC please visit the NETGEAR EU Declarations of Conformity website at: http://support.netgear.com/app/answers/detail/a_id/11621/. WARNING: Do not stack equipment or place equipment in tight spaces, in drawers, or on carpets. Make sure your equipment is surrounded by at least 2 inches of air space. For indoor use only in all EU countries and Switzerland. - Page 26 ADT Security Services October 2012...
Need help?
Do you have a question about the HS101ADT-1ADNAS and is the answer not in the manual?
Questions and answers