
Summary of Contents for Vertex MS01077
- Page 1 U S E R M A N U A L M S 0 1 0 7 7 PR O D U C T C O D E C ar e Co ( U K ) L t d , H u b er t R o a d, Br e ntw ood, E sse x , CM 1 4 4 JE P AGE 1...
-
Page 2: Table Of Contents
CONTENTS 1.PREFACE AND INTRODUCTION 2. SAFETY NOTICE 2.1 Before driving 2.2 While driving 2.3 Labelling 3. PARTS INTRODUCTION Parts description 4. OPERATION 4.1 Control panel 4.2 How to operate your scooter 4.3 Assembling and disassembling 5. BATTERY CHARGING AND CARE 5.1 Charging the battery 5.2 Battery 6. -
Page 3: Preface And Introduction
1. PREFACE AND INTRODUCTION Please carefully read this owner’s manual before using the vehicle. Improper use of the vehicle could result in harm, injury or traffic accidents. Therefore for maximum pleasure while using the vehicle please read this owner’s manual. »... -
Page 4: Safety Notice
2. SAFETY NOTICE 2.1 BEFORE DRIVING The user needs to be familiar with the usage and operation of this vehicle before driving. Therefore, please always keep the following safety notices in mind. The same traffic rules apply to the use of this vehicle as apply to pedestrians For your safety, please therefore follow the rules that apply to pedestrians. -
Page 5: While Driving
2. SAFETY NOTICE 2.2 WHILE DRIVING Please carry out daily inspections. Refer to the section entitled “DAILY CHECKING” Do not move your body out of the vehicle while moving » Such action may cause you to lose balance and risk injury from falling. »... - Page 6 2. SAFETY NOTICE Starting and Driving 1. Make sure the seat is installed properly. 2. Make sure the tiller has been secured properly. 3. Fold down the armrests so you can rest your arms on them. 4. Turn the power switch to “ON”. If necessary, turn on the headlights. 5.
- Page 7 2. SAFETY NOTICE Attention 1. Do not push both RH & LH sides of the speed control lever simultaneously. This might leave you unable to control your scooter. 2. Do not turn the power switch to OFF while driving as this will lead to an emergency stop and possible risk of accident and injury.
- Page 8 2. SAFETY NOTICE Please carefully read all labels on the scooter before driving it. For your future reference, do not remove them. CE LABEL TILLER DUMPING WARNING LABEL FREEWHEEL LABEL WARNING EMI LABEL SEAT PINCH WARNING LABEL P AGE 6...
-
Page 9: Parts Introduction
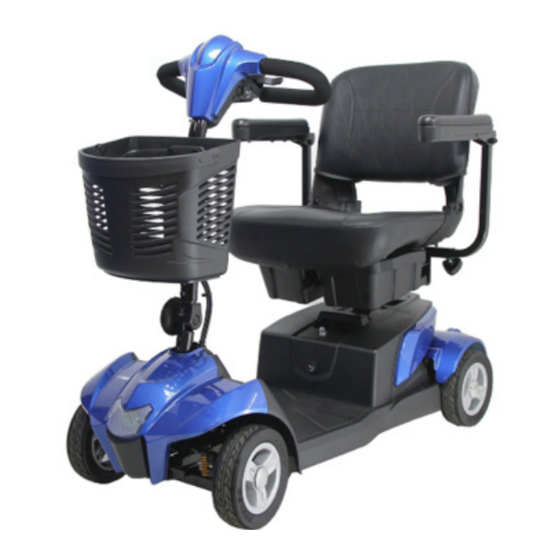
3. PARTS INTRODUCTION Parts Description 1. Power Switch 6. Armrest 10. Freewheel Lever 2. Charger Socket Cover 7. Width Adjustable 11. Anti-tip Wheel Armrests Knob 3. Basket Bracket 12. Connecting Device 8. Circuit Breaker 4. Tiller Adjust Lever 13. Wheel Lock knob 9. -
Page 10: Operation
4. OPERATION 4.1 CONTROL PANEL 1. Battery Level Indicator 2. Speed Dial 3. Horn 4. Wigwag Paddle 5. Headlight button 4.2 HOW TO OPERATE YOUR SCOOTER Turn the key to power ON or OFF (ON) : Power is turned on (OFF) : Power is turned off Speed Dial Press the slowest or fastest setting to... - Page 11 4. OPERATION Horn Button Press the horn button to sound the horn. Release the button to stop the horn. How To Set Freewheel Mode The motor on the scooter can be disengaged to allow the scooter to be pushed. Drive Mode – To put the scooter in to “drive” mode, push the freewheel »...
- Page 12 4. OPERATION Braking Electro-magnetic brake: Release the speed control lever completely, and the » electromagnetic brake will be activated automatically, and the scooter will stop. Parking After stopping, turn the main key to OFF and remove the key. The lights will turn »...
- Page 13 4. OPERATION How to re-position the seat The seat can slide backwards and forwards for a comfortable driving position. To slide the seat, pull the lever at the front of the seat and reposition as required. Tiller Adjustment The tiller can be adjusted in to many different positions to suit each driver.
- Page 14 4. OPERATION How to use the Under-seat storage To operate under-seat storage Lift up slightly on the latch on the side of the under-seat storage bin and swing » the under-seat storage bin out and away from the travel chair. To close the under-seat storage bin, push it towards the center of the travel chair »...
-
Page 15: Assembling And Disassembling
6. Turn key switch to “ON”. Make sure battery gauge indicates sufficient power. Disassembling The Scooter The Vertex Sport can be disassembled in to four pieces, the seat (11.5 kg /25.3 lbs), the front section (20.7 kg /45.6 lbs),the rear section (11.8 kg / 26 lbs) and battery pack (13.6 kg / 30 lbs). - Page 16 4. OPERATION Please follow the steps. 1. Make sure the tiller is raised before reassembling the scooter. 2. Turn key switch to “OFF”. 3. Place the free wheel mode lever in the drive position. 4. Take off the basket. 5. Push the Seat Rotate Lever whilst pulling up on the seat to remove. 6.
- Page 17 4. OPERATION 1. Remove the seat by pulling the seat rotate lever. 2. Pull up the wheel lock knob to fix the front wheel. 3. Pick up the battery pack and remove it from the scooter. PAG E 1 5...
- Page 18 4. OPERATION 4. Loosen the tiller adjustment knob and fold down the tiller and re-tighten knob. 5. Pull the connecting device upward to the rear section and stand upright. P AGE 16...
-
Page 19: Battery Charging And Care
5. BATTERY CHARGING AND CARE 5.1 CHARGING THE BATTERY Follow the procedure below step by step: 1. Turn the power switch to (OFF) 2. Connect the charger’s power cord into the power outlet. 3. Open the charging socket cap on the battery pack. - Page 20 5. BATTERY CHARGING AND CARE Attention While gripping or folding the handle bar, beware of finger or hands caught » in the handle area. Take care of your hands and fingers when returning the battery pack to » it’s cavity in the shroud. Warning! 1.
- Page 21 5. BATTERY CHARGING AND CARE 5.2 BATTERY Do not expose the battery to temperatures below -10°C or above 50°C when » charging or storing the vehicle. Under the above temperature range can cause the battery either to freeze or over heat. This will damage the batteries and shorten their life.
- Page 22 5. BATTERY CHARGING AND CARE Cleaning the battery If the batteries are contaminated by water, battery acid, dust or other substances, they will discharge quickly. The batteries supplied with the I-GO scooter are sealed and as such are maintenance free with no risk of battery leakage. Please follow the steps below to clean the battery.
-
Page 23: Battery
6. INSPECTION & MAINTENANCE 6.1 INSPECTION Clean the scooter with a damp cloth and dust down approximately once a week » to preserve the appearance of the scooter. Adjust the tiller height and return to the original position and swivel the seat »... - Page 24 6. INSPECTION & MAINTENANCE REGULAR CHECKING RECORD (6.2) YEAR YEAR Service Dates Service Dates Controller Upholstery On/off switch Seat Controller Lever Back Braking Armrests Recharge point Electrics Batteries Connections condition Levels Lights Connections Test run Discharge test Forwards Wheels and Tyres Reverse Wear Emergency stop...
- Page 25 6. INSPECTION & MAINTENANCE Suggestion Ask for help from your scooter dealer to inspect or replace the fuse, since the tiller shroud has to be removed first before you can replace the fuse. Tyres The condition of the tyres depends on how you drive and use your scooter. Inspecting tyre tread »...
-
Page 26: Storage
6. INSPECTION & MAINTENANCE 6.4 STORAGE Make sure the vehicle is stored under the following circumstances: Make sure the seat is set in the “Forward”position » Make sure the Power switch is turned to OFF » Suggestion Please store the scooter in a location where it is away from the direct sunlight, rain, or dew. -
Page 27: Trouble Shooting And Specification
7. TROUBLESHOOTING & SPECIFICATION TROUBLE SHOOTING Symptom Remedy The scooter will not switch on Try recharging the battery » Check the fuse and circuit breaker in the » scooter The scooter switches on, Ensure there is enough power in the »... - Page 28 7. TROUBLESHOOTING & SPECIFICATION SPECIFICATIONS Item Vertex Sport Dimension (L x W x H mm) 1080x495x940 (L x W x H inch) 42.5x19.5x37 Weight w/i battery 57.5kg /126.7 lbs Without battery 44kg / 96.8 lbs Battery 20AH Controller Dynamic 50A...
-
Page 29: Emi
Attention It is very important that you read this information regarding the possible effects of electromagnetic interference on your Vertex Sport scooter. Electromagnetic Interference (EMI) from radio wave sources Scooters may be susceptible to electromagnetic interference (EMI), which is interfering electromagnetic energy (EM) emitted from sources such as radio stations, TV stations, amateur radio (HAM) transmitters, two-way radios, and mobile phones. -
Page 30: Important Information
8. EMI 3. Long-range transmitters and transceivers, such as commercial broadcast transmitters (radio and TV broadcast antenna towers) and amateur (HAM) radios. Attention Other types of hand-held devices, such as cordless phones, laptop computers, AM/FM radios, TV sets, CD players, and small appliances such as electric shavers and hair dryers are not, so far as we know, likely to cause EMI problems to your scooter. -
Page 31: Warranty Declaration
9. WARRANTY DECLARATION Quality / Warranty Declaration Products are to be fit for purpose and of excellent quality and performance. For valid warranty claims I-GO will, at their discretion, replace / repair / refund items mutually agreed to be defective. The scooter’s warranty is as follows: »...
Need help?
Do you have a question about the MS01077 and is the answer not in the manual?
Questions and answers