
Related Manuals for TAT Electronics T66

Summary of Contents for TAT Electronics T66
- Page 1 User Manual Action Camera FCC ID: 2AM69T66 Model: Made by: Shenzhen TAT Electronics Co., Ltd Version: V1.0...
-
Page 2: Key Feature
1. Key Feature Video Resolution: 4K@15FPS, 2.5K@30FPS, 1080P@60FPS, 720P@120FPS Image Resolution: 14MP 2’’ TFT touch panel 3.85V/1200mAh removable Lithium-ion battery Support Wi-Fi connection, range up to 20 meters Customized App: Android & iOS Support Bluetooth Remote Controller Support Micro SD Card up to 32GB External MIC (optional)... - Page 3 2. Accessories in standard package Camera x 1 Spanner x 1 Waterproof case x 1 Lock bolt x 2 Remote controller x 1 3M adhesive for curved x 1 Quick release mount x 1 3M adhesive for flat mount x 1 Flat mount x 1 Portable case x 1 Curved mount x 1...
-
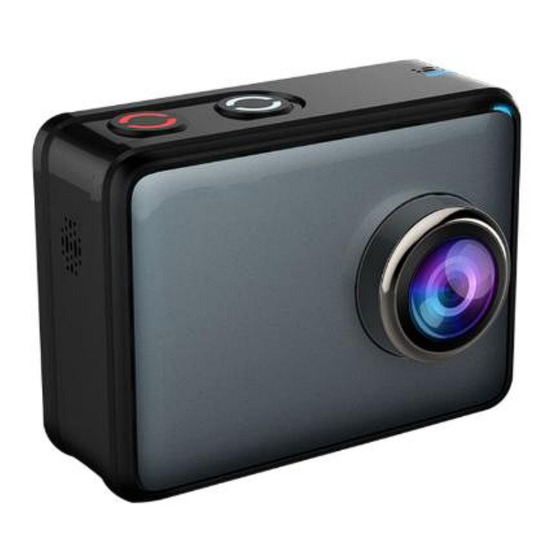
Page 4: Camera Diagram
3. Camera Diagram... -
Page 5: Using Your Camera
4. Using Your Camera Indicators 4.1 Power on & Power off the camera Turn on Long press Power button (A) for 3 seconds to power on, indicator A turns blue. Turn off Long press on Power button (A) for 3 seconds to power off, indicator A blinks and then turn off. -
Page 6: Insert A Memory Card
3. A new Micro SD Card should be formatted before using. 4.3 Charge the battery Before using the T66 for the first time, please fully charge the battery . Procedure: 1. Connect the T66 with a charger or device by Micro USB cable . -
Page 7: Setup Your Camera
4.5 Shoot Video Press Shutter button(B) when powered on, LED B blinks red twice a second; Press again to stop, and LED B light turns off. 4.6 Shoot a Single Picture Press Shutter button(B) once to shoot a single picture, LED B flashes red. 4.7 Mode Shift 1. - Page 8 Video SETUP Press Power Button (A) once to navigate, press Shutter Button (B) to Enter/Confirm selection. MODE To set the video mode, Manual, Looping, Auto Stop, Timelaspe. RESOLUTION To set the video resolution. To set the lens wide angle, Super Wide, Wide, Medium, Narrow. Video Quality To set the video quality.
-
Page 9: Scene Mode
Date stamp function will be unabled when turn on DIS, DIS function will be un abled when turn on date stamp To set the digital image stabilization. SCENE MODE To set different scene mode, Manual, Water, Riding, Winter, Diving, Night. You can easily access this mode with touch operation by swiping right. -
Page 10: Effect Setup
MEGA PIXEL To set the image resolution. To set the lens wide angle, Super Wide, Wide, Medium, Narrow. PICTURE Quality To set the picture quality. SCENE MODE To set different scene mode, Manual, Outdoor, Indoor, Portrait, Landscape, Night. You can easily access this mode with touch operation by swiping right. 5.3 EFFECT SETUP Long press Button (B) to enter in “Effect”, you will see the below interface. -
Page 11: White Balance
Press Power Button (A) once to navigate, press Shutter Button (B) to Enter/Confirm selection. ZOOM To zoom the image x1, x2, x3, x4. FILTER To define the amount of color saturation. AE METER To define which image areas are used to calculate the correct exposure. This allows user to set the light exposure value. -
Page 12: Upside Down
UPSIDE DOWN To rotate the screen. TIME STAMP To define if the time mark is displayed at the bottom of the videos or pictures. GENERAL SETTING Long press Button (B) to enter in “General”, you will see the below interface. CONTROL This allows user to set the microphone volume, Speaker volume, LCD Brightness. -
Page 13: Led Indicator
LED INDICATOR Turns off or on the LCD indicator. BLUETOOTH Turns off or on Bluetooth. QUICK REC The camera will start recording automatically after a few seconds as selected when powered on. AUTO LCD OFF This will determine if the LCD will turn off after 1 min, 3 min or 5 min. Press any key to turn the screen on. -
Page 14: Auto Power Off
AUTO POWER OFF The camera turns off when not in use after specified time. TV OUT Setting the desired TV standard, PAL or NTSC. TIME SETUP This allows user to adjust the date &time. LANGUAGE To select the device language, total 4 different languages. MEMORY FORMAT This is to format the SD card. -
Page 15: Software Info
SOFTWARE INFO To display the currently installed firmware version. Wi-Fi Selecting to turn on or turn off the Wi-Fi function. Wi-Fi INFO. To display the currently Wi-Fi SSID & Password. Note: You can easily access some settings such as Beep, Mic, Speaker, Invert and Wi-Fi with touch operation by swiping up. -
Page 16: Remote Control
Long press Shutter button (B) to select video/photo, press Shutter button (A) to navigate and press button (B) to open the video/photo. Long press button (B) to exit video/photo. Long press button (B) to enter upper Menu. Press button (A) to navigate and (B) to confirm. Notice: You can operate it more easily by tap the screen. - Page 17 LED indicator turns off accordingly. Replace a new button battery Like any battery, the one in the T66’ remote will eventually die. When it does, the red LED indicator flickers once per second. You need to replace with a new button...
- Page 18 4. Insert the new battery into the slot where the old battery was, with the flat surface up. 8. Wi-Fi Setup The T66 allows full camera control, live previewing and playback of photos/videos on most Smart phones and Tablets. a. Download the App “iSmart Pro” from “Google Play” or from the Apple “App Store”.
- Page 19 Note: You can change the Wi-Fi name in the menu setting. d. Connect your Phone to the “T66_xxxxxxxx” via Wi-Fi. The default Wi-Fi Password for the T66 is: 1234567890. Note: You can change the Wi-Fi password in the menu setting.
-
Page 21: Saving And Viewing Options
9. Saving and Viewing Options 9.1 Connecting to TV You can display the camera LCD screen on a TV screen. Note: You will need an extra Mini HDMI to HDMI cable, which is not included in the standard package. Turn the camera on; ... - Page 22 Cautions Do not drop the camera. Do not place heavy objects on the camera. Keep the camera away from water and liquids (unless equipped with waterproof case). This may cause the camera to malfunction. Recharge the battery via the USB cable. The camera should not be in heat over 55℃.
- Page 23 Note: Changes or modifications not expressly approved by the party responsible for compliance could void the user’s authority to operate the equipment. This device complies with Part 15 of the FCC Rules. Operation is subject to the following two conditions: (1) this device may not cause harmful interference, and (2) this device must accept any interference received, including interference that may cause undesired operation.
Need help?
Do you have a question about the T66 and is the answer not in the manual?
Questions and answers