Table of Contents
Advertisement
Installation/Owner's Manual
INSTALLER: Leave this manual with party responsible for use and operation.
OWNER: Retain this manual for future reference.
Contact your dealer with questions regarding installation, operation or service.
NOTICE: DO NOT discard this manual!
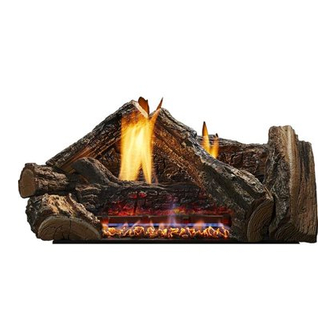
Glow Getter
Series
Models:
Appliance Setup, Care and Operation
Monessen • Glow Getter Owner's /Installation Manual • 4606-900 Rev. A • 8/17
WARNING:
FIRE OR EXPLOSION HAZARD
Failure to follow safety warnings exactly
could result in serious injury, death, or
property damage.
• DO NOT store or use gasoline or other flam-
mable vapors and liquids in the vicinity of this
or any other appliance.
• What to do if you smell gas
- DO NOT try to light any appliance.
- DO NOT touch any electrical switch. DO
NOT use any phone in your building.
- Leave the building immediately.
- Immediately call your gas supplier from
a neighbor's phone. Follow the gas sup-
plier's instructions.
- If you cannot reach your gas supplier, call
the fire department.
• Installation and service must be performed
by a qualified installer, service agency, or the
gas supplier.
In the Commonwealth of Massachusetts installation must be
performed by a licensed plumber or gas fitter.
See appliance installation manual for additional
Commonwealth of Massachusetts requirements.
• DO NOT install this unit in a bedroom or
bathroom.
1
Advertisement
Table of Contents

Subscribe to Our Youtube Channel
Related Manuals for Monessen Hearth GG18PV


Summary of Contents for Monessen Hearth GG18PV
- Page 1 Installation/Owner’s Manual Appliance Setup, Care and Operation INSTALLER: Leave this manual with party responsible for use and operation. OWNER: Retain this manual for future reference. Contact your dealer with questions regarding installation, operation or service. NOTICE: DO NOT discard this manual! WARNING: FIRE OR EXPLOSION HAZARD Glow Getter...
-
Page 2: Table Of Contents
Safety Alert Key: • DANGER! Indicates a hazardous situation which, if not avoided will result in death or serious injury. • WARNING! Indicates a hazardous situation which, if not avoided could result in death or serious injury. • CAUTION! Indicates a hazardous situation which, if not avoided, could result in minor or moderate injury. •... -
Page 3: Installation Standard Work Checklist
Installation Standard Work Checklist ATTENTION INSTALLER: Follow this Standard Work Checklist This standard work checklist is to be used by the installer in conjunction with, not instead of, the instructions contained in this installation manual. Customer: Date Installed: Lot/Address: Location of Fireplace: Installer: Model Dealer/Distributor Phone #... -
Page 4: Product Specific & Important Safety Information
Thermal Generator BTU/h BTU/h The millivolt gas log pilot is fitted with a millivolt (thermopile) GG18NV (0-4500 FT) 29,000 21,000 generator to provide power for remote activation. GG18PV (0-4500 FT) 29,000 22,500 1.35mm C. High Altitude Installations GG24NV (0-4500 FT) 37,000 27,000 1.8mm... -
Page 5: Getting Started
Getting Started A. Design and Installation Considerations C. Inspect Appliance and Components Installation MUST comply with local, regional, state and • Carefully remove the appliance and components from national codes and regulations. Consult insurance carrier, the packaging. local building inspector, fire officials or authorities having •... -
Page 6: Check Parts
D. Check Parts Verify contents to ensure you have received all parts. You should have the following: Models • Unvented gas log burner assembly • One (1) bag of crushed volcanic rock • Installation/operating instructions • Two (2) anchoring brackets •... -
Page 7: Millivolt Ignition Controls
F. Millivolt Ignition Controls Placement in Fireplace with a Restrictive Barrier The following are guidelines for placing a gas log set in a Natural Gas: An external regulator is required to reduce fireplace that has a restrictive barrier of the fireplace for supply pressure to a maximum of 10-1/2”... -
Page 8: Adequate Combustion Ventilation Air
H. Adequate Combustion Ventilation Air This heater shall not be installed in a confined space or Counter unusually tight construction unless provisions are provided Fireplace for adequate combustion and ventilation air. The National Fuel Gas Code, (ANSI Z223.1/NFPA54), defines a confined space as a space whose volume is less than 50 cubic feet per 1,000 BTU per hour (4.8m per kw) of the aggregate input rating of all appliances installed in... -
Page 9: Clearances And Height Requirements
Clearances and Height Requirements Heat resistant material (minimum requirements) with WARNING no wooden mantel or other combustible projection: The dimensions shown in Figures 3 through 11 and To install the gas logs into a fireplace with no wooden defined in the fireplace manufacturer's instructions mantel, shelf or other combustible projection above the are minimum clearances to maintain when installing fireplace opening, measure the heat resistant material... - Page 10 Heat resistant material (minimum requirements) with wooden mantel or other combustible projection: To install the heater with a wooden mantel, shelf or other combustible projection above, first measure the heat resis- tant material shown in Figure 3.3, then refer to Table B. 8"...
- Page 11 10" 10" or less 8" 6" 2¹⁄₂" Heat Heat Resistant Resistant 28" Material Material 12" min. 8" 14" 20¹⁄₂" 24⁵⁄₈" 28" Heater in Heater in Fireplace or Fireplace or Firebox Firebox Figure 3.6 -Minimum Mantel Clearance with No Hood — Figure 3.4 - Minimum Mantel Clearance with No Hood —...
- Page 12 The gas log heater must be installed at least 1 ⁄ " above any combustible flooring material, such as carpeting or tile, which is closer than 14" to the base of the fireplace. The minimum distance must be maintained from the top surface of carpeting, tile, etc.
-
Page 13: Before Installing The Appliance
Before installing the appliance: WARNING • Turn off gas supply to fireplace or firebox. Before installing in a solid fuel burning fireplace, • The chimney flue and firebox must be cleaned of Have the fireplace floor and chimney professionally soot, creosote, ashes and loose paint by a qualified cleaned to remove ashes, soot, creosote or other chimney cleaner. -
Page 14: Assembly Procedure
Assembly Procedure WARNING 1. Attach the two brackets shipped with the engine You must secure the gas log heater to the fireplace assembly to the engine base on the right and left hand floor. If not, the entire unit may move when you side using the two sheet metal screws shipped with the adjust the controls. -
Page 15: Gas Information
Gas Information WARNING WARNING Connecting directly to an unregulated propane/ Use new black iron or steel pipe. Internally tinned LPG tank can cause an explosion. copper or copper tubing can be used per National Fuel Code, section 2.6.3, providing gas meets hydrogen sulfide limits, and where permitted by local The heater gas inlet connection is a 3/8"... -
Page 16: Fuel Type
C. Fuel Type Note: Have the gas supply line installed in accordance with local codes, if any. If not, follow ANSI 223.1. Installation • This appliance is equipped for either natural or propane should be done by a qualified installer approved and/or gas. -
Page 17: Connect Optional Wall Switch Or Thermostat
F. Connect Optional Wall Switch or Label all wires prior to disconnection when Thermostat (vent free application only) servicing controls. Wiring errors can cause improper and dangerous operation. Verify 1. Use 18 awg, two-wire cable, 15 feet maximum length. proper operation after servicing. 2. -
Page 18: Connect Remote Receiver
1. Complete Millivolt System Check G. Connect Remote Receiver (“A” Reading - Thermostat contacts CLOSED - 1. Set remote receiver. See instructions included in Control Knob “ON” - Main burner should turn receiver kit. 2. Unplug the two terminals for the log switch from the a. - Page 19 BEFORE YOU BEGIN WARNING Glow Getter logs are sold separately and can be purchased The positioning of the logs is critical to the safe and in either a bark or split design. Do not handle these logs with clean operation of this heater. Sooting and other your bare hands.
-
Page 20: Gas Log Sets
Gas Log Sets 3. Hold log #2 with the flat surface away from you. WARNING Place log #2 toward the back to the left by positioning the pin locator hole on the bottom of the log over the • Gloves are recommended when handling logs to pin on the left-hand side and push back against the prevent skin irritation from loose fibers. -
Page 21: Log Placement (Moxie)
6. Hold log #5 with the pointed end toward the right. 9. Hold Log #8 with the branched end away from you. Place log #5 by positioning the pin locator hole on Place log #8 by positioning the pin locator hole on the bottom of the log over the left pin behind the grate the bottom of the log over the pin on log #1 and by and resting the left end of the log over the notch on... - Page 22 7. Hold log #6 with the flat end toward the bottom. Place log #6 by positioning the two pin locator holes on the bottom of the log over the two pins on log #4 and log #5. See Figure 5.16. Figure 5.12 - Log #2 Placement 4.
-
Page 23: Flame Appearance
In normal operation at full rate after 15 minutes, the PLACE THE DECORATIVE ROCK following flame appearances should be observed: The volcanic rocks are shipped with your log set. The vol- Burner will have a random pattern of yellow flames as canic rocks may be placed around the unit on the floor of shown in Figure 5.21. -
Page 24: Owner's Manual
Owner’s Manual Care & Operation Owner’s Manual Care and Operation INSTALLER: Leave this manual with party responsible for use and operation. OWNER: Retain this manual for future reference. Contact your dealer with questions regarding installation, operation or service. NOTICE: DO NOT discard this manual! WARNING: FIRE OR EXPLOSION HAZARD Glow Getter... -
Page 25: Congratulations
Read this manual before operating this appliance. Please retain this Owner’s Manual for future reference. Read the Installation Manual before making any installation or finishing changes. A. Congratulations This owner’s manual should be retained for future reference. We suggest that you keep it with your other Congratulations and thank you for selecting a Monessen important documents and product manuals. -
Page 26: Limited Lifetime Warranty
B. Limited Lifetime Warranty Hearth & Home Technologies LIMITED LIFETIME WARRANTY Hearth & Home Technologies, on behalf of its hearth brands (“HHT”), extends the following warranty for HHT gas, wood, pellet, coal and electric hearth appliances that are purchased from an HHT authorized dealer. WARRANTY COVERAGE: HHT warrants to the original owner of the HHT appliance at the site of installation, and to any transferee taking ownership of the appliance at the site of installation within two years following the date of original purchase, that the HHT appliance... - Page 27 B. Limited Lifetime Warranty (continued) WARRANTY CONDITIONS: • This warranty only covers HHT appliances that are purchased through an HHT authorized dealer or distributor. A list of HHT authorized dealers is available on the HHT branded websites. • This warranty is only valid while the HHT appliance remains at the site of original installation. •...
-
Page 28: Important Safety & Operating Information
Important Safety and Operating Information A. Appliance Safety Clear Space WARNING! DO NOT place combustible objects in front WARNING! DO NOT operate gas log set before read- of the fireplace. High temperatures may start a fire. See ing and understanding operating instructions. Failure Figure 9.1. - Page 29 Important Safety and Operating Information (con’t) OWNER Please retain these instructions for future reference. WARNING • Any change to this heater or its controls can be dangerous. • Improper installation or use of the heater can cause serious injury or death from fire, burns, explosion or carbon monoxide poisoning.
-
Page 30: General Operating Parts
B. General Operating Parts 20. Input ratings are shown in BTU per hour and are for elevations up to 4,500 feet. For elevations above 4,500 Figure 7.2 references the general operating parts of the each 1,000 feet above sea level. Refer to the National appliance and the section of this manual in which they are Fuel Gas Code. -
Page 31: Application Certification
Input Input Orifice Orifice BTU/h BTU/h LABORATORY: CSA TYPE: Unvented Room Heater GG18NV (0-4500 FT) 29,000 21,000 STANDARD: ANSI Z21.11.2-2016 (Unvented Application) GG18PV (0-4500 FT) 29,000 22,500 1.35mm ANSI Z21.60-2012/CSA2.26-2012 (Vented Application) GG24NV (0-4500 FT) 37,000 27,000 1.8mm 2.5mm GG24PV... -
Page 32: Lighting Instructions
Lighting Instructions FOR YOUR SAFETY READ BEFORE LIGHTING WARNING If you do not follow these instruction exactly, a fire or explosion may result causing property damage, personal injury or loss of life. A. This appliance is equipped with a piezo ignition device which lights the pilot. If piezo is not working properly see Match Lighting Instructions. -
Page 33: Millivolt Control Lighting Instructions
Lighting Instructions (con’t) MILLIVOLT CONTROL LIGHTING INSTRUCTIONS 1. STOP! Read the safety information label. 2. Make sure the manual shutoff valve is fully open. 3. This gas log set is equipped with an ignition device (piezo) which automatically lights the pilot. If piezo ignitor does not light the pilot, refer to instructions for Match Lighting Instructions. -
Page 34: Match Lighting Instructions
Lighting Instructions (con’t) MATCH LIGHTING INSTRUCTIONS 1. Remove any items necessary for easy access to the pilot (for example: logs, screens, etc.). 2. Follow appropriate lighting instructions found previously. Instead of pushing and releasing the piezo button, light a match and hold the flame to the end of the pilot and ignite the pilot. 3. -
Page 35: Maintenance And Service
Maintenance and Service Any safety screen removed for servicing must be replaced prior to operating the unvented room heater. When properly maintained, your fireplace will give you many years of trouble-free service. Contact your dealer to answer questions regarding proper operation, trouble- shooting and service for your appliance. -
Page 36: Burner Ignition & Operation
C. Burner Ignition and Operation D. Cleaning and Servicing Frequency: Annually Annual inspection and cleaning by your dealer or By: Qualified Service Technician qualified service technician is recommended to pre- vent malfunction and/or sooting. Tools needed: Protective gloves, vacuum cleaner, whisk broom, flashlight, voltmeter, indexed drill bit set, and a manometer. -
Page 37: Troubleshooting
Troubleshooting WARNING Turn appliance OFF and allow to cool before servicing. Only a qualified service person should service and repair the heater. MILLIVOLT CONTROL SYSTEM NOTE: All troubleshooting items are listed in order of operation. PROBLEM POSSIBLE CAUSE SOLUTION Ignitor electrode positioned wrong. Replace ignitor. -
Page 38: Service Parts & Accessories
Service Parts A. Service Parts GG18NV Service Parts Beginning Manufacturing Date: Sept 2017 Glo Getter 18” Hearth Kit Ending Manufacturing Date: Active Part number list on following page. 09/17 Monessen • Glow Getter Owner’s /Installation Manual • 4606-900 Rev. A • 8/17... - Page 39 GG18NV Service Parts Beginning Manufacturing Date: Sept 2017 Ending Manufacturing Date: Active IMPORTANT: THIS IS DATED INFORMATION . Parts must be ordered from a dealer or Stocked Hearth and Home Technologies does not sell directly to consumers distributor. . Provide model number and serial number when requesting service parts from your dealer or distributor.
- Page 40 GG18PV Service Parts Beginning Manufacturing Date: Sept 2017 Glo Getter 18” Hearth Kit Ending Manufacturing Date: Active Part number list on following page. 09/17 Monessen • Glow Getter Owner’s /Installation Manual • 4606-900 Rev. A • 8/17...
- Page 41 GG18PV Service Parts Beginning Manufacturing Date: Sept 2017 Ending Manufacturing Date: Active IMPORTANT: THIS IS DATED INFORMATION . Parts must be ordered from a dealer or Stocked Hearth and Home Technologies does not sell directly to consumers distributor. . Provide model number and serial number when requesting service parts from your dealer or distributor.
- Page 42 GG24NV Service Parts Beginning Manufacturing Date: Sept 2017 Glo Getter 24” Hearth Kit Ending Manufacturing Date: Active Part number list on following page. 09/17 Monessen • Glow Getter Owner’s /Installation Manual • 4606-900 Rev. A • 8/17...
- Page 43 GG24NV Service Parts Beginning Manufacturing Date: Sept 2017 Ending Manufacturing Date: Active IMPORTANT: THIS IS DATED INFORMATION . Parts must be ordered from a dealer or Stocked Hearth and Home Technologies does not sell directly to consumers distributor. . Provide model number and serial number when requesting service parts from your dealer or distributor.
- Page 44 GG24PV Service Parts Beginning Manufacturing Date: Sept 2017 Glo Getter 24” Hearth Kit Ending Manufacturing Date: Active Part number list on following page. 09/17 Monessen • Glow Getter Owner’s /Installation Manual • 4606-900 Rev. A • 8/17...
- Page 45 GG24PV Service Parts Beginning Manufacturing Date: Sept 2017 Ending Manufacturing Date: Active IMPORTANT: THIS IS DATED INFORMATION . Parts must be ordered from a dealer or Stocked Hearth and Home Technologies does not sell directly to consumers distributor. . Provide model number and serial number when requesting service parts from your dealer or distributor.
-
Page 46: Accessories
B. Accessories HILOKTN - Hi/Lo Kit Natural HILOKTP - Hi/Lo Kit Propane Monessen • Glow Getter Owner’s /Installation Manual • 4606-900 Rev. A • 8/17... -
Page 47: Massachusetts Residents Only
MASSACHUSETTS RESIDENTS ONLY Please read and follow these special requirements NOTE REGARDING VENTED PRODUCTS 2. Approved Carbon Monoxide Detectors. Each carbon This product must be installed by a licensed plumber or monoxide detector as required in accordance with the above gas fitter when installed within the Commonwealth of provisions shall comply with NFPA 720 and be ANSI/UL 2034 Massachusetts. -
Page 48: Contact Information
C. Contact Information Monessen, a brand of Hearth & Home Technologies 7571 215 Street West, Lakeville, MN 55044 www.monessenhearth.com Please contact your dealer with any questions or concerns. For the location of your nearest dealer, please visit www.monessenhearth.com - NOTES - ________________________________________________________________________________ ________________________________________________________________________________ ________________________________________________________________________________...
Need help?
Do you have a question about the GG18PV and is the answer not in the manual?
Questions and answers