Table of Contents
Advertisement
Advertisement
Table of Contents

Related Manuals for Hitachi SPX-WKT2


Summary of Contents for Hitachi SPX-WKT2
- Page 1 WIRED REMOTE CONTROLLER INSTRUCTION MANUAL MODEL SPX-WKT2...
-
Page 2: Table Of Contents
CONTENTS 1. SAFETY PRECAUTIONS ........... 2. NAMES AND FUNCTIONS OF REMOTE CONTROLLER ........... 3. PREPARATION BEFORE OPERATION ........... ADJUSTING DATE/TIME ........... LANGUAGE SETTING ........... 4. OPERATION METHOD ........... OPERATION START/STOP ........... BASIC OPERATION ........... OPERATION MODE SELECT ........... ROOM TEMPERATURE SETTING ........... -
Page 3: Safety Precautions
1. SAFETY PRECAUTIONS Also see instruction manual attached to the indoor unit. • Please read the “Safety Precaution” carefully before operating the unit to ensure correct usage of the unit. • Pay special attention to signs of “ Warning” and “ Caution”. -
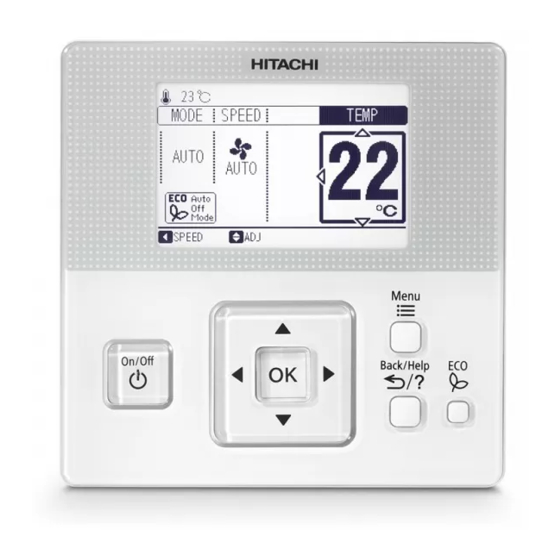
Page 4: Names And Functions Of Remote Controller
2. NAMES AND FUNCTIONS OF REMOTE CONTROLLER The figure below shows all the indications for reference. The actual display during operation is different. Display part Eco Auto Off Indicator It is indicated when the eco auto off function is set. Sleep Timer Indicator It is indicated when the sleep Fan Speed Indicator... -
Page 5: Preparation Before Operation
3. PREPARATION BEFORE OPERATION 3.1 ADJUSTING DATE/TIME This function is used to adjust the date and time. 5 After the setting is completed, press "OK" and the confirmation screen will be displayed. Periodic time setting is recommended. (Clock accuracy: difference within +/-5 seconds by month). As for this remote controller, the clock can work up to 72 hours when power failure occurs. -
Page 6: Operation Method
4. OPERATION METHOD 4.1 OPERATION START/STOP 1 Operation start 2 Operation stop Press " " (START/STOP). The operation indicator lamp Press " " (START/STOP) again. The operation indicator lamp will be turned on and the operation will be started. will be turned off and the operation will be stopped. 4.2 BASIC OPERATION 1 Item Selection 2 Changing Setting... -
Page 7: Fan Speed Select
4.5 FAN SPEED SELECT 2 By pressing "" or "", the operation mode will be changed 1 Press "" or "" and select "SPEED". as follows. NOTE • The fan speed of dehumidifying operation can select "LOW" and "SILENT" only. •... -
Page 8: Menu Operation
5. MENU OPERATION 5.1 MENU 2 Select the function by pressing "" or "" and press "OK". All setting functions can be displayed in the menu. (" " will be displayed if the function is not available.) Refer to the following sections for each function. NOTE : Unable to set If the function with "... -
Page 9: Simple Timer Operation ("Functions" Menu)
5.2 SIMPLE TIMER OPERATION ("Functions" menu) 4 Press "OK" to finish the simple timer setting. This function is used to start or stop the unit operation at the The confirmation screen will be displayed. setting time. The timer operation contents can be set from "Once"... -
Page 10: Sleep Timer Operation ("Functions" Menu)
5.3 SLEEP TIMER OPERATION ("Functions" menu) 4 Press "OK" to finish the sleep timer setting. This function is Off Timer operation to stop the operation if The confirmation screen will be displayed. preset time has passed when you sleep. 1 Select "Sleep Timer" from the menu and press "OK". The sleep timer setting will be displayed. -
Page 11: Weekly Timer Operation ("Functions" Menu)
5.4 WEEKLY TIMER OPERATION ("Functions" menu) 5.4.1 Weekly schedule setting • When "ON Time" or "OFF Time" is selected, the setting time can be set every 1 minute by pressing "" or "". This function is used to start or stop the unit operation at the Press and hold ""... - Page 12 5.4.2 Copy and cancel the reservation schedule ◆ How to copy and paste 1 Select "Weekly Timer" from the menu and press "OK". Select "Day/Time Setting" by pressing "" or "" and press "OK". "Weekly Schedule Setting" screen will be displayed. NOTE •...
- Page 13 ◆ How to delete "Weekly schedule setting" 1 Select "Weekly Timer" from the menu and press "OK". 4 Press " "(return/help) to return to "Timer Setting" screen. Select "Day/Time Setting" by pressing "" or "" and press Press "OK". The confirmation screen will be displayed. "OK".
- Page 14 5.4.3 Holiday setting This function is used to deactivate the schedule operation temporarily. This function is used to deactivate the schedule operation just for one day. After that, the schedule operation will recover automatically. This function is used to set irregular schedules such as national holidays.
-
Page 15: Leave Home Operation ("Functions" Menu)
5.5 LEAVE HOME OPERATION ("Functions" menu) Prevent the room temperature from falling too much when no one is at home. The initial setting temperature is 10°C and the temperature range can be set between 10°C and 16°C. This operation is able to operate by "Continuous operation" or "Day timer operation". - Page 16 4 Set the temperature by pressing "" or "". • After reaching the set number of operation days for leave Temperature range can be set between 10°C and 16°C. home or leave home operation is canceled, the unit will Keep pressing and the value will change more quickly. operate in previous mode.
-
Page 17: Powerful Operation ("Functions" Menu)
5.6 POWERFUL OPERATION ("Functions" menu) "Powerful" operation is set during operation (Auto, Heating, Dehumidifying and Cooling of Fan), the air conditioner performs at the maximum power. 5.6.1 To START "Powerful" operation 1 Select "Powerful" from the menu and press "OK". The confirmation screen will be displayed. -
Page 18: Info Function ("Functions" Menu)
5.7 INFO FUNCTION ("Functions" menu) 5.8 FILTER SIGN RESET ("Functions" menu) This is the function to display the monthly power consumption When the unit is operated for a total of about 200 hours, on the remote controller screen. " " will be indicated on the screen of normal mode, it is time to clean the filter. -
Page 19: Clean Operation ("Functions" Menu)
5.9 CLEAN OPERATION ("Functions" menu) Drying indoor heat exchanger after cooling operation to 5.9.2 To cancel "Clean" operation prevent mildew. • Press " " (START/STOP). Or 5.9.1 To start "Clean" operation 1 When unit is OFF, select "Clean" from the menu and press "OK". -
Page 20: Operation Lock ("Functions" Menu)
5.10 OPERATION LOCK ("Functions" menu) This function is used to lock the operation mode from the 3 Select "Yes" by pressing ""or "" and press "OK". remote controller. The remote controller can be set to fix the "Heating" mode (including "Fan"), "Cooling" mode and "Dehumidifying" mode (including "Fan") operations. -
Page 21: Daylight Saving Time("Remocon Settings" Menu)
5.11 DAYLIGHT SAVING TIME ("Remocon Settings" menu) This function adjusts time forward or backward an hour when 5.11.2 To stop Daylight Saving Time daylight saving time starts or ends. 1 Select "Daylight Saving Time" from the menu and press "OK". 5.11.1 To start Daylight Saving Time 1 Select "Daylight Saving Time"... -
Page 22: Eco Operation
6. ECO OPERATION The "Eco" lamp on the indoor unit lights up. There are two kinds of "Eco operation" with sensor or The sensor starts to detect the presence of people in the room. without sensor, depending on models. Please refer to [Names and Functions of each part] in the unit instruction manual to verify if your unit is equipped with a sensor and read the following instruction on "Eco operation"... -
Page 23: Help Menu
7. HELP MENU 7.2 Indication on LCD 7.1 Help menu The explanation of indicators on LCD and operations can be This function is used when the explanation of each icon on LCD found in the help menu. is required. The purpose of this function is to support manual operation. 1 Select “About Indication”... -
Page 24: About Operation
7.4 Contact information 7.3 About operation The screen will display contact information and the latest This function is used when the explanation of operations and alarm code. operation methods is required. 1 Select "Contact Information" from the help menu and press 1 Select "About Operation"... -
Page 25: Other Indications
8. OTHER INDICATIONS 8.2 In abnormal condition 8.1 In normal condition 8.2.1 Communication failure 8.1.1 External device It occurs when can not communicate with this remote "External device" is turned on. controller and the indoor unit. In this case, the operation has been operated from external The operation indicator (Red) is flashing and it continues to device except the remote controller.
Need help?
Do you have a question about the SPX-WKT2 and is the answer not in the manual?
Questions and answers