Table of Contents
Advertisement
Advertisement
Table of Contents

Summary of Contents for GammaTech DURABOOK R11AH
- Page 1 EN-1...
-
Page 2: Table Of Contents
Table of Contents ..................4 EFORE TART ..................4 ACKAGE ONTENTS ..................5 RODUCT VERVIEW Front View ......................5 Back View ......................6 Bottom View ......................7 Left View ....................... 7 Right View ......................8 ..................8 TATUS NDICATORS GETTING STARTED ..............9 ................ - Page 3 ..................37 ECURITY & E ..................38 APPENDIX ................39 ....................39 OPYRIGHT ................39 EGULATORY TATEMENT Federal Communications Commission Statement ............39 Declaration of Conformity ..................39 RF exposure warning ..................... 40 Canada, Industry Canada (IC) Notices ..............40 Battery Disposal ....................
-
Page 4: Before You Start
Before You Start Before You Start Congratulations on your purchase of this tablet PC. This rugged tablet PC is portable and provides users with maximum mobile computing experience in a wide range of working environments. Before you begin using your tablet PC, read this chapter to familiarize yourself with the main components installed in the system. -
Page 5: Product Overview
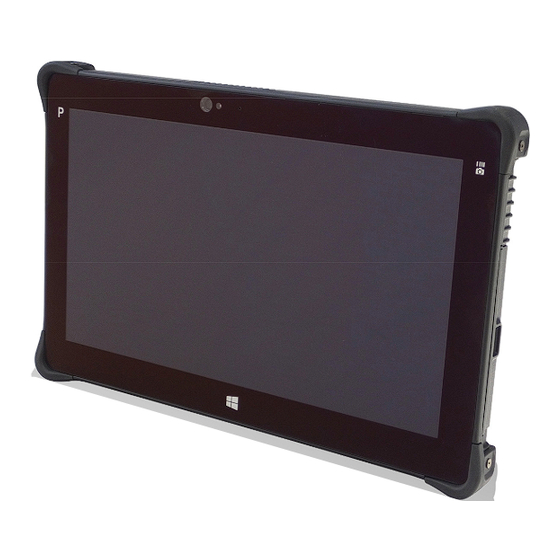
Before You Start Product Overview Front View Item Description Program button Tap to enter the chosen program. (user definition) Front camera Use for video conference. Ambient light sensor Use to detect the current level of visible light in the surrounding environment. Microphone Record the surrounding sound. -
Page 6: Back View
Before You Start Back View Item Description Barcode scanner Scan barcodes. Camera LED flash Provide additional lighting when taking pictures under low light environment. Rear camera Use to take pictures. Battery compartment Contain the battery. Battery latch release Press and hold the button to slide the battery button latch to the unlock position. -
Page 7: Bottom View
Before You Start Bottom View Item Description Audio Combo jack Connect a headphone or an external speakers or microphone. USB 3.0 ports (x2) Connect USB 3.0 peripheral devices. Memory card slot Use to insert memory cards to transfer pictures, music, and data between your Tablet PC and flash compatible devices. -
Page 8: Right View
Before You Start Right View Item Description Docking connector Connect the tablet PC to a docking station. DC-in jack Connect the power adapter. Status Indicators The status indicators in the upper side of the tablet PC light up when a particular function of the tablet PC is active. -
Page 9: Getting Started
Getting Started Getting Started This chapter will help you get started using the device. Installing the Battery To install the battery, follow the steps below: 1. Align and insert the battery to the battery compartment. 2. Push completely until the battery locks into place. -
Page 10: When To Replace The Battery Pack
Getting Started When to replace the Battery Pack The battery performance gradually decreases over time and usage. We recommend you to replace your battery pack after 18 to 24 months of usage. Removing the Battery To remove the battery, follow the steps below: 1. -
Page 11: Connecting The Power
Getting Started Connecting the Power Your tablet PC can be powered up using the AC adapter or the Lithium-ion battery. Connecting the AC Adapter The AC adapter powers up your tablet PC and charges the battery. 1. Connect the AC adapter to the DC-in jack of your tablet PC. 2. -
Page 12: Starting Your Tablet Pc
Getting Started Starting Your Tablet PC Turning On Your Device Press the button until the Power LED lights up. Turning Off Your Device It is important to properly shut down your tablet PC to avoid the loss of unsaved data. To shut down your tablet PC, do the following: On Windows 8 1. -
Page 13: Operating Your Tablet Pc
Operating Your Tablet PC Operating Your Tablet PC This chapter will guide you on how to use your Tablet PC. Using the Quick Menu To enter the Quick menu: • On Windows 8: In Apps view, tap Quick Menu ( ). - Page 14 Operating Your Tablet PC Icon Item Description WLAN Tap the icon to enable/disable the Wi-Fi (WLAN) function. Tap the icon to enable/disable the WWAN/GPS function. WWAN/GPS (Windows 7 only) Tap the icon to enable/disable the WWAN function. WWAN (Windows 8 only) Bluetooth Tap the icon to enable/disable the Bluetooth function.
- Page 15 Operating Your Tablet PC Icon Item Description Tap the icon to display/hide the on-screen keyboard Keyboard (OSK.exe). (Windows 7 only) Mobility Tap the icon to adjust brightness, screen orientation, center volume, external display, battery status, sync, wireless network, and presentation settings. Barcode Tap the icon to enable/disable the Barcode function.
-
Page 16: Configuring The Setup Menu Settings
Operating Your Tablet PC Configuring the SETUP Menu Settings In Quick Menu, you can set the following settings via Setup menu: a. Programmable Button b. External GPS Antenna c. Light Sensor d. External WWAN Antenna EN-16... -
Page 17: Configuring Hotkey
Operating Your Tablet PC Configuring Hotkey Tap the Programmable Button tab to configure the Function or Program button. • If the device is not installed with a barcode scanner, the Function button can be set as the shutter button when using the Camera. •... -
Page 18: Configuring External Wwan Antenna Switching Mode
Operating Your Tablet PC Configuring External WWAN Antenna Switching Mode Tap the External WWAN Antenna tab to enable/disable the device to automatically switch to the external WWAN antenna when it is affixed on a docking station. • Dock with external WWAN antenna: The device will be automatically switched to the external WWAN antenna when docking. -
Page 19: Configuring Light Sensor Settings
Operating Your Tablet PC Configuring Light Sensor Settings Tap the Light Sensor tab to enable/disable the automatic light sensor function, specify and adjust the brightness level. Current ambient brightness reading Current preset brightness level Tap to restore the default settings. Set the range of illumination settings. - Page 20 Operating Your Tablet PC Configuring External GPS Antenna Switching Mode Tap the External GPS Antenna tab to enable/disable the device to automatically switch to the external GPS antenna when it is affixed on a docking station. • Dock with external GPS antenna: The device will be automatically switched to the external GPS antenna when docking.
-
Page 21: Using The Camera
Operating Your Tablet PC Using the Camera Durabook Camera Scan Application This tablet PC supports Durabook Camera Scan application that enables users to take photos using the device camera. Launch the application There are two ways to launch the application: •... - Page 22 Operating Your Tablet PC Delete Photos Press the Play button “ ” to switch to Playback Mode. Use the Forward or Backward button “ ” to select the photo that you want to delete. Press the Delete button “ ” and then choose Yes to delete the current photo.
- Page 23 Operating Your Tablet PC How to Make Adjustments on Features: Press the Setup button “ ” to enter the Setup menu. Camera Selection: There are three cameras that you can select: “ ” – the camera is available and ready to use. •...
- Page 24 Operating Your Tablet PC Preview Size: There are two preview size options that you can select: Press the Leave button “ ” after you have chosen the desired preview size. Geotagging: Tap ON to enable the Geotagging feature. Press the Leave button “ ”...
-
Page 25: Making Connections
Making Connections Making Connections This chapter will guide you on installing peripheral devices to maximize the use of your tablet PC. Installing the Memory Card Your Tablet PC supports different types of memory cards to provide faster data transfer. Supported types: SDHC, SDXC To insert a memory card: 1. -
Page 26: Installing The Sim Card
Making Connections Installing the SIM Card You can use a SIM card for wireless internet access. NOTE • Check the availability of service and plan rates of data connection with your network service provider. To insert a SIM card: 1. Push down and pull to open the I/O port cover. 2. -
Page 27: Connecting Usb Devices
Making Connections Connecting USB Devices You can connect your tablet PC to other USB devices, such as a mouse, keyboard, digital camera, printer, or an external hard disk drive. 1. Push down and pull to open the I/O port cover. 2. -
Page 28: Connecting To Wireless Connections
Making Connections Connecting to Wireless Connections Your tablet PC can connect and communicate with other Bluetooth-enabled devices. Connecting to a Bluetooth Device Your tablet PC can connect and communicate with other Bluetooth-enabled devices. To add a device, follow the steps below: 1. - Page 29 Making Connections 6. Tap on a device, then tap Next to continue. 7. Tap Close to complete the pairing connection. NOTE • Most Bluetooth-enabled devices need to be paired with your tablet PC. The PIN you enter on the tablet PC must be the same PIN to be entered on the other Bluetooth device.
-
Page 30: Connecting To A Wireless Local Area Network
Making Connections Connecting to a Wireless Local Area Network Your tablet PC comes with a WLAN module. A wireless network can be added either when the network is detected or by manually entering the settings information. To connect, follow the steps below: 1. - Page 31 Making Connections Connecting to a Wireless Wide Area Network (WWAN) With WWAN function, it allows your tablet PC to connect to the Internet using mobile or cellular data networks. To enable the function, follow the steps below: 1. Insert a valid SIM card into the SIM card slot. 2.
-
Page 32: Using The Bios Setup Utility
Using the BIOS Setup Utility Using the BIOS Setup Utility Your tablet PC has a BIOS setup utility which allows you to configure important system settings, including settings for various optional functions of the tablet PC. This chapter explains how to use the BIOS setup utility. BIOS Setup Menu The BIOS Setup Utility allows you to configure your Tablet PC basic settings. - Page 33 Using the BIOS Setup Utility Navigating and Entering Information in BIOS Use the following keys to move between fields and to enter information: Keyboard Description Selects screen. Moves up/down to select items. Enter Confirms the selection and enters the selected menu screen. + / - Changes an option for the selected items.
-
Page 34: Main Menu
Using the BIOS Setup Utility Main Menu The Main menu displays the system overview information about the device, including the system date and time. Item Description BIOS Information Display the BIOS version detected during boot up. Display the CPU type and speed, total memory, mainboard System Information version, Intel PCH SKU name, ME FW version, and ME Firmware SKU. -
Page 35: Advanced Menu
Using the BIOS Setup Utility Advanced Menu The Advanced menu allows you to configure specific system settings. Item Description Wake on LAN from Enable/disable the system to wake on the unit from Sleep S4/S5 mode status when the AC power is connected. BARCODE Display the barcode function status. -
Page 36: Boot Menu
Using the BIOS Setup Utility Boot Menu The Boot menu allows you to configure the boot settings and boot sequence. Item Description Bootup NumLock Select the keyboard NumLock state. State Enable/disable boot with initialization of a minimal set of Fast Boot devices required to launch active boot option. -
Page 37: Security Menu
Using the BIOS Setup Utility Security Menu The Security menu allows you to set or change the Administrator and User passwords. Item Description Administrator Create or change the Administrator password. Password User Password Create or change the User password. EN-37... -
Page 38: Save & Exit Menu
Using the BIOS Setup Utility Save & Exit Menu The Save & Exit menu allows you to save/discard the changes and restore the default values for all setup options before leaving the BIOS Setup Menu. Item Description Save Changes and Reset the system after saving the changes. -
Page 39: Appendix
Appendix Appendix Copyright © Copyright 2014. All rights reserved. No part of this user manual may be transmitted, stored in a retrieval system, or translated into any language or computer language, in any form or by any means, without the prior written permission of the manufacturer. Information is subject to change without prior notice. -
Page 40: Rf Exposure Warning
Appendix This device may not cause harmful interference This device must accept any interference received, including interference that may cause undesired operation. RF exposure warning This equipment must be installed and operated in accordance with provided instructions and must not be co-located or operating in conjunction with any other antenna or transmitter. -
Page 41: Battery Disposal
Appendix Informations concernant l'exposition aux fréquences radio (RF) La puissance de sortie émise par l’appareil de sans fil est inférieure à la limite d'exposition aux fréquences radio d'Industry Canada (IC). Utilisez l’appareil de sans fil de façon à minimiser les contacts humains lors du fonctionnement normal. Ce périphérique a été... - Page 42 Appendix CAUTION FOR ADAPTER THE TABLET PC IS FOR USE WITH DEDICATED AC ADAPTER. BATTERY SAFETY DANGER OF EXPLOSION IF BATTERY IS INCORRECTLY REPLACED. REPLACE ONLY WITH THE SAME OR EQUIVALENT TYPE RECOMMENDED BY THE MANUFACTURER. DISPOSE OF USED BATTERIES ACCORDING TO THE MANUFACTURER'S INSTRUCTIONS.
-
Page 43: Safety Instructions
Appendix Safety Instructions These safety instructions should always be observed to ensure safe operation when handling the device. • Do not place this device on an unstable table or surface. The device may fall, causing serious damage to its housing and components. •...
Need help?
Do you have a question about the DURABOOK R11AH and is the answer not in the manual?
Questions and answers