Table of Contents
Advertisement
USER
MANUAL
Be er Brew Au tom a ti
c™
Mo del 30 and 6 0
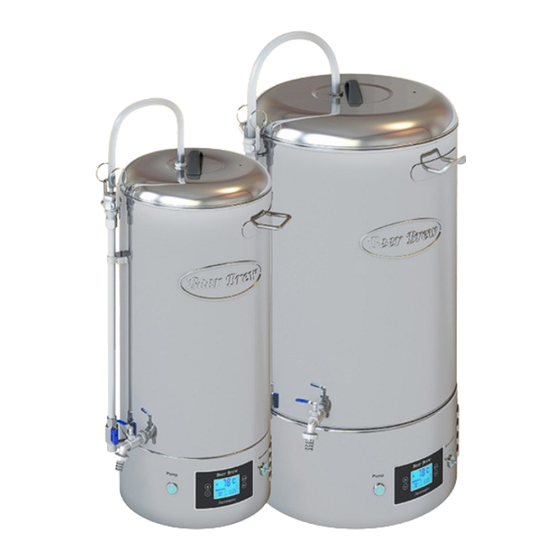
Brew your own beer. An all-in-one electric brewing system with an easy to use brew controller.
Mashing – Lautering – Boling in one kettle. Can hold up to 9Kg (model 30) or 16Kg (model 60) of malt.
Choose between brewing using either the malt basket or the false bottom.
Advertisement
Table of Contents

Subscribe to Our Youtube Channel
Summary of Contents for Saice Beer Brew 30
- Page 1 USER MANUAL Be er Brew Au tom a ti c™ Mo del 30 and 6 0 Brew your own beer. An all-in-one electric brewing system with an easy to use brew controller. Mashing – Lautering – Boling in one kettle. Can hold up to 9Kg (model 30) or 16Kg (model 60) of malt. Choose between brewing using either the malt basket or the false bottom.
-
Page 5: Table Of Contents
TA B L E O F C O N T E N T S C H A P T E R 1 ........................6 Safety instructions C H A P T E R 2 ..........................7 Specifications C H A P T E R 3 ...........................8 The equipment 3.1 All parts explained ......................8... -
Page 6: Safety Instructions
C h a p t e r 1 S A F E T Y I N S T R U C T I O N S Read this user manual before using the Beer Brew Automatic™. • During use, the surface temperature of the brew •... -
Page 7: Specifications
C h a p t e r 2 S P E C I F I C AT I O N S MODEL 30 MODEL 60 € 304 Stainless steel* 304 Stainless steel* Material 0,6mm wall thickness 0,6mm wall thickness Single wall Double wall Weight w/ lid w/ Malt basket = 8 kg... -
Page 8: The Equipment
Chapter 3 T H E E Q U I PM E N T 1: Brew kettle 2: Lid 3: Malt basket 4: Bracket (for the malt basket) 5: False bottom 6: Whirlpool pipe 7: Immersion chiller Note: The Beer Brew Automatic™, model 60 also includes a stainless steel mixing paddle. When brewing you must decide whether you want to use either the malt basket or false bottom equipment setup. - Page 9 CamLock fitting to the riser pipe male CamLock fitting and pull both levers evenly to an upward position before switching on the pump. After use and when the pump is switched off, pull the lever rings downwards to unlock and release the CamLock fittings.
-
Page 10: Getting Started
fitting. When using the pump for cooling in conjunction with the whirlpool pipe, you will get a rotating movement in the wort, hence a quicker cooling of the wort. The whirlpool effect can also be used for whirlpool hopping, or with a hop-stand, i.e. -
Page 11: Before Your First Brew
4.2 - BEFORE YOUR FIRST BREW Close the tap and riser pipe valve. Add about 5 litres of water to the brew kettle. • Check for any water leakage underneath the brew kettle or around any of the fittings. If any water is found, check and tighten fittings. -
Page 12: Understanding The Beer Brew Automatic™ Brew Controller
5.2 - UNDERSTANDING THE BEER BREW AUTOMATIC™ BREW CONTROLLER The Beer Brew Automatic™ has an easy to use built-in controller that has been designed to support the three phases of brewing, as described earlier in this user manual. Each phase is completed by heating up and maintaining the temperature for a certain amount of thime, and where each phase has a different function in the beer brewing process. -
Page 13: The Brew Controller Display Explained
5.3 - THE BREW CONTROLLER DISPLAY EXPLAINED Current temperature reading, determined by a sensor The exception is the target strike/mash temperature for phase I. in the bottom of the brew kettle. Will display ambient The setting for the target strike temperature (the temperature temperature whenever the power cord is connected. -
Page 14: Using The Brew Program Selector
5.3 B - THE LAUTERING PHASE If a power failure occurs during boiling, and when regaining • • • power you should set the program selector to position “ ” Heating up to and maintaining the desired temperature in the and then press the brew controller “ON”... -
Page 15: How To Brew With Beer Brew Automatic
C h a p t e r 6 H O W T O B R E W W I T H B E E R B R E W AU T O M AT I C ™ Note: The target strike temperature is affected by several The Beer Brew Automatic™... - Page 16 during the mashing phase or if you are performing a multi-step mashing and want to increase the temperature to the next temperature level. TIP: If the flow of wort through the malt basket is slow you need to reduce the flow through the pump by using the riser pipe valve. The mash can be “stuck”, i.e.
- Page 17 Cooling: You will now normally add the first hop addition, bittering hops to the boiling wort. The added hops can also result in the formation With the immersion chiller already placed in the brew kettle, of foam and subsequently an boil-over condition. open the cold water tap and allow cold water to flow through the immersion chiller.
-
Page 18: How To Brew: Using The False Bottom Equipment Setup
all the equipment. Follow the procedure for this described later in this user manual. 6.2 - HOW TO BREW: USING THE FALSE BOTTOM EQUIPMENT SETUP On the day of brewing, start out with preparing all equipment and ingredients. Calculate the water required for brewing. You can read about this later in this user manual. - Page 19 TIP: If the flow of wort through the false bottom is slow you need to that will maintain 2-3 cm of water above the grain, for an even reduce the flow through the pump by using the riser pipe valve. This pressure across the grain bed.
- Page 20 Tip: If you haven’t already adjusted the settings for this phase you immersion chiller steel tubing. Start out by first connecting one can do this now. end of a garden hose style tubing to a cold water tap, and the other end to the inlet of the immersion chiller.
-
Page 21: How To Do Multi Step Mashing
the wort. Leave the wort to ferment at the desired temperature. You can read more about the bottling and kegging process later Tip: Add some water to the air-lock before using. in this user manual. Note: Although debated, getting trub into your fermenting You have now finished brewing and it is time to empty and clean vessel will normally not cause any unfavourable flavor or aroma all the equipment. -
Page 22: Whirlpool Hopping With A Hop-Stand
6.4 - WHIRLPOOL HOPPING Tip: If you want to increase the aroma in your beer, you can also use dry hopping. This is when you add hops to your beer in the WITH A HOP-STAND fermenting vessel, a few days after the fermentation has started. Dry hopping is normally mentioned as part your beer recipe. -
Page 23: Water Calculation
from the expected FG. To mention some: The mashing time and to finish fermenting. Most often it will be a drinkable beer. Keep temperature, the lautering, the yeast type, the age and amount a journal or log, and learn from your mistakes. Read books and of the yeast, the yeast pitching temperature and the fermenting online sources, and improve the next time you brew. -
Page 24: Cleaning And Maintenance
C h a p t e r 8 C L E A N I N G A N D M A I N T E N A N C E Cleaning your Beer Brew Automatic™ after use: properly attached before tightening the screws. Ensure that After use you should empty the brew kettle of any remaining both ground cables are attached to the fastening screw (4). -
Page 25: Brew Log
C h a p t e r 9 B R E W L O G Brew name: Batch number: Original Gravity (OG): Brew date: Final Gravity (FG): Malt temperature: In fermenter, amount (L): Water strike temp: Finished beer, amount (L): Mash temperature: Bottling date: Calculate the alcohol content:... -
Page 26: C H A P T E R 1 0
C h a p t e r 1 0 A L L G R A I N B E E R R E C I P E E X A M P L E S PALE ALE Malt, total 5,1 kg: 4,5 kg Pale ale malt 0,4 kg... - Page 27 A L L G R A I N B E E R R E C I P E E X A M P L E S INDIA PALE ALE Malt, total 7,0 kg: 6,0 kg Pale ale malt 0,5 kg RedX malt 0,4 kg Wheat malt...
- Page 28 Manufactured and imported by: Anergi AS, Østerskogen 55, 4879 Grimstad, Norway VAT: 996428249 NO Phone: +47-37407040 • Mail: post@beer-brew.com • Web: www.beer-brew.com Reseller: Anergi AS, Østerskogen 55, 4879 Grimstad, Norway VAT: 996428249 NO Phone: +47-37407040 • Mail: support@olbrygging.no • Web: www.olbrygging.no Facebook: www.facebook.com/olbrygging.no Instagram: www.instagram.com/olbrygging.no YouTube: www.youtube.com/c/OlbryggingNo...
Need help?
Do you have a question about the Beer Brew 30 and is the answer not in the manual?
Questions and answers