Table of Contents
Advertisement
Quick Links
Advertisement
Table of Contents

Related Manuals for Humanware VICTOR READER TREK

Summary of Contents for Humanware VICTOR READER TREK
- Page 1 VICTOR READER TREK USER GUIDE by HumanWare revision 02-2017/10/11...
- Page 2 User Guide...
- Page 3 It allows you to transfer content from your PC to its removable flash memory card and provides advanced navigation of multiple formats including DAISY, MP3, NISO and electronic text. The VICTOR READER TREK will be referred to as the Trek throughout this User guide to shorten the text.
-
Page 4: Table Of Contents
Table of Contents OVERVIEW OF VICTOR READER TREK ................8 ....................8 NPACKING THE LAYER VICTOR READER TREK ............8 HYSICAL ESCRIPTION OF 1.2.1 Front Face of the Player .....................8 1.2.2 Left Side of the Player ....................8 1.2.3 Right Side of the Player ....................9 1.2.4... - Page 5 — P 3.14 ........... 20 ONFIRM OCK AND ANCEL OUND AND TAR KEYS — K 3.15 0 ........................21 3.15.1 Available Information Items..................21 DIRECT NAVIGATION (GO TO KEY) ................... 22 ........................22 O TO ....................... 22 O TO EADING ........................
- Page 6 6.9.1 Bluetooth ........................38 6.9.2 Connect to Bluetooth device ..................38 6.9.3 Disconnect from Bluetooth device ................38 6.9.4 Forget Bluetooth device ................... 38 6.9.5 Bluetooth Device Assistance ................... 38 6.10 ......................... 39 ENERAL 6.11 ......................39 NTERNET ADIO 6.12 ........................
- Page 7 References (Wikipedia and Wiktionary) ..............68 10.2.5 Podcasts ........................69 10.2.6 NLS BARD (United States only) ................71 10.3 NLS O ................... 72 NLINE UTHORIZATION UPDATING TREK SOFTWARE ..................73 TECHNICAL SPECIFICATIONS ..................74 BATTERY SAFETY PRECAUTIONS ................77 TECHNOLOGIES HUMANWARE CONTACT INFORMATION ........78...
- Page 8 END USER LICENSE AGREEMENT................. 79 APPENDIX 1 - TREK ERROR MESSAGES ..............80 APPENDIX 2 - MANUFACTURER WARRANTY .............. 81...
-
Page 9: Overview Of Victor Reader Trek
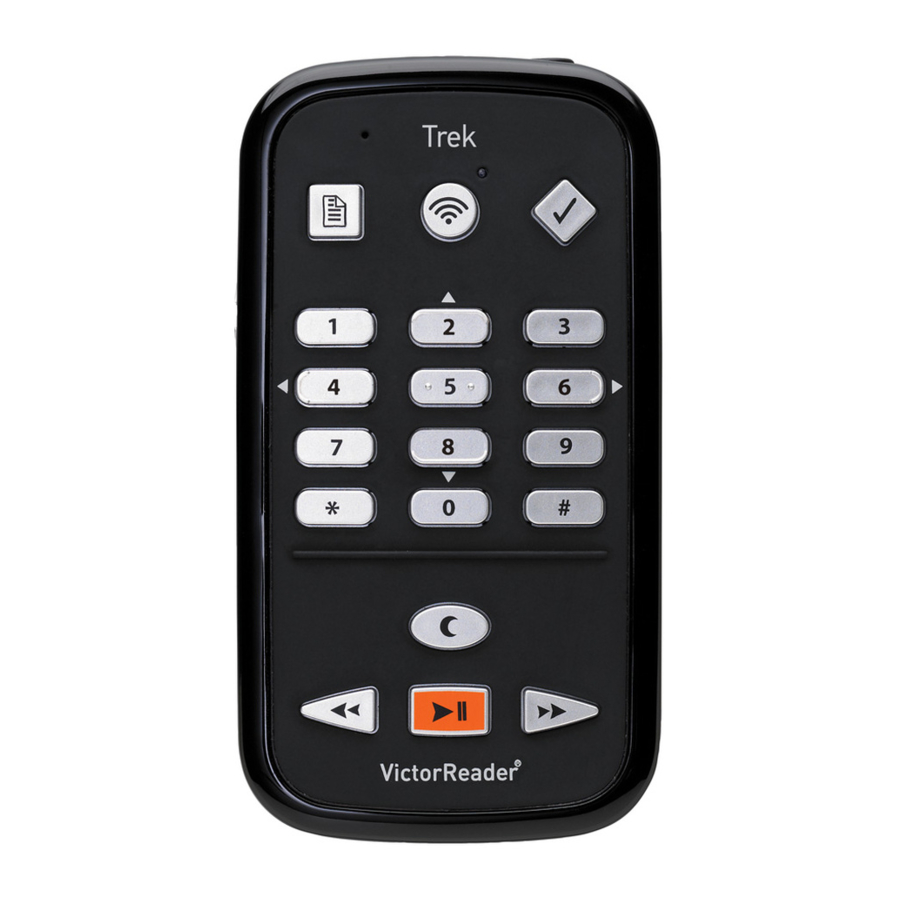
Toll Free: 1 (888) 723-7273 (Canada & U.S.A.) Telephone: +1 (819) 471-4818 E-mail: ca.sales@humanware.com Physical Description of VICTOR READER TREK 1.2.1 Front Face of the Player The face of the player can be divided into upper and lower sections: •... -
Page 10: Right Side Of The Player
Note: If you wish, you may safely use any other commercial USB charger without damaging your Trek. However, other chargers may take longer to charge the Trek. HumanWare recommends a 1 amp USB charger. 1.2.6 Back side of the Player (Battery Compartment) The battery compartment is located in the back of the player. -
Page 11: Nls Book Cartridge (United States Only)
USB power supplied by the computer. You may safely use a micro USB AC adapter other than the supplied power adapter. HumanWare recommends a 1 amp USB power adapter. Adapters with less power will likely require more than 5 hours to fully recharge the battery. -
Page 12: Player Reset Using Power Button
1.3.2 Player Reset Using Power Button If the Trek does not respond to any key presses including power off, hold down the Power button for 7 seconds to force a player reset. Inserting or Removing the SD Card To insert and remove the SD card follow these steps: - Hold the player facing you. - Page 13 Usage: The files comprising each of your DTB books should be saved in separate subfolders under this folder. Single book files such as EPUB files may be saved in the root of this folder. Use the 2 / 8 keys to select folder or book navigation level and keys 4 / 6 to navigate at the chosen level. Press PLAY to select the book.
-
Page 14: Other Reserved File Names
Other Reserved File Names The Trek may create other file names beginning with “$VR” on the SD card. Removing or altering these files could result in unpredictable behavior. Transferring Files Between Your Computer and Trek To connect Trek to your computer for transferring files, turn the Trek's power off, connect the small end of the long USB cable to the micro-USB port on the bottom edge of the Trek and the other end to your computer's USB port. -
Page 15: Basic Functions
Basic Functions 2.1 Changing Volume, Speed, Tone/Pitch When the Trek is on, press the Power button on the top left side multiple times to toggle volume, speed, or tone/pitch settings. After 10 seconds of non-use, the toggle control will return to Volume. Use the up / down arrows on the left side just below the Power button to raise or lower the selected setting. -
Page 16: Setting The Date And Time
Press once to hear the time and date. You can configure the way the time and date is announced by pressing and holding the Sleep key. Press multiple times to set a Sleep timer of 15 minutes, 30 minutes, 45 minutes, 60 minutes, or custom, after which the Trek will automatically shut off. - Page 17 While in Key Describer mode you may press any key to hear its function.
-
Page 18: Numeric Key Functions
Numeric Key Functions 3.1 Numeric Key pad List • 1: Bookshelf if pressed, User Guide if pressed and held • 2: Navigation element • 3: Delete / Copy / Move or edit landmark or route in orientation mode • 4: Back •... -
Page 19: Spell Mode For Text Content
between elements of the selected level using the 4 / 6 (left / right) keys. The Screen element will only be available when no pages are defined in the book. Spell Mode for Text Content Spell mode can be selected using the 2 and 8 keys. The Spell mode can be found between the Word and character navigation levels. -
Page 20: User Guide - Key 1 (Press And Hold)
4 and 6, you can choose the level of navigation with the UP and DOWN keys 2 and 8. Then, when pressing keys 4 or 6, you will move from folder to folder at the chosen level in a circular fashion. When you arrive at the folder of interest, press keys 2 or 8 again to select the book level within that folder and proceed to select the desired book. -
Page 21: Where Am I Tag Information
For Talking books, Other Books, Saved Podcasts and Notes it will announce the percentage of the book or note played as well as individual file times. For text files, it will announce the percentage of the file played. Reading will resume once this information has been announced. For talking books, the time remaining in the section will also be announced. -
Page 22: 3.15.1 Available Information Items
Number of books, SD space remaining, Internal memory space remaining, the Battery status, Download Info, the Wireless status, and the VICTOR READER Trek model number, software version number, number of user authorization keys (if any), and player serial number. -
Page 23: Direct Navigation (Go To Key)
Direct Navigation (Go To Key) 4.1 Go to Page The Go to Page function allows you to go directly to a desired page. Press the Go to Page key above key 1. Enter a page number. Press Confirm to go to the selected Page, Trek will confirm the entered Page number. -
Page 24: 4.6 Go To Book
4.6 Go to Book If you are browsing the Bookshelf the Go to Page key becomes a Go to Book key allowing you to enter a relative book number on a given Bookshelf which is useful for Bookshelves that contain many books. -
Page 25: Advanced Functions
Advanced Functions Text Search The Trek has a text search function for text books. Using the multi-tap text entry method on the number keys as you would to enter text on a telephone, you can type in your search item. If you have a multilingual Trek, the typing keypad will offer the characters of the currently selected text- to-speech language. -
Page 26: Search Next Or Previous
Pressing another key enters the previous character automatically, and no clicking noise is made. This method allows you to find the letters on the numeric keypad more easily. • When entering successive letters on the same key when using the “Announce final character only method,”... -
Page 27: Recording Audio Notes
Recording Audio Notes You can use Trek for voice recordings which are called audio notes. These notes will be saved on the SD memory card in the $VRNotes folder. Each recording is assigned an incremental numeric filename. You can record using either the built-in microphone or an external headset plugged into the audio connector located just above the record button. -
Page 28: Insert Audio Bookmark
to 99998 that you wish to assign to the Bookmark. Press Confirm to confirm, or the Play/Stop key to confirm and start playback. The bookmark will be stored in memory. NOTE: If you confirm without entering a number, Trek will assign the first available bookmark number. -
Page 29: Bookmark List
5.3.4.2 End Highlight Bookmark After setting the starting position, navigate to the point where you wish to mark the end of the highlight. Press the Bookmark once. You will hear “End highlight bookmark”. Press Confirm or the Play/Stop key to confirm. The current position is set as the ending position. If the end position is placed before the start position, they will be switched. - Page 30 Bookmark alerts can be turned on or off. Read the Configuration menu section for more information.
-
Page 31: Configuration Menu - Key 7
Configuration Menu – Key 7 The Trek can be customized using the Configuration menu. To open the Menu, press the Menu (7) key. Pressing the Menu key again will switch to the next Menu. Browse Menu Items with the Up/Down (2, 8) keys. Use the Left/Right (4, 6) keys to select an Item’s value and press Confirm. - Page 32 Item: Producer note. Values: Play*, Skip, On Demand. Item: Sidebar. Values: Play*, Skip, On Demand. Menu: Language Item: Text-to-Speech Voice Values: The installed Text-to-Speech voices Item: Braille translation table Values: The installed braille translation tables for the selected Text-to-Speech voice Menu: Recording All items pertain to both recorded notes and audio bookmarks.
- Page 33 Values: 1, 2, 3*, 4, 5, 6, 7, 8, 9, 10, Manual Only. Item: Import Podcast feeds from file Item: Export subscribed podcast feeds to S D card Item: HumanWare suggested Podcasts Values: List of regions (Default value according to Trek language) Menu: NLS BARD (United States only)
-
Page 34: Playback And Navigation
Item: Remove Bookshare service and delete all associated books Item: Import a Bookshare configuration from file Item: Modify Bookshare login information Menu: NFB Newsline Item: Add NFB Newsline service Item: Remove NFB Newsline service and delete all associated books Item: Get latest editions Values: Once daily, Always* Item: Modify NFB Newsline login information Menu: Daisy Online... -
Page 35: Sleep Messages
6.2.4 Sleep messages The Sleep timer's 1 minute warning and Sleep off messages can be turned on or off. 6.2.5 Bookmark Alert While playing a book, you can have the Trek alert you when it passes over a previously marked position. -
Page 36: Recording
Recording When considering your recording configurations note that the built-in microphone operates only in mono mode. The choice of recording file type will affect both the quality of the recording and the size of the recorded file. If you increase the quality of the recording, it will produce a larger recorded file. -
Page 37: Multi-Tap Text Entry Method
• Connect your headphones to your Trek. They are required to adjust the recording volume. • The normal output volume of the Trek affects the volume of everything you hear from the Trek, so adjust it to a comfortable level before adjusting the recording volume. •... -
Page 38: Airplane Mode
to such a network, you need to use the Create a New Connection option and manually enter the SSID. • The Password is the authentication key used with your network router. It is case sensitive so when entered with the Trek’s multi-tap feature, you may toggle between lowercase, uppercase, and numeric only with the Bookmark key. -
Page 39: Delete A Connection
Use this item to validate your current connection to the Internet. The Trek will access a special page on the HumanWare website. If successful, the Trek will download a short message from that page that informs you of a successful connection. You can replay the message by pressing the Play key. -
Page 40: General
Trek to a wireless network. An Internet Radio bookshelf will be added to the online bookcase. Use the “HumanWare playlist” item to change the region of the playlist that will be offered to you. The default playlist depends on your country or region of purchase (ex: North America). Select a playlist with key 4 or 6, and press Confirm. -
Page 41: Nfb Newsline
6.15 NFB Newsline Use the NFB Newsline menu to manage the online service. The service can be turned on by selecting the “Add NFB Newsline service” item followed by the Confirm key. You will then be prompted to enter your NFB Newsline member ID and PIN each followed by the Confirm key. After you have successfully entered your account information an NFB Newsline online bookshelf will be added to the online bookcase. -
Page 42: Bookshelf Structure And Characteristics
Bookshelf Structure and Characteristics For files on all bookshelves, the maximum file name length, including the file path, is 512 characters (includes media/book path). When scanning the memory card at insertion, any folder or file with a full path name greater than 512 will be ignored. The following sections provide general rules and information for listening to the non-Talking Books bookshelves. -
Page 43: Music Structure
The music bookshelf is in the reserved folder $VRMusic. It contains a folder structure of audio files and this entire structure is defined as the All Music book. Unless you create playlists, this will be the only Music book. If you add playlist (M3U) files to the root of $VRMusic then each playlist will be an additional music book. -
Page 44: Music Search
7.2.3 Music Search You can search your music by pressing the Go To key until you hear “Search”. Then using the multi-tap keypad as described in the Text Search section, enter the word or words to search for and press the Confirm key. Use the Bookmark key to toggle between Text and Numeric input types while entering your text to search. -
Page 45: Saved Podcasts
between music files and do not want to hear the folder/file announcements simply press the Play key first to put the player in play mode. Saved Podcasts The Saved Podcasts bookshelf contains a folder structure of audio files where each folder represents a podcast feed and each file an episode of that feed. -
Page 46: Navigating Html/Xml/Docx Headings
Reading: Playback stops at the end of each file. The navigation levels on keys 2 or 8 include: page (if page markers are in the file), screen (if no page markers), paragraph, line, sentence, word, spell, and character. If you do a search in text then a Search level is added as the last navigation level to allow you to find the next or previous search item. -
Page 47: Daisy Online
Daisy Online Menu Items Note: The following menu and menu items are only available from the online bookcase. Menu: Daisy Online Item: Add a Daisy Online Service Item: Import a Daisy Online configuration from file Item: Modify Daisy Online login information Item: Download Method to use Values: Automatic download, Manual download, Semi-automatic download Item: Remove a Daisy Online Service... - Page 48 whether a book is downloaded or not. From a book, you can also press the Where Am I? key to know its expiration date. Navigating in your Daisy Online bookshelves: • Each Daisy Online service offers a menu that may differ from one service to another. The menus are therefore dynamic.
- Page 49 If you selected Automatic download method in the Daisy Online menu, the Trek will periodically download new books issued to your account on your Daisy Online bookshelf. However, if you want the Trek to immediately download any available books, you can use the option on the bookshelf named “Check for New Content”.
-
Page 50: Gps - Orientation Mode
GPS – Orientation Mode General description The Trek was designed as an orientation aid to help you find your way. Trek locates your position through the Global Positioning System (GPS) and relates it to digital maps of your area. You can record your routes while walking them. -
Page 51: Maps Installed In Your Device
modified and therefore affect Trek's performance. The GPS signal is not precise or may not be accessible at all times, especially when traveling in an area surrounded by tall buildings. 9.1.2 Maps installed in your device The GPS system uses electronic maps to provide detailed and handy information about all street names and ranges of addresses for urban areas, as well as points of interest such as banks, restaurants, pharmacies. -
Page 52: Using The Gps
Button 3 is used to quickly access landmarks and routes settings in a list. Press and hold the Right arrow (6 key or Fastforward button) to lock you into open area and prevent Trek from automatically placing you on a nearby street. Press and hold the Right arrow again to leave open area lock. -
Page 53: Carrying The Trek
unobstructed view of the sky. Note that this step can take a few minutes the first time you use your Trek’s Orientation mode. If GPS is already on in the settings menu, the connection will be established in background before switching to Orientation mode. Carrying the Trek You should not use headphones when walking on the street. -
Page 54: Information By Request
Information by request 9.6.1 Where am I? To obtain your current position, press the Where am I button. Depending on your configurations, the Where am I function will provide information regarding: Route Status: On Route or Off Route. This information is only available if you are actually being guided on a route. -
Page 55: Next Instruction Or Next Intersection
"Automotive" "All" The Trek will then provide you with a list of up to 50 points of interest found within a range of 5 miles (8 km) that correspond to the selected category. Use the arrows to select the destination of your choice, and Confirm to begin instructions. -
Page 56: Routes
Note that it is possible to cancel the recording of a landmark by pressing the * (star) key. The recorded landmarks are kept in the list of possible destinations. Important: Before recording landmarks, press the Where am I button to make sure that the Trek has properly located your position. -
Page 57: Activate A Recorded Route
1. Activate the route. To do so, press and hold the Go To button and use the left and right arrows to browse among available routes. When the route you are looking for is announced, press Confirm to load the route in the system. 2. -
Page 58: Cancelling A Route
If you deviate from your route in an open area, the system will provide instructions on how to return to your route. Guidance instructions will be given in clockwise manner. For example, if the system notices that you are heading away from the route, you might get a message such as: "Off-route: Turn at 3 o'clock to come back to the route". -
Page 59: Getting Guidance To A Landmark
It is important that you keep in mind that the "previous session" track used to return to your point of origin will not be kept indefinitely. Only the track created up to the last Power off will be kept in memory. -
Page 60: Creating A Landmark For An Address
9.11.1 Creating a Landmark for an address If you select Enter an address when browsing your landmark list, you will have the opportunity to type in the address of your choice using the Trek's buttons. To have Trek guide you to an address: 1. -
Page 61: Getting Guidance To A Postal Code (Uk And The Netherlands Users Only)
2 long vibrations: Turn left 1 long vibration: Go straight ahead 2 short vibrations and 2 long vibrations: Off route When in Explore mode, you will feel one long vibration when receiving information about an upcoming intersection. 9.13 Getting Guidance to a postal code (UK and The Netherlands users only) When browsing the list of possible landmarks towards which you can be guided, (see Getting... -
Page 62: Settings
To leave open area locked, press and hold the Right arrow again. Trek will announce “Leaving open area locked” and will automatically recognize whether you are in an open area or on a street. 9.15 Settings To configure the system, press the 7 button. Use the arrows to select the option you wish to modify. -
Page 63: Configuring Routes
Note regarding Landmark configuration: You can directly access Landmark Settings. To do so, press and hold the Go To button, then select a landmark and press 3. The following options are made available: Rename landmark Unset landmark as a possible destination Delete landmark 9.15.3 Configuring Routes... -
Page 64: Import Routes
Import routes Selecting this item will import all routes found in both the root and the $TREKRoutes folder of your SD card. Delete all routes Selecting this item will delete all routes saved on your device. If you are sure you wish to delete all routes, confirm by pressing the # key. -
Page 65: Distance Units
9.15.6 Distance Units Use the arrows to cycle through the 2 options and press Confirm to make your selection. The Distance settings are as follows: Kilometers and meters Miles and feet (default value) Miles and yards 9.15.7 Haptic Feedback Haptic feedback on the Trek is a system through which vibrations are used to guide you to your destination. -
Page 66: 10 Trek Wireless Features
When the Trek is connected to a wireless network and has Internet access, it will access the HumanWare website from the online bookcase. The Trek will check for any available software updates and will prompt you to download and install them automatically. This automatic check for updates can be disabled from the Software Updates configuration menu. -
Page 67: Bookshare
If you wish to save a copy of a publication it is possible to use the copy function of key 3 when reading the publication to copy it to the Talking Books bookshelf of the SD card. It is not possible to delete publications from the NFB Newsline online bookshelf as the automatic synchronization will remove old editions and add new ones as they become available. -
Page 68: Internet Radio
Internet Radio bookshelf and offers a sample list of stations. The selected HumanWare playlist is based on your country or region of purchase and can be changed in the online configuration menu. The Internet Radio Recordings playlist contains all your radio recordings. -
Page 69: References (Wikipedia And Wiktionary)
• While recording, press Play/Stop to pause your recording. Press Play/Stop again to resume recording. • Press Record again to stop recording the radio station. Note: You can add bookmarks and save your position while recording a radio station simply by pressing the Bookmark button while recording. -
Page 70: Podcasts
The first time you connect your Trek to a wireless network, it will automatically download the HumanWare podcast, which shares general information about the Trek and HumanWare. The podcast episodes that have been downloaded will be available even when the Trek is not connected to a wireless network. - Page 71 episodes. If you only want to browse the podcast feeds that contain new episodes, use keys 2 and 8. • To copy an episode to your Saved Podcasts folder on the S D card, press key 3 twice from your list of episodes or when playing an episode. •...
-
Page 72: Nls Bard (United States Only)
10.2.6 NLS BARD (United States only) National Library Service for the Blind and Physically Handicapped (NLS BARD) is a free library program of audio materials (for eligible United States citizens only). More information about NLS BARD can be found on http://www.loc.gov/nls/bardnls/. You are able to wirelessly search for books and download them to the Trek. -
Page 73: Nls Online Authorization
When the Trek is connected to a wireless network and has Internet access, it will access the HumanWare website from the online bookcase. The Trek will check for any available NLS authorization keys (for eligible United States citizens only). If a key is found for your Trek, it will be... -
Page 74: 11 Updating Trek Software
11 Updating Trek Software HumanWare may from time to time offer new versions of the Trek software. There are 2 ways to update your Trek’s software; wirelessly, or by downloading an update file on your SD card . To update your Trek wirelessly, you must first have an active connection to the Internet using the built-in Wi-Fi (see section 6.7 for more information on the wireless configuration menu). -
Page 75: 12 Technical Specifications
12 Technical Specifications Victor Reader Trek Specifications: • Size: 114 x 62 x 24mm (4.5 x 2.4 x 0.9 inches) • Weight with battery: 140g (5.0 ounces) • 3.5mm stereo Headset jack • Built-in mono omni-directional microphone • Built-in 500 mW speaker •... - Page 76 If the user finds the battery autonomy has decreased, a replacement battery may be purchased and replaced by the user. Contact HumanWare or your distributor for any repair or malfunction questions. Service shall only be done by HumanWare or its authorized distributor.
-
Page 78: 13 Battery Safety Precautions
13 Battery Safety Precautions • Do not use or leave the battery near heat source and fire. Do not store in high temperatures • Only use USB-compliant power supplies to charge the battery • Do not disassemble or modify the battery •... -
Page 79: Technologies Humanware Contact Information
14 Technologies HumanWare Contact Information 1800, Michaud street Drummondville, Quebec Canada J2C 7G7 Telephone: 1 (819) 471-4818 Toll-free (Canada & USA): 1 (888) 723-7273 Fax: 1 (819) 471-4828 E-mail: support@humanware.com Website: www.humanware.com... -
Page 80: End User License Agreement
15 End User License Agreement By using this product (Victor Reader Trek) you agree to the following minimum terms. 1. License Grant. HumanWare grants to End User a non-exclusive, non-transferable right and license to use the Software on this product. - Page 81 16 Appendix 1 - Trek Error Messages SYSTEM error 1: CDROM, Does not apply. SYSTEM error 2: MEMORY, Memory allocation problem. SYSTEM error 3: BATTERY, Error with battery detection. SYSTEM error 4: INT_STOR_FAIL, Error detecting internal storage. SYSTEM error 5: INT_STOR_CORRUPT, Corrupted internal storage. SYSTEM error 6: TTS, Failure to initiate the TTS.
- Page 82 17 Appendix 2 - Manufacturer Warranty This device is a high quality product, built and packaged with care. All units and components are guaranteed against any operational defects as follows: US and Canada: One (1) year Continental Europe and UK: Two (2) years Australia and New Zealand: One (1) year Other countries: One (1) year Warranty covers all parts (except battery) and labor.
Need help?
Do you have a question about the VICTOR READER TREK and is the answer not in the manual?
Questions and answers
No Gps cover. Wi fi on