Advertisement
Table of Contents
Thank you for selecting our product. To ensure that your installation goes smoothly, please read these
instructions carefully before you begin. Also review the recommended materials and tools for a smooth
Installation. Before you start, verify that you have all the components shown below for your upper unit model
and ensure that all components are free from defects. Questions, problems, missing parts? Before
returning to your retailer, call our Customer Service department at 1-855-995-5578, 8:30 a.m. - 5 p.m., EST,
Monday - Friday. ContactUs@magickwoods.com
INSTALLATION INSTRUCTIONS FOR:
30 in. CONCORD UPPER UNIT
PRODUCT:
DIMENSIONS: 30 in. W x 7-3/8 in. D x 28 in. H
MODEL:
FM.UP130
40 in. CONCORD UPPER UNIT
PRODUCT:
DIMENSIONS: 40 in. W x 7-3/8 in. D x 28 in. H
MODEL:
FM.UP240
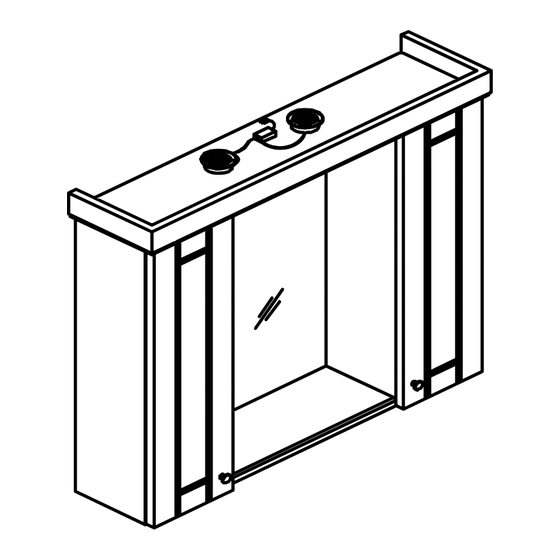
COMPONENTS
Valance (1x)
Left cabinet
(1x)
WARNINGS & CAUTIONS
WARNING:
Two people are required for safe installation. Take extra precautionary measures to ensure a secure grip on
the cabinet when lifting.
CAUTION:
• Do not turn on the lights of the unit for prolonged periods of time (i.e.: more than 12 hours continuously).
• Maximum weight limit of the cabinet: 28 lbs (excluding cabinet). The weight bearing capacity of this cabinet is
conditional upon materials and methods used in its installation. It is essential to ensure directions are followed
correctly.
• To maintain the beauty of the cabinet finish, avoid placing the cabinet in direct sunlight.
• Avoid exposing the cabinet to extreme temperatures by installing away from heat and air vents.
• The bathroom wall must be finished prior to installation of the cabinet.
Mirror
(1x)
Right cabinet
(1x)
Shelf (1x)
Lightset (with 2 lights) (1x)
CONCORD UPPER UNITS
Knob (2x)
Washer (6x)
2 in. screw (6x)
1-1/4 in. screw (2x)
1 in. screw (2x)
Advertisement
Table of Contents

Summary of Contents for Magickwoods FM.UP240
- Page 1 Before returning to your retailer, call our Customer Service department at 1-855-995-5578, 8:30 a.m. - 5 p.m., EST, Monday - Friday. ContactUs@magickwoods.com INSTALLATION INSTRUCTIONS FOR: 30 in. CONCORD UPPER UNIT PRODUCT: DIMENSIONS: 30 in. W x 7-3/8 in. D x 28 in. H MODEL: FM.UP130 40 in. CONCORD UPPER UNIT PRODUCT: DIMENSIONS: 40 in. W x 7-3/8 in. D x 28 in. H MODEL: FM.UP240 COMPONENTS 2 in. screw (6x) Valance (1x) Knob (2x) 1-1/4 in. screw (2x) Mirror (1x) Washer (6x) Right cabinet (1x) Left cabinet 1 in. screw (2x)
- Page 2 PREPARATION Tools Required for Assembly (not included): • Tape measure • Electric drill with #2 drill bit (A) • Straight edge or leveling meter • (6x) wall anchors - if the cabinet will not be screwed to wall studs (type dependent on wall material and local building code (if building code applicable)) (B) Estimated installation time: 1/2 hour INSTALLATION Step 1: 1) Determine the desired location Marking line for the left side wall cabinet. 2) Mark the location for the cabinet corners on the wall ensuring that they are level. Note: It is recommended that the cabinet be installed to at least 1 wall stud. In order to locate wall studs, you can use a stud finder or tap along the wall until you find a spot that sounds solid. If you are unable to locate a wall stud, it is recommended that you use wall anchors (B) (not included) to secure your wall...
- Page 3 provided through the drilled holes/anchors directly into the wall. Figure 2. Step 7: 1) Determine the location for the right side wall cabinet (aligned with the left cabinet and mirror). 2) Repeat steps 1 through 5 to hang the right side cabinet. Figure 3. Step 8: 1) Position the shelf between the two wall cabinets and carefully slide downward to align with the bottom of both cabinets. Insert the shelf so its brackets rest securely on top of the pre-installed mounting screws in the sides of each wall cabinet. Figure 4. Step 9: Hang the mirror on the wall with the provided hanging hardware attached to the back of the mirror. Figure 4. Figure 4 Figure 3 Step 10: 1) Position the valance above the unit, aligned on all edges. 2) Carefully lower the valance and attach it to the tops of the wall cabinets (on both left and right cabinet) using the 1-1/4 in. screws and washers provided. Figure 5. Step 11: 1) Insert each light wire through each valance hole from the bottom (the light transformer and wires will sit on top of the valance). Figure 6. 2) Insert each light into each valance hole from the bottom. Figure 7. Light connectors (sockets) Figure 6 Figure 5...
- Page 4 3) Connect each light connector (socket) with its respecting adapters and then connect to the power supply. Figure 8. Adapter Connect to power supply Light Light connectors (sockets) Figure 7 Figure 8 TROUBLESHOOTING Problem: Cabinet/mirror is higher on one side than the other. Possible Cause: 1) Hanging hardware or mounting screws are not level. Corrective Action: 1) Remove the cabinet/mirror from the wall and check the mounting screws. Adjust as needed. 2) Measure the position of the hanging hardware on the back of mirror and ensure that it is level. Adjust as needed. WARRANTY What This Warranty Covers: Magick Woods Exports Pvt. Ltd. warrants its parts to be free from substantial defects in materials and workmanship from the original date of purchase under normal home use. This warranty is offered only to the original consumer purchaser and may not be transferred. How Long The Warranty Lasts: Coverage for all vanity cabinets, fixed vanities, drawer banks, bath storage cabinets, linen cabinets, wall hutches, fillers, toe kicks, medicine cabinets, mirrors, and accessories lasts from 3 years from the original date of purchase.
Need help?
Do you have a question about the FM.UP240 and is the answer not in the manual?
Questions and answers