
Summary of Contents for Oracing Wheelchairs Street Jet
-
Page 1: User Manual
USER MANUAL Oracing Wheelchairs Torre Alcodar, 6 46071 GANDIA (Valencia) SPAIN +34 960 046 400 info@oracing.es... - Page 2 Street Jet is a pleasant, reliable, life changing and “zero emission” solution for those who are willing to improve their mobility experience. We are proud to provide you with a product that we are sure will accompany you for many years to come.
-
Page 3: Table Of Contents
REVERSE-DRIVE (if installed) ................. 23 AFTER ..........................23 MAINTENANCE ........................24 PREDICTIVE MAINTENANCE ..................24 4.1.1 TYRE MAINTENANCE ..................... 25 4.1.2 BRAKE MAINTENANCE ..................25 4.1.3 CLEANING AND HYGENE ..................25 RECYCLING .......................... 27 TROUBLESHOOTING ......................28 STREET JET USER MANUAL... - Page 4 SPECIFICATIONS ........................29 GENERAL ........................29 WEIGHT .......................... 29 WHEEL ..........................29 TECHNICAL SPECIFICATIONS ..................29 ENVIRONMENTAL CONDITIONS .................. 29 GUARANTEE .......................... 30 STREET JET USER MANUAL...
-
Page 5: Safety Instructions
5. If you have a stand, make sure you pull it from the ground before moving. 6. For security reasons, our Street Jet is valid for a maximum speed of 20 km/h, please do not exceed this speed in any circumstance. - Page 6 22. Safe use of Street Jet comes with practice and experience. For beginners, it is important to ride slowly and especially carefully. Avoid putting yourself in difficult situations such as steep hills and roads in bad conditions until you get used to your Street Jet.
-
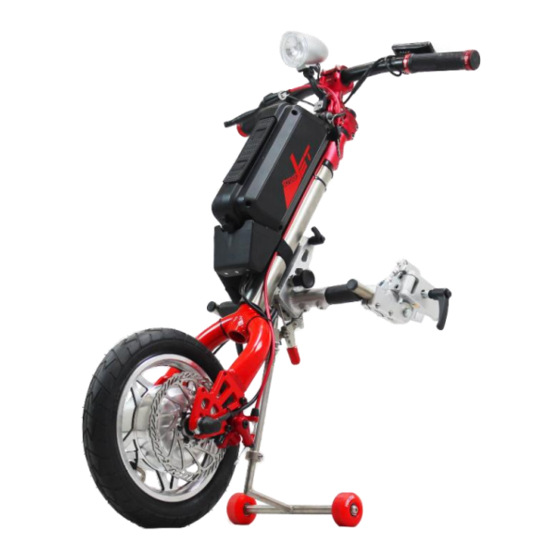
Page 7: Product Description
⚠ NOTE It is possible that the components of the Street Jet shown and described in this manual are not exactly the same as the ones you own, as our products are in constant improvement and development. All the figures, measurements and capacities here shown are approximate and do not constitute specifications. -
Page 8: Battery
Electromagnetic compatibility in accordance to the Directive 2004/108/EC For which next norm has been followed: EN 61000-6-1:2001 EN 61000-6-3:2001 + A11:2004 The following verifying tests have been performed: TUV – 18000556 001 TUV – 18000555 001 STREET JET USER MANUAL... -
Page 9: Installation And Removal
2.1.2 INSTALLATION AND REMOVAL The battery can be easy mounted and removed from the Street Jet. In order to place it on the frame, engage it in a downward movement until the terminals fit (the main connector in the one placed on the Street Jet). Push it against the Street Jet until it gets fixed into place. -
Page 10: Motor
It is recommended to use the battery at least once every 60 days. 2.2 MOTOR The motor is located on the wheel. Depending on your Street Jet power, you will have a different motor: 250 W: Bafang FM G320.250.V 500 W: GoldenMotor Smart Pie 5 ⚠... - Page 11 (burn) the motor and the controller. The warranty will not cover any overload of the electric systems. 2.2.1.2 DISPLAY AND CONTROLLER 1. DISPLAY CONTROLLER 2. REVERSE (SWITCH) 3. LCD DISPLAY 4. THUMB THROTTLE 5. NON FUNCTIONAL BUTTONS IN THIS CONFIGURATION STREET JET USER MANUAL...
- Page 12 Walk assisted model(WALK) 5. Speed display a. Maximum speed(MAX) b. Average speed(AVG) c. MPH, KM/H are both optional. (According Wheel size and signal data, the meter could figure out the real speed.) 6. Error display STREET JET USER MANUAL...
- Page 13 5. Speed display When the Street Jet starts, the display will automatically show the current speed. Hold and the display will show the MAX speed during this ride. Hold again and the display will show the AVG speed during this ride.
-
Page 14: 500 W - Golden Motor Smart Pie 5
USB cable or by Bluetooth (iOS or Andoid compatible), too. It also implements regenerative braking and cruise control. It has a maximum nominal velocity of 45 km/h (48 V). The engine is controlled with a thumb accelerator. STREET JET USER MANUAL... - Page 15 (burn) the motor and the controller. The warranty will not cover any overload of the electric systems. 2.2.2.2 DISPLAY AND CONTROLLER 1. DISPLAY CONTROLLER 2. CRUISE CONTROL (RED SWITCH) 3. REVERSE (GREEN SWITCH) 4. DISPLAY 5. POWER ON/OFF 6. THUMB THROTTLE STREET JET USER MANUAL...
- Page 16 Short press "MODE" button, the LCD will show: AVG SPEED (current average speed km/h); SPEED SPEED (real-time speed km / h); MAX (current maximum speed km/h); TRIP (current mileage km); TRIP TIME (current driving time h); ODO (total cumulative mileage km). STREET JET USER MANUAL...
- Page 17 , you need to charge the battery immediately. Under Voltage 5. Output Power Display LCD will display the output power of the electric vehicle, the unit used is “Watt”. STREET JET USER MANUAL...
- Page 18 Hall Failure or Phase Under Voltage MOSFET Failure Overheating Over current Over voltage Communication Failure Only after the failure has been cleared, LCD can exit the error display screen. The electric vehicle cannot continue driving when the failure appears. STREET JET USER MANUAL...
-
Page 19: Stand
The Street Jet’s stand is designed so it can help in the process where your wheelchair’s front wheels are lifted and the frontal weight is placed on the Street Jet and so it can be easily put into place and transported. It is connected to the tilting mechanism, which makes the lifting process possible and also keeps the stand from touching the ground while driving. -
Page 20: Wheelchair Attaching Clamps
2.5 WHEELCHAIR ATTACHING CLAMPS In order to attach the Street Jet to your wheelchair, the attaching clamps have been designed to fit every kind of frame shape. The whole system has 5 main parts, which allow all its functionality: 1. ANGLE REGULATOR (XY AXIS) 2. -
Page 21: Usage
3.1 BEFORE 3.1.1 PACKAGING AND DELIVERY The Street Jet is delivered in a cardboard box that protects it from weather and dust. It must be transported by the user with the same care as the shipping packaging, in order to protect it from the elements. -
Page 22: During
(1 step). It will place the front weight on the Street Jet. Pull up the Click&Go lever in order to ensure a perfect hold of the mechanism (2 step). You will then be in riding position. -
Page 23: Starting
In order to accelerate, you will have to push the accelerator in a downward movement and keep it down for continuous acceleration. Remember to drive carefully and never do abrupt movements with the steering handle while driving at a high speed. Be especially careful around corners and when braking. STREET JET USER MANUAL... -
Page 24: Reverse-Drive (If Installed)
3.3 AFTER Make sure you disconnect the motor. It is recommended that you pull out the battery while not using the Street Jet. Keep both in a dry place without extreme temperatures that could damage the components. When needed, clean the Street Jet carefully with a dampened tissue. Do not wet the electric components or the disc brakes. -
Page 25: Maintenance
4 MAINTENANCE The maintenance should be strictly followed for a proper preservation of the Street Jet. Be aware that depending on the use, the maintenance needs might vary. Adjust accordingly. Before starting the maintenance, please disconnect the battery and take it out. -
Page 26: Tyre Maintenance
4.1.1 TYRE MAINTENANCE Your Street Jet is equipped with a 12” or a 16” wheel. Check the tyre pressure periodically and make sure it is always inflated with the correct pressure (check the tyre for more information). If your tyre is less inflated than it should, it will offer more rolling resistance, therefore hindering the driving conditions. - Page 27 Street Jet. ⚠ ⚠ NOTE Never use steam or high pressure to clean the Street Jet. Never use abrasive, aggressive or acidic cleaning products. Make sure the electric components do not enter in contact with any water. STREET JET USER MANUAL...
-
Page 28: Recycling
5 RECYCLING Be sure to follow the local regulations for recycling the components of the Street Jet (these regulations might include cleaning and decontaminating the vehicle previous to the disposal). Aluminium: Fork, stand, attaching clamps Steel: Main frame, tilting arms (inox.), tilting mechanism (inox.) Composite: Handle cover, tyres, cups, trims Electric components: Cables, display, control systems. -
Page 29: Troubleshooting
Check battery charge status Charge if necessary Check battery positioning (all the way down and turn the key clockwise) Street Jet does not turn on Check all the connectors are well connected. If all three conditions are met and still does not turn on, call for assistance. -
Page 30: Specifications
7.5 ENVIRONMENTAL CONDITIONS Do not expose the device to temperatures below -20 ºC or above 50 ºC. Do not expose the device to heavy rain. Avoid driving the Street Jet on slippery surfaces, such as ice . STREET JET USER MANUAL... -
Page 31: Guarantee
7. The guarantee is not applicable in case of breaks or faults derived from neglectful use of the Street Jet, the assembly of not original accessories or lack of maintenance. 8. The guarantee is recounted only to the reinstatement of the defective components and does not cover in any case bodily injuries that could stem directly or indirectly of the failure of the same ones during his utilization.
Need help?
Do you have a question about the Street Jet and is the answer not in the manual?
Questions and answers