Advertisement
Quick Links
It's the ultimate radio control experience! Your Starter Kit comes with a radio controller and a full set of
factory parts to assemble your car. With a quick charge about 60 seconds, your ZipZaps micro RC will
be revving in no time.
Your ZipZaps micro RC provides totally 6 selectable channels. You can enjoy racing with 6 cars a time.
Your ZipZaps micro RC comes with a built-in Ni-MH rechargeable battery to power the car, and it
requires four AAA batteries (not supplied) for the controller/charger.
Built to 1:64 scale, your tunable ZipZaps micro RC is small enough to carry in your pocket. ZipZaps are
perfect for anyone ages 8 and up.
To really rev up the fun factor, you can customize your ZipZaps micro RC with optional performance
upgrade kits, available at the ZipZaps Showroom at www.zipzaps.com
(Please confirm this)
and your
local RadioShack. Just follow these steps to get your car up to speed and ready to race.
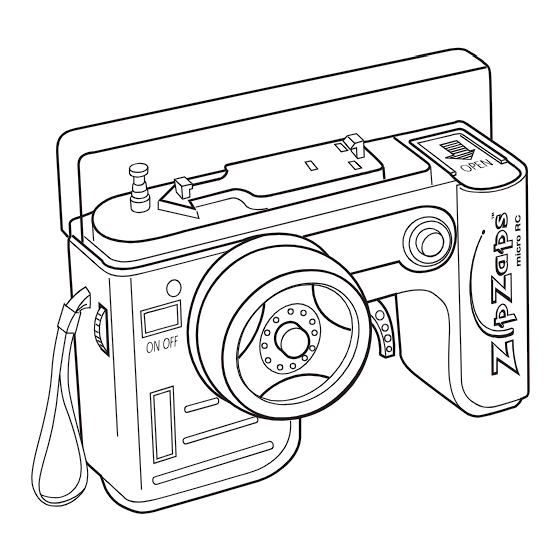
1 Starter Kit Includes
Your ZipZaps micro RC Starter Kit includes everything you see here:
ON OFF
RELEASE
Factory parts.eps here
2
Attach the WRIST STRAP
Attach the WRIST STRAP as shown below to prevent dropping your CONTROLLER. Thread the string
through the hole on the left side of the CONTROLLER as show, and then thread the strap through the
ring of the string.
Attach strap.eps here.
3 Powers Up Your Controller
The CONTROLLER charges your micro RC and controls its steering and speed. You'll need to install
four AAA batteries. For the best performance and longest life, the ZipZaps factory recommends
RadioShack Enercell Plus alkaline batteries.
Advertisement

Subscribe to Our Youtube Channel
Summary of Contents for ZipZaps micro RC
- Page 1 Your ZipZaps micro RC comes with a built-in Ni-MH rechargeable battery to power the car, and it requires four AAA batteries (not supplied) for the controller/charger. Built to 1:64 scale, your tunable ZipZaps micro RC is small enough to carry in your pocket. ZipZaps are perfect for anyone ages 8 and up.
- Page 2 Do not mix old and new batteries, different types of batteries (standard, alkaline, or rechargeable), or rechargeable batteries of different capacities. If you do not plan to use the micro RC for a week or more, remove all the batteries from the CONTROLLER. Batteries can leak chemicals that can destroy electronic parts.
- Page 3 4) Rotate the MOTOR CLIP WITH SET SCREW as shown below to set the MOTOR in position. Install motor2.eps, 5) Secure the MOTOR CLIP WITH SET SCREW with the SCREWDRIVER which is stored at the bottom of the CONTROLLER. 6) Plug the TRANSFER GEAR into the axle as shown. Be sure the TRANSFER GEAR meshes with the DRIVE GEAR on the STOCK MOTOR.
- Page 4 3) Open the cover on the top of the CONTROLLER. Align the metal contact points on the car’s chassis with the metal contact points on top of the CONTROLLER. Place the micro RC in direction as shown below and snap it into position – it will lock automatically. The indicator blinks in red to indicate frequency channel programming in progress.
- Page 5 Neutral trimmer on transmitter If the micro RC does not stop during natural position of transmitter, adjust trimmer as shown until the wheel stops. Neutral Trimmer.eps Caution: Always use RELEASE when removing the car from the charger. You can change the operation channel even during charging. The channel programming sequence starts with indicator blinking in RED if charging is still not completed, or in GREEN if charging has been already completed.
- Page 6 You can change the left/right movement of the trigger with L/R on the top of the CONTROLLER. Set it to R and the micro RC moves forward as you pull the trigger to left, moves backward as you pull the trigger to right.
- Page 7 1. The Wheel Alignment only takes effective when both of the CONTROLLER and the micro RC are turned on. 2. If you make alignment by adjusting the wheel alignment screw on the bottom of the micro RC, it is necessary to keep the car running. (I.e. to push/pull the trigger during the alignment process).
- Page 8 If the micro RC moves slowly and you just charged or recharges the micro RC, check the wheel mechanisms for lint, thread, hair, or dust. CBs could interfere with control of the micro RC. If this happens, move the micro RC away from the CB. ZipZaps Care Keep your ZipZaps micro RC dry;...
- Page 9 NOTE: THE MANUFACTURER IS NOT RESPONSIBLE FOR ANY RADIO OR TV INTERFERENCE CAUSED BY UNAUTHORIZED MODIFICATIONS TO THIS EQUIP- MENT. SUCH MODIFICATIONS COULD VOID THE USER'S AUTHORITY TO OPERATE THE EQUIPMENT.
Need help?
Do you have a question about the micro RC and is the answer not in the manual?
Questions and answers