Table of Contents
Advertisement
Advertisement
Table of Contents
Troubleshooting

Related Manuals for Staaker Staaker 1

Summary of Contents for Staaker Staaker 1
- Page 1 USER MANUAL...
- Page 3 TAAKER ANUAL The Staaker Company AS v1.3 November 2, 2017...
-
Page 4: Introduction
1.1 Using This Manual Read the Staaker 1 User Manual before flying the drone for the first time. Before flight, learn how to operate the drone and be aware of any local laws regarding flight of drones in your area. -
Page 5: Terminology
Gimbal: Camera stabilization module for improved video footage and framing. LED: Abbreviation for light-emitting diode, a light located on the bottom of the Staaker drone. Locate Staaker: A menu option on the Tracker for locating the Staaker drone. Requires GPS signal on the Tracker. -
Page 6: Table Of Contents
3 Safety and disclaimer 4 Staaker Drone 4.1 Status LED .......... - Page 7 6 How to use the Staaker 6.1 Before use ..........33 6.2 Check list .
- Page 8 9 Staaker Tips 9.1 Camera tips ..........46 9.2 Drone tips .
- Page 9 13.2 Staaker Drone ........
-
Page 10: Safety And Disclaimer
2. The user holding the tracker controlling the drone is legally the pilot of the drone. The pilot is re- sponsible for safe usage and consequences of unsafe usage of the drone. The Staaker Company is not responsible for any injury, damage of property or harm caused by usage of the drone. -
Page 11: Staaker Drone
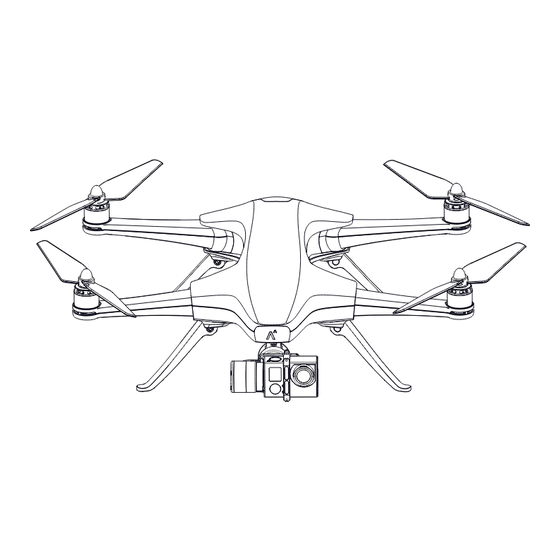
4 Staaker Drone The Staaker drone is a quadcopter powered by a Smart Battery and carries a 3-axis stabilization gimbal equipped with a camera (camera not included). The drone is foldable and compact, designed to be durable and lightweight. The drone is equipped with an intelligent autopilot to aid you in flying the drone and keeping you always in the video frame. -
Page 12: Status Led
Figure 2: Technical overview of the Staaker drone 4.1 Status LED The multi-coloured status LED is located on the bottom of the Staaker drone. The LED indicates if the drone is ready to fly or not. The LED is only on when the drone is powered. -
Page 13: Unfolding The Drone
Status Light Description Flashing yellow light Drone cannot takeoff because of GPS signal or magnetic interference Flashing green light Drone is ready for takeoff Flashing red light Drone has an error, check tracker for message Table 1: Status Light Status Light Description Steady yellow light Drone has lost GPS and is landing... - Page 14 Figure 3: Unfolding the drone...
-
Page 15: Camera Protection
4.3 Camera Protection We always recommend using the protective Staaker camera cover on Gopro 3 and 4 to make the camera water and dust resistant. Figure 4: Staaker protective camera cover 4.4 Gimbal The gimbal eliminates vibrations and makes a steady video footage. The Staaker 3-axis gimbal supports the following cameras: •... - Page 16 3. Loosen the two screws on the camera holder so the camera fits in the holder. (Figure 6) Figure 6: Loosen the two screws 4. Insert the camera in the middle of the holder. (Figure 7) Figure 7: Inserting the camera 5.
-
Page 17: Battery Insertion And Removal
6. Insert the power cable from the Gimbal into the camera (only for GoPro 3 and 4). (Figure 9) Figure 9: Insert charging cable between the gimbal and camera Make sure the camera is inserted all the way in and is aligned with the edge where it stops (Figure 7). - Page 18 Figure 11: Inserting the Smart Battery To remove the battery, pull the battery while pressing the battery lock button. Figure 12: Removing the Smart Battery If the battery is not properly secured, there’s a risk that it may fall out during flight. This can happen if the battery is not fully inserted or damaged.
- Page 19 If the drone is unfolded incorrectly, battery not inserted properly or the camera is not secured it may cause unsafe flights, damages, bad video quality and/or uncon- trolled crash landings. Do not power on the drone without a camera mounted in the gimbal. The gimbal will spin erratically without the counter-weight from the camera and can damage your equipment.
-
Page 20: Tracker
5 Tracker The Tracker is the technology that replaces an ordinary remote control. It has multiple buttons for navigating the menus and controlling the Staaker in flight. The screen displays the current state of the drone and tracker. Figure 13: The Tracker Up/Down: Used to navigate menus or increase/decrease altitude of the drone. -
Page 21: Tracker Radio Signals
The tracker has multiple sensors inside to read your movements, the GPS is the most important one. Illustration shows where on the tracker that the wireless signals to the Staaker is being sent from and the GPS location. These locations should be unobstructed while flying the drone. -
Page 22: Navigating The Main Menu
Figure 15: Tracker user interface If the Tracker has no connection with the drone (as shown by the radio signal strength indicator on the bottom left on the screen), the tracker does not know the current battery status of the drone. Note the status bar on the bottom of the screen: 5.3.1 Navigating the Main Menu The main menu is the initial screen state on the tracker. - Page 23 Quick Staak is a default and easy preset that fits most use scenarios on land. It is the fastest way to get your camera up in the air ready to film your adventure. If this is you first time using Staaker we recommend using Quick Staak on land the first times to get used to the drone and using the tracker.
- Page 24 Locate Staaker The Locate Staaker feature allows the tracker to determine the current location of the drone. It will point you towards the last known location of the drone. The tracker needs a GPS fix for this functionality to...
- Page 25 You can use Locate Staaker before takeoff to determine the GPS and altitude accu- racy. Press while in Locate Staaker and the drone will respond with an audio beep if it has connection. Pairing After uploading new software or replacing tracker/drone, you might need to pair the tracker and drone.
-
Page 26: Pro Staak Settings
Do not touch the devices while pairing. This might interfere with the calibration process and cause degraded tracking performance. You can only pair two devices that are running the same software version (the tracker will tell you if this fails). You can determine which version the tracker and drone are running in the About screen. -
Page 27: Return To Home
Water Staak for an easier and safe default setup. Navigate the Pro Staak settings by using either or the buttons and press to modify the selected setting. The tracker will remember your Pro Staak settings from previous session, even if the tracker is powered off. -
Page 28: Responsivity
In the screen shown above, the Staaker drone needs to improve its GPS signal and has an estimated error radius of 7 meters. Both tracker and drone needs an estimated error less than 5 meters in more than 5 seconds before takeoff can be engaged. - Page 29 A message will appear if the drone is unable to takeoff for some reason. The most common and easily fixable is when the drone detects a nearby magnetic disturbance interfering with the compass sensor: Refer to the Troubleshooting section on how to interpret and solve warnings displayed on the tracker. If both the tracker and drone is ready for takeoff, the following screen will appear: Press and hold to start the takeoff procedure.
-
Page 30: Tracking
5.5 Tracking After takeoff is complete, the drone will begin tracking your movements and following you. Figure 17: Overview of the Tracking state The drone battery usage indicator displayed on the tracker has a safety margin built into it. This means there is still a tiny reserve of power left at 0% which will be used for emergency landing. - Page 31 The mode selection menu (opened by pressing ) looks like this: The current selection is highlighted in black. Navigate the menu by pressing . Pressing will confirm your current selection and activate the selected mode. There are two options in this menu that are not tracking modes, Land and Back : Back: Returns to the previous state without changing anything.
-
Page 32: Landing
5.6 Landing Open the land menu by either pressing and holding the button or select Land in the mode menu. You can choose between Land Now or Return to Home. When a landing option is selected, the drone engages the selected landing mode. For safety reasons, the drone will automatically engage Pause while in the land menu. -
Page 33: Land Now
5.6.1 Land Now The drone will execute landing in its current position and start the descent when Land Now is activated. You can abort landing anytime by holding the button. Holding the Down button while landing makes the drone descend faster (useful when land is engage when the drone is flying high above the ground). -
Page 34: Pause/Unpause
If the drone reaches 0% battery while Return to Home is engaged, it will land at its current position. For your own safety, wait for the propellers to stop before approaching the drone after it has landed. 5.7 Pause/Unpause While the drone is tracking you, you can pause the drone by pressing once. -
Page 35: Attaching The Strap
5.9 Attaching the Strap 1. Place the tracker upside down 2. Lead the strap through the slots with the logo on the strap pointing up. 3. Pull the strap all the way in Figure 18: Attaching the Tracker strap 5.10 Charging the Tracker Charge the battery before using it for the first time or when it has been unused for extended periods. -
Page 36: How To Use The Staaker
6.1 Before use The Staaker drone is ready to fly out of the box. However, we recommend that you download the newest firmware for the tracker and the drone before using it first time. This ensures the best user experience and system stability. -
Page 37: Flying Above Water
4. Turn on the tracker by pressing and the power button on the right side of the tracker. 5. Insert a battery into the Staaker and turn it ON. 6. The tracker and the drone will connect and you will see the drone status on your tracker. -
Page 38: Flight
1. Takeoff is completed when the drone reaches 10 meters altitude and the GoPro is pointing at your tracker. 2. The Staaker is now in Compass mode and is ready to Staak. When you are ready to go, the drone will follow you in this position. - Page 39 Altitude control Figure 19: Up and Down controls altitude When pressing up or down while the drone is flying (and the tracker is not in the mode selection menu) you will change the drone’s altitude (See figure 19). The drone will try to maintain the set altitude above the tracker. If the tracker ascends, the drone will also ascend an equal amount.
- Page 40 Note that in Scenery mode the drone will move forwards in the direction that the camera is pointing if you press Forward , and backwards if you press Backward Position around the tracker Figure 21: Left and Right rotates the drone around the tracker (clockwise and counter-clockwise respectively).
-
Page 41: Tracking Modes
6.9 Tracking Modes This section describes the five different interactive flight modes that can be engaged by the tracker. Under flight, pressing the button at any time opens the tracking mode selection menu. Use the buttons to navigate the menu and select the desired tracking mode. Press the button to confirm selection. - Page 42 Circle As soon as you enter this mode, the drone will begin to circle around the tracker position in a clockwise direction. It will keep a fixed distance and altitude above the tracker while orbiting. In Circle mode the Left and Right button no longer control position, but instead control the orbit speed:...
-
Page 43: Drone Smart Battery
7 Drone Smart Battery Figure 22: Staaker Drone Smart Battery The battery is inserted at the back of the drone and secured by a locking mechanism. The drone has no power until the battery is turned on. Ensure that the battery is inserted properly. Failure to do so can lead to in-flight power loss. -
Page 44: Charging
Only charge the Staaker battery with the accompanying Staaker charger. Damage to the battery and fire can occur when using the wrong charging equipment. To charge the battery, insert the Staaker battery charger jack into the charging plug on the battery (see figure 23). -
Page 45: Battery Failure
• Storing empty batteries To make the most of your Staaker batteries, the batteries should be stored in a dry place at 5°C to 20°C degrees (41°F to 68°F), and be charged to 50%. This puts the minimal strain on the internal chemistry of the battery, preserving it longer. -
Page 46: Maintenance And Repairs
• Always use the rubber USB protector on the tracker. Warranty Warning We recommend that all repairs are done by personnel authorized by Staaker, if this is done by unauthorized personnel it will affect the warranty of the product. See “Terms &... -
Page 47: Replacing Gimbal
8.3 Replacing Gimbal 1. Place the drone upside down, unfolded, on a table. 2. Loosen all set screw on all four legs. 3. Unscrew all four socket head cap screws for the legs and remove them. 4. Unscrew all torx on the bottom part of the main body. 5. -
Page 48: Propellers
Make sure the propeller sits tight. A loose propeller might detach under flight and make the drone crash. Only use original Staaker propellers. If you use wrong propellers on the motors the treads on the shaft and nut will not match. -
Page 49: Staaker Tips
GPS fix is by looking at the estimated distance between drone and tracker. For example if you are standing next to the drone and Locate Staaker reports 5 meters distance, the GPS has currently an error of 5 meters which can adversely affect tracking performance and camera framing. -
Page 50: Troubleshooting
10 Troubleshooting 10.1 Error Messages This section explains the various error messages that can be displayed on the tracker. An error message on the tracker looks like this: In this case, the drone cannot takeoff because it detects nearby magnetic interference. To solve the issue and enable takeoff, the drone needs to be moved away from the magnetic disturbance. -
Page 51: Before Or During Takeoff
Wait for better signal or move around too poor for takeoff. with the tracker to establish a better view of the sky. Staaker has too low bat- The drone battery level is Either use Pro Staak option to disable tery for automatic Return... -
Page 52: Land Reasons
Other transmitters can also in- the drone and tracker is terfere with the Staaker link signal. not reestablished. If au- tomatic RTH is enabled, it will RTH instead. -
Page 53: Tracker Cannot Connect To The Drone
Automatic Return to Home will only happen if you are in Water Staak or Pro Staak with the Return to Home setting enabled. If you lose connection with the tracker while flying Scenery mode, the drone will engage automatic Return to Home flight. -
Page 54: Tracker Cannot Get Gps
Figure 25: Representation of GPS satellite reception The bold lines indicates satellites which causes degraded position accuracy (e.g signals passing through buildings/trees or signals reflected on buildings/mountains). A degraded GPS signal can cause the drone to drift in position and not follow the tracker properly. Therefore, do not fly the drone in urban areas or GPS denied environments 10.3.2 Tracker cannot get GPS •... -
Page 55: Drone Cannot Get Gps
Staaker Assist). Write down the date and time of the flight. Let us know how the crash happened. If the drone breaks and you cannot fix it, please collect all the pieces you can find and contact Staaker support. -
Page 56: Staaker Assist
Staaker Assist requires internet connection and will download and update the latest firmware version for you. Staaker Assist will also notify you if there is a new firmware since last time you updated your Staaker when you are plugged in. -
Page 57: Uploading Flight Logs
11.2 Uploading flight logs By using the Staaker Assist application on your desktop you will help us improve reliability and user experience when using the Staaker and Tracker. By connecting your drone to Staaker Assist, the latest flight logs from your drone will be uploaded and used for further development and user experience improvements. -
Page 58: Terms & Warranties
Product. Staaker accepts no risk, obligation or liability whatsoever to you or any third party for any of the following (“Disclaimed Activities”) performed or caused, by act or omission, by you or a third party with access to your Product: •... -
Page 59: Product Warranty And Return
You agree to read, and abide by any written instructions shipped with your Product and all safety precau- tions contained therein. If you do not understand any part of any of these instructions or the functionality of Product, you may view the FAQ on our webpages or contact us at support@staaker.com. 12.3 Limited One-Year Warranty Our Products are warrantied against manufacturing defects for a period of one year from the original date of delivery of the Product to you. -
Page 60: Indemnity
SUBJECT TO OUR WARRANTY PROGRAM, THE PRODUCT IS PROVIDED ON AN \AS IS" BASIS AND YOUR USE OF THE PRODUCT IS AT YOUR OWN RISK, AND IN NO EVENT WILL STAAKER BE LIABLE FOR ANY PUNITIVE, EXEMPLARY, SPECIAL, CONSEQUENTIAL OR INCIDENTAL DAMAGES (INCLUDING, WITHOUT LIMITATION,... -
Page 61: Dispute Resolution
For any dispute, claim or controversy with Staaker arising out of or relating to these Terms or the use of the Product (collectively, “Dispute”), you agree to first contact us and attempt to resolve the Dispute with us informally. -
Page 62: General Terms
Staaker’s failure to enforce any right or provision of these Terms will not be considered a waiver of such right or provision. The waiver of any such right or provision will be effective only if in writing and signed by a duly authorized representative of Staaker. -
Page 63: Technical Specifications
WIND RESISTANCE Designed for, and tested, in all 3 axis gimbal, with high Staaker can withstand winds kinds of weather. Staaker flies accuracy, stabilizes the camera up to 30 kph / 20 mph in snow, wind and rain! at all times... -
Page 64: Staaker Drone
Dimensions (Folded, see figure 26) Width: 200 mm Length: 340 mm Height: 110 mm Dimensions (Expanded, see figure 27) Width: 440 mm Length: 340 mm Height: 150 mm Figure 26: Staaker folded Figure 27: Staaker expanded Short term, -130 dBm, 12 SVs... -
Page 65: Tracker
Physical dimensions (See figure 28) Width: 55 mm Length: 85 mm Height: 30 mm Weight: 85 grams 13.4 Smart Battery Name: STAAKER 1 Intelligent LiPo Battery Art. nr: 120000 Rated Capacity: 6400mAh, 94.72Wh Max Charge Voltage: 16.8V Nominal Voltage: 14.8V Charging temperature: 45 C... -
Page 66: Smart Battery Charger
13.5 Smart Battery Charger AC/DC CHARGER Model: XVE-1680500 Input: 100V-240VAC 50/60Hz 2.0A (max) Output: DC 16.8V 5.0A Art. nr: 130003 CAUTION: Indoor use only! Do not remove the cover. No serviceable parts inside. Read the Staaker user manual before using the battery charger. -
Page 67: Ce, Fcc And Ic Compliance
14 CE, FCC and IC compliance 14.1 CE This product is CE compliant. 14.2 Exposure Statement This portable device with its antenna complies with FCC RF exposure limits for general population / un- controlled exposure. The antenna used for this device must not be co-located or operating in conjunction with any other antenna or transmitter. -
Page 68: Industry Canada Notes
(2) l’utilisateur de l’appareil doit accepter tout brouillage radio ´ electrique subi, m ˆ eme si le brouillage est susceptible d’en compromettre le fonctionnement. 14.7 About Staaker STAAKER1 DRONE Designed by The Staaker Company© in Norway. Assembled in Norway. -
Page 69: Customer Support
15 Customer Support Website: www.staaker.com/support E-Mail: support@staaker.com Address: The Staaker Company AS, Martin Linges vei 25, 1364 Fornebu, Norway www.youtube.com/staaker www.facebook.com/staaker www.instagram.com/staaker Submit support request in Staaker Assist See section 11.3 on how to submit support requests through the Staaker Assist application.
Need help?
Do you have a question about the Staaker 1 and is the answer not in the manual?
Questions and answers