
Summary of Contents for DeAgostini Model Space RB7
- Page 1 Red Bull Racing RB7: Step by Step ™ ™ RADIO CONTROLLED • BUILD IT YOURSELF • NITRO ENGINE Pack 1 Stages 1-4...
- Page 2 All rights reserved © 2013 De Agostini UK Ltd, Battersea Studios 2, 82 Silverthorne Road, London SW8 3HE NOT SUITABLE FOR CHILDREN UNDER THE AGE OF 14. THIS PRODUCT IS NOT A TOY AND IS NOT DESIGNED OR INTENDED FOR USE IN PLAY. RED BULL RACING RB7 complies with CE regulations. Items may vary from those shown.
-
Page 3: Stages
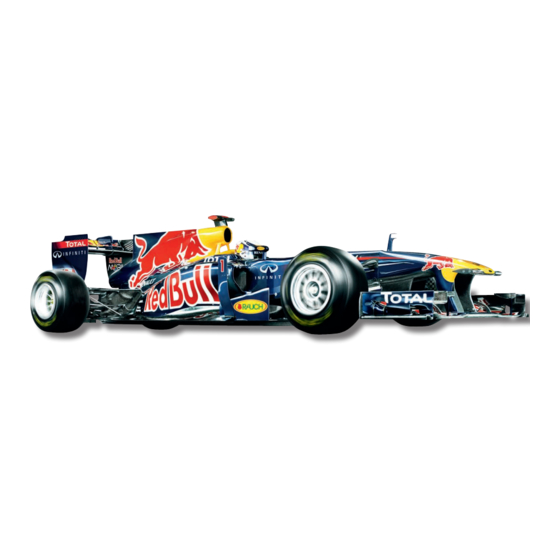
RACING RB7 AT A GLANCE MODERN TECHNOLOGY AND A RANGE OF TUNING OPTIONS MAKE THE RED BULL RACING RB7 RACING CAR A FASCINATING MODEL FOR BEGINNERS AND EXPERIENCED MODELLERS ALIKE. Based on Kyosho’s proven technology, your 1:7-scale And with each pack, alongside the assembly guides,... - Page 4 – enough to see off the stiffest competition. The car’s simple single-speed transmission The centrepiece of the Red Bull Racing RB7 model – its saves having to make complex adjustments to ensure race-proven chassis – provides numerous adjustments...
-
Page 5: The Remote Control System
Red Bull which is more comfortable to use than a simple joystick. Racing RB7, they are made a little more robust for racing The trigger on the grip controls the car’s acceleration... - Page 6 The radio signals from the remote control handset are picked up by an RC receiver unit located in the radio box on the chassis of your Red Bull Racing RB7 racing car, The model’s steering servo can be seen on the right of the picture, on the left of the engine.
-
Page 7: Stages
™ Stage 1 ASSEMBLING THE FRONT WING BEGIN THE ASSEMBLY OF YOUR REALISTICALLY DETAILED RB7 MODEL BY FITTING TOGETHER THE LOWER AND CENTRAL PARTS OF THE FRONT WING, ALONG WITH ITS LEFT AND RIGHT BASEPLATES. Tools & Materials Phillips screwdriver (size 0) - Page 8 Red Bull Racing RB7: Step by Step ™ Place the centre front wing on Turn the assembly over. Take the Lay the left front wing baseplate the lower front wing, as shown. two 1.4 x 2.5mm screws and on your work surface, as shown.
-
Page 9: Stage
™ Stage 2 ASSEMBLING THE REAR WINGS CONTINUE PUTTING TOGETHER THE COMPONENTS OF THE FRONT WING, FOLLOWED BY ASSEMBLING THE COMPONENTS FOR THE REAR WING OF YOUR RB7 MODEL. Tools & Materials Phillips screwdriver (size 0) Superglue Rear upper wing... - Page 10 This completes this phase of the front wing assembly. The front wing of your Red rear of the wing assembly. Align the Bull Racing RB7 should now look like the example shown above. Store the assembly holes at the arrow on the right and secure in a safe place until it is needed.
- Page 11 Red Bull Racing RB7: Step by Step ™ Position the rear middle wing Take the back of the rear middle Place the assembly on the raised top plate as shown, and apply wing baseplate and press it into areas on the inside of the left rear superglue to the sunken area of the part.
- Page 12 Red Bull Racing RB7: Step by Step ™ Position the right endplate of the Secure the endplate in place Take the the rear wing adjuster rear wing endplate, as shown. using two 1.4 x 6mm screws. and apply superglue to the flat Then take the rear wing assembly, and surface, as shown.
-
Page 13: Assembling The Front Wing
Red Bull Racing RB7: Step by Step ™ Stage 3 ASSEMBLING THE FRONT WING AERODYNAMIC ADD-ONS GIVE THE FRONT WING SOME FINISHING TOUCHES. IN ADDITION, YOU GET THE FIRST WHEEL FOR YOUR MODEL. Tools & Materials Phillips screwdriver (size 3) - Page 14 Red Bull Racing RB7: Step by Step ™ Hold one of the two fins of the Fit the fins at the indicated Using a knife carefully separate front wing with your pliers and positions on the front wing (see the two small front wing apply superglue to the flat bottom, as green arrows).
- Page 15 Red Bull Racing RB7: Step by Step ™ Fit a 1.4 x 4mm screw into the Take the first left upper flap and Position the second upper flap hole on the underside of the position on the inside of the left...
- Page 16 Position the support, as shown, At the end of this session, the front wing of your Red Bull Racing RB7 should look between the underside of the like the one shown above. Store the wings until they are needed again.
-
Page 17: Stage
Red Bull Racing RB7: Step by Step ™ Stage 4 THE FIRST SHOCK ABSORBER AFTER ASSEMBLING THE FRONT AND REAR WINGS, WE BEGIN TO BUILD THE CHASSIS, STARTING WITH THE ASSEMBLY OF THE FIRST SHOCK ABSORBER FOR YOUR MODEL. Tools & Materials... - Page 18 Red Bull Racing RB7: Step by Step ™ Take the shock casing and Holding the shock casing as Pull the shaft, using some remove the shock cap. Keep the shown, push the shock shaft needle-nose pliers, until it stops cap to one side.
- Page 19 Red Bull Racing RB7: Step by Step ™ Holding the shock cap as shown, Take the shock oil and fill the By moving the piston up and push the shock top into the hole shock case to about halfway. down, air is forced upward, and in the cap (see red arrow), until it stops.
- Page 20 Red Bull Racing RB7: Step by Step ™ The edge of the diaphragm must Now take the shock top and cap Hold the case assembly as shown. be flush with the top of the case. and place it on the thread at the...
Need help?
Do you have a question about the RB7 and is the answer not in the manual?
Questions and answers