Table of Contents
Advertisement
Quick Links
Light L16 User Guide
Table of Contents
Welcome
Getting Started
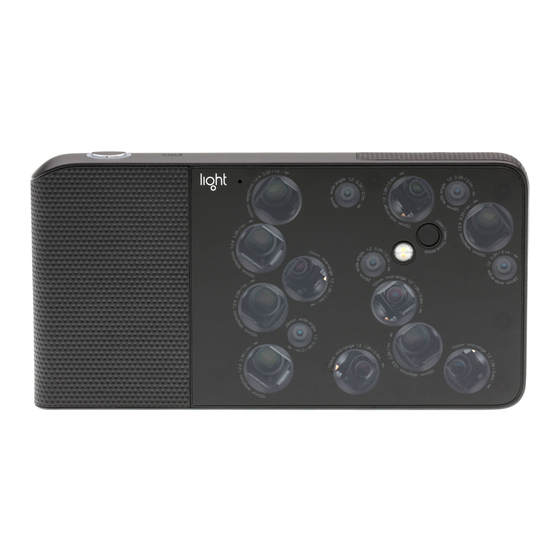
A quick look at Light L16
Power on, Power off, Sleep, Wake
Connectivity settings
Charging and battery life
Photo Capture
At a glance
Take a photo
Auto Exposure mode
Manual Exposure mode
Focus
Zoom
Exposure
ISO
Shutter Speed
Flash
White Balance
Self-Timer
Capture information
Grid
Video Capture
At a glance
Take a video
Access Video mode
Gallery
View photos and videos
Safety, Handling and Support
Care for Light L16
Customer support
Advertisement
Table of Contents

Related Manuals for Light L16

Summary of Contents for Light L16
- Page 1 Light L16 User Guide Table of Contents Welcome Getting Started A quick look at Light L16 Power on, Power off, Sleep, Wake Connectivity settings Charging and battery life Photo Capture At a glance Take a photo Auto Exposure mode Manual Exposure mode...
-
Page 2: Getting Started
Welcome Welcome to your new Light L16. Here’s everything you need to know to start taking pictures. Getting Started ● A quick look at Light L16 ■ Software Package Version ● This guide describes Light L16 with software package XX. - Page 4 ● Power on, Power off, Sleep, Wake ■ Turn on Light L16. I f Light L16 is off, press and hold the Power button until the Light logo appears. The camera interface appears shortly after. ■ Turn off Light L16. T o power off Light L16, press and hold the Power button until the Power off button appears on screen.
- Page 5 2. Tap the Bluetooth icon [ICON] to toggle Bluetooth on and open the Available Devices menu. 3. Your Light L16 will search for nearby devices. When you see the name of your device, tap it to connect. Your Light L16 will then connect with the device. ● Turn Bluetooth off.
- Page 6 5. Once successfully connected, "Connected" shows under the network name. The Wi-Fi network is now a "Saved network." When in range, your Light L16 automatically connects to it, as long as Wi-Fi is turned on. ● Turn Wi-Fi off.
- Page 7 ■ Check remaining power. O n Light L16, swipe down from the top of the camera touchscreen to open Control Center. In the top right corner you see remaining power indicated as a percentage next to a battery icon.
- Page 8 ● When not shooting, it’s best to keep your Light L16 screen off. ● If you know you won’t be using your Light L16 for an extended period of time, fully power down the camera before storing it in your Light soft case.
-
Page 9: Photo Capture
Photo Capture ● At a glance ■ With Light L16, you can take pictures in one of two modes: Auto or Manual. In each mode, you have the ability to adjust exposure and preview your adjustments live on screen. Beyond exposure controls, you have additional options located in the Toolbar. -
Page 10: Take A Photo
Toolbar. ■ Take a photo. T here are multiple ways to take a photo with Light L16: ● Press and hold the Shutter button to take a photo with exposure automatically calculated by Light L16. For more information on exposure, see ... -
Page 11: Auto Exposure Mode
■ Auto mode sets exposure (ISO and Shutter Speed) automatically. Depth of field (the amount of blur before and after your subject) for images taken with Light L16 is adjustable after your images are transferred to the Light desktop app... -
Page 13: Manual Exposure Mode
● Manual Exposure mode ■ Manual mode allows you to adjust exposure through two capture controls: ISO [ISO.png] and Shutter Speed [Shutter Speed.png] What are ISO and Shutter Speed? . When you open Manual mode, ISO and Shutter Speed will be set to a default value based on what? ■... - Page 14 ■ View your current ISO value. T ap the ISO button [ISO.png] see your last used ISO value. Or press and hold the ISO button [ICON] to open the ISO slider. Your previously used ISO value is indicated by a hollow carrot [Hollow Carrot.png] With Capture Information turned on, you can see your ISO value in the Info bar on the left of the screen.
- Page 15 ■ View your current shutter speed value. T ap the Shutter Speed button [Shutter Speed.png] to see your last used shutter speed. Or tap and hold the Shutter Speed button [Shutter Speed.png] to open the Shutter Speed slider. Your previously used shutter speed value is indicated by a hollow arrow [Hollow Carrot.png] With Capture Information turned on, you can see your ISO value in the Info bar on the left of the screen.
- Page 16 ■ Note: R emember that Light L16 does not have a native aperture control. You can adjust aperture after uploading images to your computer. Click here to read more about why Light L16 doesn’t have native aperture control. [Link to help article] ...
- Page 17 ● Exposure ■ Adjust Exposure in Auto mode. A uto mode automatically adjusts exposure based on the scene you are capturing. If you want, you can make adjustments to the calculated exposure before taking a photo. Press and hold the Exposure button [Exposure (black).png] on the right side of the screen to open the Exposure slider.
- Page 18 ● ISO ■ Adjust ISO in Manual mode. P ress and hold the ISO button [ISO.png] on the right side of the screen to open the ISO slider. While holding, move your finger up or down to set your desired ISO value. L earn more about ISO...
-
Page 19: Shutter Speed
open the ISO slider. Your previously used ISO value is indicated by a hollow carrot [ICON] With Capture Information turned on, you can see your ISO value in the Info bar on the left of the screen. For more information, see C apture Information... - Page 20 : Fires the flash every time you take a photo. : F lash will not fire. ● Flash Off [ICON] : L ight L16 will determine if flash is ● Flash Auto [ICON] necessary to provide a proper exposure.
-
Page 21: White Balance
● White Balance ■ In tricky lighting situations, you may want to control how Light L16 perceives the color of light in a scene. Light L16 has several white balance options for use in various environments. Changing your White Balance on Light L16 ■... - Page 22 ● Cloudy [ICON] Choose the Cloudy White Balance option to adjust Light L16 for cloudy conditions. ● Shady [ICON] Choose the Shade White Balance option to adjust Light L16 for shady conditions. ● Fluorescent [ICON] Choose the Flourescent White Balance option to adjust Light L16 for shooting under Fluorescent lighting.
- Page 23 ● Capture information ■ Turning on Light L16’s Capture Information allows you to view important information about your current capture settings including shutter speed, ISO, focal length, and more. ■ Turn on Capture Information. T ap the Toolbar button [Toolbar.png] in the bottom right corner to show the Toolbar.
- Page 24 ● Grid ■ To display grid lines over Light L16’s live preview, Tap the Toolbar button [Toolbar.png] in the bottom right corner to show the Toolbar. Tap the Grid button to show the available grid options. ■ Grid options. ● Thirds The Thirds grid [ICON] divides the screen into a 3x3 grid of equal size sections.
-
Page 25: Video Capture
FHD (1080p) or HD (720p). ● Take a video ■ Take a video. T here are multiple ways to take a video with Light L16: ● Press the Shutter button to begin recording a video. Press the Shutter button again to stop recording. - Page 26 ● Tap the Record button [ICON] to begin recording a video. The button will turn from a red circle to a red square. Tap the End Recording button [ICON] to stop recording. ● Access Video mode ■ Switch to video mode. T ap the Toolbar button [Toolbar.png] the bottom right corner to show the Toolbar.
- Page 27 Gallery ● View photos and videos ■ View your photos. From the any capture mode, tap the thumbnail icon in the upper-right corner to access the gallery. Swipe right to see your previous photos, or tap the collage icon [ICON] in the upper-left corner to see all of your photos.
-
Page 28: Safety, Handling And Support
Safety, Handling and Support ● Care for Light L16 ■ Storing Light L16. I ncluded with your Light L16 is a soft case for storing the camera on the go. The outside of the case is made of durable eco-yarn to protect the camera when being stored in your pocket or bag. - Page 29 FCC Statement This equipment has been tested and found to comply with the limits for a Class B digital device, pursuant to part 15 of the FCC Rules. These limits are designed to provide reasonable protection against harmful interference in a residential installation. This equipment generates, uses and can radiate radio frequency energy and, if not installed and used in accordance with the instructions, may cause harmful interference to radio communications.
Need help?
Do you have a question about the L16 and is the answer not in the manual?
Questions and answers