Table of Contents
Advertisement
Quick Links
QUICK START GUIDE
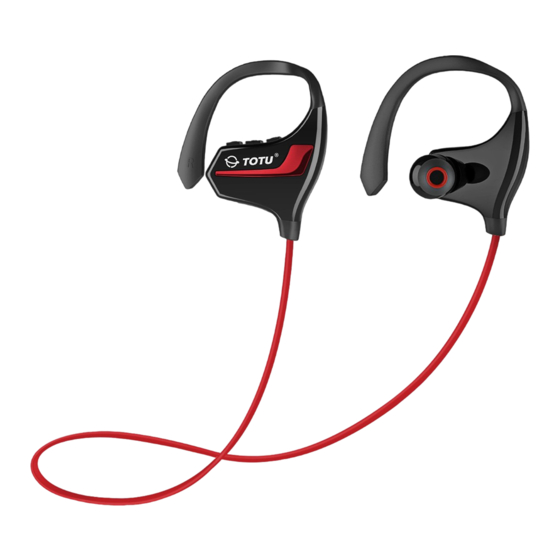
Wireless Sport Headphones
BT‐2
Switching On and Off
To switch the BT‐2 on or off, hold down the MFB for about 4 seconds until you hear "power
on/power off," indicating that the BT‐2 is starting up/shutting down.
Connecting the headphones to your Bluetooth device
1. To use your TOTU BT‐2 Bluetooth headphones with a Bluetooth device (such as a smartphone
or tablet), you must first establish a wireless connection between the headphones and your
device. This process is called "pairing." Once the headphones and your device have been paired,
they will automatically reconnect the next time you use them together.
2. The instructions below provide some additional information about the pairing procedure, in
case youencounter problems pairing your phone with the BT‐2.
Procedure:
1. With the BT‐2 switched on, bring your smartphone to BT‐2.The BT‐2 is in pairing mode until
you see the blue/red LED is blinking alternately.
2. Find the Bluetooth menu in your smart phone, and turn Bluetooth on.
3. Use your phone's Bluetooth menu to search for Bluetooth devices. This may take a
fewminutes,depending on your phone model.
4. When your phone finishes searching, it will display a list of devices it has found. Select the
TOTU BT‐2from the list.
5. If your phone prompts you for a password or security code, enter "0000" (four zeros).
6. Depending on your phone model, it may now connect to the TOTU BT‐2 automatically when
the blue LED is blinking.
7. If this does not happen, use your phone's Bluetooth menu options to connect to the BT‐2.
You are now ready to start using the BT‐2.
Placement and Fit
Position the earhook over the back of your ear.
Insert the earbud into the ear canal and adjust it by twisting it into position if the fit is not right.
Adjust the flexible earhook to fit securely around the ear.
Adjust the ear tip size if necessary.
Charging
1. Use the supplied USB cable to charge the BT‐2 whenever the battery is low.
2. When the BT‐2 battery is low, It beeps and the indicator light flashes red. If the BT‐2 powers
offduring a call, the call will be automatically transferred to the phone.
3. If the battery level drops to very low, then the BT‐2 will automaticallyswitch itself off.
Advertisement
Table of Contents

Related Manuals for Totu BT-2

Summary of Contents for Totu BT-2
- Page 1 QUICK START GUIDE Wireless Sport Headphones BT‐2 Switching On and Off To switch the BT‐2 on or off, hold down the MFB for about 4 seconds until you hear “power on/power off,” indicating that the BT‐2 is starting up/shutting down. Connecting the headphones to your Bluetooth device 1. To use your TOTU BT‐2 Bluetooth headphones with a Bluetooth device (such as a smartphone or tablet), you must first establish a wireless connection between the headphones and your device. This process is called “pairing.” Once the headphones and your device have been paired, they will automatically reconnect the next time you use them together. 2. The instructions below provide some additional information about the pairing procedure, in case youencounter problems pairing your phone with the BT‐2. Procedure: 1. With the BT‐2 switched on, bring your smartphone to BT‐2.The BT‐2 is in pairing mode until you see the blue/red LED is blinking alternately. 2. Find the Bluetooth menu in your smart phone, and turn Bluetooth on. 3. Use your phone's Bluetooth menu to search for Bluetooth devices. This may take a fewminutes,depending on your phone model. 4. When your phone finishes searching, it will display a list of devices it has found. Select the TOTU BT‐2from the list. 5. If your phone prompts you for a password or security code, enter "0000" (four zeros). 6. Depending on your phone model, it may now connect to the TOTU BT‐2 automatically when the blue LED is blinking. 7. If this does not happen, use your phone's Bluetooth menu options to connect to the BT‐2. You are now ready to start using the BT‐2. Placement and Fit Position the earhook over the back of your ear. Insert the earbud into the ear canal and adjust it by twisting it into position if the fit is not right. Adjust the flexible earhook to fit securely around the ear. Adjust the ear tip size if necessary. Charging ...
- Page 2 4. The battery life on the BT‐2 will vary depending on the device you are using.Some devices draw significantly more power than others. In particular, using the BT‐2 with aVoIP application such as Skype will drain the battery more quickly. 5. Makesure the BT‐2 is fully charged before using it for the first time. 6. Repeated charging and discharging of the headset over time will causethe batteryperformance to diminish. This is normal for all rechargeablebatteries. Procedure: 1. Plug the supplied USB cable into a spare USB socket on your computer or attach it to your AC adapter. 2. Then plug the other end of the USB cable into your headphones. 3. Duringcharging, the indicator light will turn red. Ifcharging does not begin, unplug the travel adapterand plug it in again. 4. When the headset is fully charged, the redindicator light changes to blue.Disconnect the AC adapter and USB cable. LED Status Red Light=Charging Blue Light=Fullycharged Blinking Red Light=Under 15 minutes of playback remaining Blinking Blue Light=Normal use Blinking Blue/Red Light=Paring Note: Some smart devices provide additional battery status feedback via an on‐screen icon. Technical Specification Mylar thickness titanium diaphragm 6μ Impedance 16Ω±20% (DCR) Rating input power ...
-
Page 3: Fcc Statement
Standby time Up to 160 hours Play time Up to 7 hours Charging time Approximately 1.5 hours * Depending on the phone type and usage, the actual time may vary. Warranty 1. TOTU warrants this product as free of defects in material, design, and workmanship. 2. The warranty is limited to the original purchaser. 3. A copy of your receipt or other proof of purchase is required for a proper warrantyservice. 4. The warranty is void if the product label is removed, or if the product has been subjectto physical abuse, improper installation, modification, or repair by unauthorized thirdparties. 5. TOTU will not assume any responsibility for any loss or damage incurred inshipping. Safety Precautions 1.When using your BT‐2 while driving, follow local regulations in the region you are in. 2. Never disassemble or modify your BT‐2 for any reason. Doing this may cause theheadphone to malfunction or become combustible. 3. Keep your device and all accessories out of the reach of small children or animals. Smallparts may cause choking or serious injury if swallowed. 4. Avoid exposing your device to very cold or very hot temperatures (below 0 °C or above45 °C). Extreme temperatures can cause the deformation of the device and reduce thecharging capacity and life of your device. 5. Donot allow your device to get wet — liquids can cause serious damage. Water damage toyour device can void your manufacturer’s warranty. 7. Donot use the device during a thunderstorm. Thunderstorms can cause the devicetomalfunction and increase the risk of electric shock. 8. Excessive exposure to sound at high volumes can cause hearing damage. Alwaysturn the volume down before plugging the earphones into an audio source and useonly the minimum volume setting necessary to hear your conversation or music. FCC Statement This equipment has been tested and found to comply with the limits for a Class B digital device, pursuant to Part 15 of the FCC Rules. - Page 4 -- Connect the equipment into an outlet on a circuit different from that to which the receiver is connected. -- Consult the dealer or an experienced radio/TV technician for help. This device complies with part 15 of the FCC Rules. Operation is subject to the following two conditions:(1) This device may not cause harmful interference, and (2) this device must accept any interference received, including interference that may cause undesired operation.
Need help?
Do you have a question about the BT-2 and is the answer not in the manual?
Questions and answers