
Related Manuals for DELLA 048-GM-48200


Summary of Contents for DELLA 048-GM-48200
-
Page 1: User Manual
USER MANUAL WATER DISPENSER WITH ICE MAKER Model:048-GM-48200 Please read this owner’s manual carefully before operating the unit. -
Page 2: Table Of Contents
TABLE OF CONTENTS INTRODUCTIONS………………………………………………………...…3 IMPORTANT SAFETY INSTRUCTIONS……………………….……….…3 GETTING TO KNOW YOUR UNIT............... Unit outline…………………………………………………….……………..5 Operation panel………………………………………………………………6 Main function………………………………………………………………...6 START TO OPERATE THE UNIT……………………………………….…6 Unpack the unit………………………………………………………………6 Clean your unit before first using……………………………………………7 Prepare for use……………………………………………………………….7 Operate the unit………………………………………………………………8 ELECTRICAL DIAGRAM………………………………………………….10 G ….…………………..10 E ………….……………………………….12 …... -
Page 3: Introductions
INTRODUCTIONS Thank you for purchasing our ICE MARKER WITH WATER DISPENSER with multi-function. This unit is designed to improve your living and entertaining comfort. Not only you can enjoy ICE making function, also you can enjoy the cool and hot water drink. With its whisper quiet operation and attractive design, you will enjoy its convenience and comfort for years to come. - Page 4 And place the unit away from direct sunlight and make sure that there is at least 2 inches of space between the back of your unit and wall. Keep a minimum distance of 4 inches on each side of your unit free. Do not tip over the unit.
-
Page 5: Getting To Know Your Unit
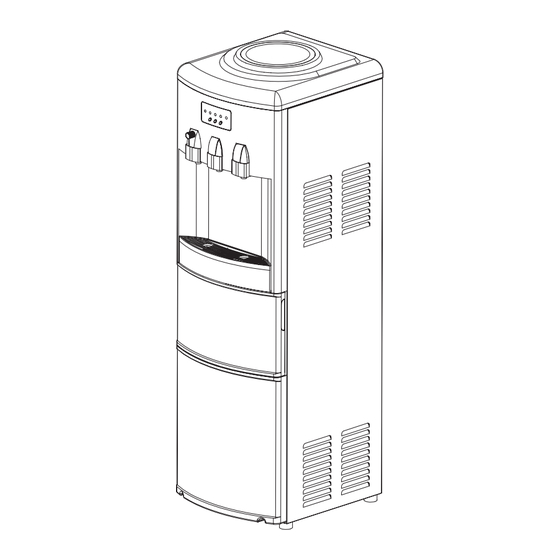
GETTING TO KNOW YOUR UNIT Unit Outline Smart Device for Water Bottle Top Cover Handle Operation Panel Hot Water Faucet Power Cord Room Temp Water Faucet Cold Water Faucet Drain cap for hot tank Drip Water Tray Drain cap for Ice Getting Ice dispenser Entrance Door... -
Page 6: Operation Panel
Operation panel Cold Water Indicator Hot Water Indicator Ice-Maker Indicator Warning Indicator Power Indicator POWER WARN COLD Ice-maker Button Hot Water Button Cold Water Button Main function ● Hot Water ● Cold Water only ● Ice-making only ● Cold water and ice-making at same time START TO OPERATE YOUR UNIT UNPACKING THE UNIT Removing the package, do not turn the unit upside down, or lay it on its side. -
Page 7: Clean Your Unit Before First Using
it from being exposed in the sunlight. ● The appliance must be positioned so that the plug is accessible. Fasten the drain cap tightly at the back of the unit before start to run the unit. Because during the shipping process, it maybe has loosed. When you not fasten it again, it will cause the water leakage and make your floor wet. -
Page 8: Operate The Unit
5). Plug the unit into a grounded power outlet. Do not plug in before the water can flow out from all of the water faucets. DANGER: This unit should be properly grounded for your safety. The power cord of this appliance is equipped with a three-prong plug which mates with standard three prong wall outlets to minimize the possibility of electric shock. -
Page 9: Cold Water Operation
Cold Water Operation Warning Indicator Cold Water Indicator Power Indicator COLD POWER WARN Cold Water Button Press the Cold Water button to start making the cold water, after this, the Cold Water indicator will start to blink, means that the compressor has started running to cool the water. When the Cold Water indicator change from blinking to illuminating, means that the cold water has reached the desired temperature and you can have the cold drink. -
Page 10: Electrical Diagram
If unit isn’t in use for a long time, take down the water bottle and drain out all water from both drain port at the back of the unit. 6. How to get the ice Open the ice getting entrance door, use the ice scoop supplied as the accessory to get the ice from the unit. - Page 11 system (smart device) counterclockwise and pull it up. Smart Device Smart Core Water separator of the cold tank Cold Tank Take apart the non-spill system (smart device and smart core showed in above figure), then proceed to wash it with the dish washing fluid, rinse it and reassemble. Empty the both tanks (hot and cold) by unplugging the drain cap of the hot tank at the back of the unit.
-
Page 12: Trouble Shooting Guide
them back to original position with screw by screwdriver. PRECAUTION When cleaning, the outside of the machine can be washed with the wet soft clothe. Don’t use erosive chemical solvent such as rubber water to wash, this maybe hurt the machine and make it change color. - Page 13 Cold Water using The preceding mount of cold Wait for a moment until cold water is too much. water comes out. clearance The ventilation around the Space the unit from the wall between the unit apparatus is insufficient. by more than 15 centimeters and the wall at each side of the unit.
-
Page 14: Product Specification
Install it evenly and lock the unit. Locating position Contact with other products. Move it away from other products. PRODUCT SPECIFICATION 048-GM-48200 Power Supply 115V~,60Hz Ice-making capacity 12 Kg/24Hours* (Ice-making only) Cold Water Capacity 4 L* (Cold water only) Hot Water Capacity Total Electrical Rating 7.3A **...
Need help?
Do you have a question about the 048-GM-48200 and is the answer not in the manual?
Questions and answers