Kenwood TS-590SG Instruction Manual
Hf / 50mhz transceiver
Hide thumbs
Also See for TS-590SG:
- Service manual (155 pages) ,
- Instruction manual (96 pages) ,
- Manual (76 pages)
Table of Contents
Advertisement
Quick Links
Advertisement
Table of Contents

Related Manuals for Kenwood TS-590SG


Summary of Contents for Kenwood TS-590SG
-
Page 1: Instruction Manual
HF/50MHz TRANSCEIVER TS-590SG INSTRUCTION MANUAL © B5A-0180-00 (K, E) - Page 2 COPYRIGHTS FOR THIS MANUAL JVC KENWOOD Corporation shall be free from any responsibilities for any incidental losses or JVC KENWOOD Corporation shall own all copyrights damages, such as missing communications or call and other intellectual properties for the product and...
-
Page 3: Features
THANK YOU NOTICE TO THE USER Thank you for choosing this KENWOOD TS-590S One or more of the following statements may be transceiver. It has been developed by a team of applicable for this equipment. engineers determined to continue the tradition of FCC WARNING excellence and innovation in KENWOOD transceivers. -
Page 4: Before Starting
BEFORE STARTING SUPPLIED ACCESSORIES Amateur radio regulations vary from country to After carefully unpacking the transceiver, identify the country. Confirm your local amateur radio regulations and requirements before operating the transceiver. keep the box and packing materials in case you need to repack the transceiver in the future. -
Page 5: Precautions
For example, avoid use near a bathtub, sink, swimming pool, or in a damp basement or attic. often a sign of trouble. Immediately turn the a KENWOOD service station or your dealer for advice. -
Page 6: Table Of Contents
CONTENTS THANK YOU ................. i TX SIDETONE/ RX PITCH FREQUENCY ......24 FEATURES ................i CARRIER LEVEL ...............24 NOTICE TO THE USER ............i POWER ON MESSAGE ............24 BEFORE STARTING ............. ii CHAPTER 6 ENHANCED COMMUNICATIONS MARKET CODES ..............ii SPLIT-FREQUENCY OPERATION ........25 WRITING CONVENTIONS FOLLOWED ........ -
Page 7: Contents
CONTENTS Reverse Keying Weight Ratio ........36 STORING INTO QUICK MEMORY ........47 BUG KEY FUNCTION .............36 RECALLING QUICK MEMORY CHANNELS ....47 CW MESSAGE MEMORY ..........36 TEMPORARY FREQUENCY CHANGES ......47 Storing CW Messages ..........36 QUICK MEMORY Á VFO TRANSFER ......47 Checking CW Messages without Transmitting ..37 ERASING QUICK MEMORY CHANNELS ......47 Transmitting CW Messages ........37 CHAPTER 11... - Page 8 Audio Level Settings ..........61 VFO RESET ..............83 CHANGING THE SIGNAL FOR THE COM TERMINAL ..61 FULL RESET ............83 CONTROLLING THE TS-590SG FROM A PC ....61 OPERATION NOTICES ............84 REMOTELY CONTROLLING THE TS-590SG ON THE DC POWER SUPPLY ............84 NETWORK ..............61 INTERNAL COOLING FAN ..........84...
-
Page 9: Chapter 1 Installation
Use heavy gauge wire or a copper strap, cut as short as possible, for this connection. Do not use a gas pipe, an electrical conduit, or a plastic water pipe as a ground. Fuse (25 A) E-type only Black (í) Red (+) DC Power supply (20.5 A or more) TS-590SG... -
Page 10: Utilizing The Bail
If newly installed fuses continue to blow, disconnect the power plug and On the rear panel of the transceiver, there is an contact a KENWOOD service center or your dealer for external speaker jack. If an external speaker is assistance. - Page 11 INSTALLATION 1 Headphones Front Panel GND (STBY) GND (MIC) DOWN 8 V (10 mA max) MIC connector (Front view) External speaker Microphone Rear Panel Note: ◆ Do not use a cable exceeding 3 m (9.8 feet) with the following connectors: PHONES jack MIC connector COM connector...
-
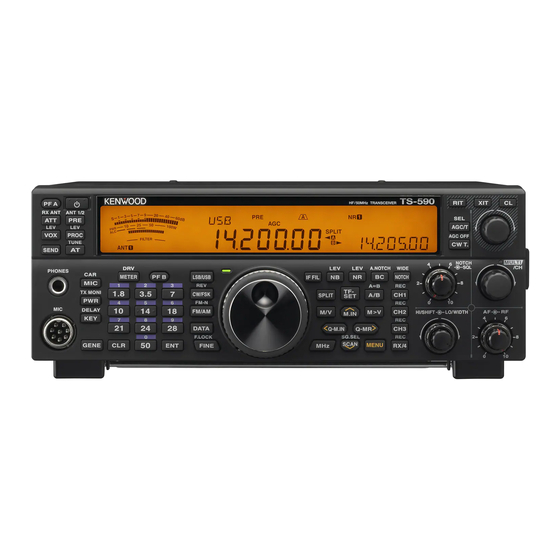
Page 12: Getting Acquainted
2 GETTING ACQUAINTED FRONT PANEL —— A —— —— C —— [METER (DRV)] Press and hold to switch the transceiver power ON Press to switch the meter type {page 12}. Press and and OFF {page 10}. hold to turn the Drive Out function ON or OFF {page 50}. [PF A] [PF B] You can assign a function to this Programmable... - Page 13 GETTING ACQUAINTED 2 [21 (7)] [NB (LEV)] Press to select the 21 MHz band memory {page 11} or Press to cycle through Noise Blanker 1, Noise Blanker enter keypad number 7. 2, and OFF. Press and hold to adjust the Noise Blanker level {page 42}.
- Page 14 2 GETTING ACQUAINTED [CL] [CH1 (REC)] Press to clear the RIT/ XIT frequency to zero Press to play back a CW {page 37} or voice message {pages 33}. (requires VGS-1 option) {page 62}. Press and hold to record a CW {page 36} or voice message (requires You can assign a function to this Programmable VGS-1 option) {page 62}.
-
Page 15: Lcd Display
GETTING ACQUAINTED 2 LCD DISPLAY —— A —— Appears when the Noise Blanker 1 or 2 is ON {page 42}. While receiving, the meter serves as an S-meter to “ ” (fast) or “ ” (slow) appears when the measure and display the received signal strength. Automatic Gain Control function is ON. - Page 16 2 GETTING ACQUAINTED —— F —— Appears when the VOX (Voice Operated Transmission) function is ON or the Break-in function is ON for CW mode {page 32}. (Main DIsplay) In normal operating mode and various configuration modes, it displays the transceiver operating frequency. Appears when the Frequency Lock function is ON In Menu mode, it displays the various menus, and in {page 55}.
-
Page 17: Rear Panel
GETTING ACQUAINTED 2 REAR PANEL ANT 1 and ANT 2 connectors DRV connector Connect your primary HF/ 50 MHz antenna to ANT 1 Connect a drive device to this RCA connector {page connector. If you are using 2 antennas for the HF/ 52}. -
Page 18: Operating Basics
3 OPERATING BASICS SWITCHING POWER ON/ OFF RF (RADIO FREQUENCY) GAIN 1 Switch the DC power supply ON. 2 Press [ ] to switch the transceiver ON. RF gain slightly when you have trouble hearing the switch back OFF. RF control [ ] again. -
Page 19: Selecting A Band
3 OPERATING BASICS SELECTING A BAND SELECTING A MODE Press [1.8 (1)] ~ [50 (0)] or [GENE] to select your [LSB/USB] [CW/FSK (REV)] [FM/AM (FM-N)]. [LSB/USB] [DATA] to toggle between [DATA] you can press [LSB/USB] settings as shown in the table below. [CW/FSK (REV)] save that setting. -
Page 20: Adjusting The Squelch
3 OPERATING BASICS ADJUSTING THE SQUELCH MULTI-FUNCTION METER [METER (DRV)] cycles between the Turn the SQL control when there are no signals the SQL COMP TUNING A FREQUENCY Turn the Tuning control clockwise or press Mic [UP Tuning control counterclockwise or press Mic [DWN] Meter Name Parameters Measured COMP... -
Page 21: Transmitting
OPERATING BASICS 3 TRANSMITTING MICROPHONE GAIN [PTT] [PTT] to receive. 1 Press [MIC (CAR)]. [VOX (REV)] [CW/FSK (REV)]. SELECTING TRANSMISSION POWER recharging is necessary. This transceiver allows [PTT]. 1 Press [PWR (TX MONI)]. the MULTI/CH the MULTI/CH slightly reflects your voice level. 2 Turn the MULTI/CH control counterclockwise to power. -
Page 22: Menu Setup
4 MENU SETUP WHAT IS A MENU? QUICK MENU Many functions on this transceiver are selected or Because the number of functions this transceiver configured via a software-controlled Menu, rather than provides is extraordinary, there are numerous items through the physical controls of the transceiver. Once in each Menu. -
Page 23: Menu Configuration
MENU SETUP 4 MENU CONFIGURATION Description Settings** Ref. Category Page Display* Default** Firmware version – FIRMWARE Power on message POWER ON Display brightness OFF/ 1 ~ 6 Off, 1: minimum, 6: maximum BRIGHTNE Operator Interface Display backlight color 1 ~ 10 1: amber, 2 ~ 9: mixed colors, 10: green COLOR Panel key response for double function... - Page 24 4 MENU SETUP Description Settings** Ref. Category Page Display* Default** MULTI/CH control in AM mode on the AM broadcast band 9KHZ STE Frequency step size for the MULTI/CH control in OFF/ 0.5/ 1/ 2.5/ 5/ 10 MULTI/CH Frequency step size for the MULTI/CH control in OFF/ 0.5/ 1/ 2.5/ 5/ 10 Tuning CW MULTI/CH CONTROL...
- Page 25 MENU SETUP 4 Description Settings** Ref. Category Page Display* Default** 10/ 100/ 200/ 300/ 400/ DATA LOW 2500/ 2600/ 2700/ 2800/ (continued) DATA HIG 2700 EFFECT Formant pass, bb1: Bass boost1, TX EQUAL Formant pass, bb1 Bass boost1, RX EQUAL A/ B KEYER MO KEYING P...
- Page 26 4 MENU SETUP Description Settings** Ref. Category Page Display* Default** speed NO BREAK-IN FSK SHIFT FSK KEY FSK TONE 2125 1 ~ 3 FM MIC G Fine transmission power tuning FINE TRA OFF/ 3/ 5/ 10/ 20/ 30 Time-out timer (min) TIME-OUT Xverter/ power down of Xverter...
- Page 27 MENU SETUP 4 Description Settings** Ref. Category Page Display* Default** 4800/ 9600/ 19200/ 38400/ 57600/ 115200 COM PORT 9600 (bps) 4800/ 9600/ 19200/ 38400/ 57600/ 115200 USB PORT 115200 (bps) Audio input line selection for data communications LINE SEL SOURCE 0 ~ 9 (1 step) USB INPU 0 ~ 9 (1 step)
- Page 28 4 MENU SETUP Description Settings** Ref. Category Page Display* Default** APO (Auto Power Off) function Timer AUTO POW 0 ~ 99, 120 ~ 170, Front panel PF A key assignment 200 ~ 209, OFF PF A KEY 0 ~ 99, 120 ~ 170, Front panel PF B key assignment 200 ~ 209, OFF PF B KEY...
-
Page 29: Character Entry
MENU SETUP 4 CHARACTER ENTRY on the display. 1 Move the cursor to the left or right by pressing [Q-M.IN] or [Q-MR]. 2 Turn the MULTI/CH control or press [M.IN]/ [SCAN (SG.SEL)] to select your desired character. pressing [CL]. characters. 4 Press [MENU] to set the entry and to exit character entry mode. -
Page 30: Basic Communications
5 BASIC COMMUNICATIONS SSB TRANSMISSION FM TRANSMISSION SSB is the most commonly-used mode on the HF Amateur radio bands. Compared with other voice UHF frequencies. As for HF and the 6 m band, modes, SSB requires only a narrow bandwidth for 29 MHz and 51-54 MHz bands are commonly used communications. -
Page 31: Am Transmission
BASIC COMMUNICATIONS 5 AM TRANSMISSION NARROW BANDWIDTH FOR FM Each mode used on the HF Amateur bands has its depending on whether the other station is using wide may be less common while using AM, the superior band or narrow band filter for FM mode. While “NAR” audio quality characteristic of AM operation is one appears, the TS-590S transceiver transmits signals in reason why some hams prefer this mode. -
Page 32: Auto Zero-Beat
5 BASIC COMMUNICATIONS AUTO ZERO-BEAT CARRIER LEVEL Use Auto Zero-beat before transmitting to tune in a When using AM, CW, or FSK mode, you can adjust CW station. Auto Zero-beat automatically and exactly the carrier level. matches your transmit frequency with the station you 1 Press and hold [MIC (CAR]. -
Page 33: Enhanced Communications
6 ENHANCED COMMUNICATIONS SPLIT-FREQUENCY OPERATION right end digit of the main display flashes for approximately 2 seconds after the Power On Usually you can communicate with other stations message is displayed. using a single frequency for receiving and transmitting. In this case, you select only one frequency on either VFO A or VFO B. -
Page 34: Tf-Set (Transmission Frequency Set)
6 ENHANCED COMMUNICATIONS TF-SET (TRANSMISSION FREQUENCY SET) FM REPEATER OPERATION Most Amateur radio voice repeaters use a separate transmission frequency and reception frequency. reception and transmission frequency. The Canceling this function immediately restores the transmission frequency may be higher or lower than original transmission and reception frequencies. -
Page 35: Transmitting A Tone
ENHANCED COMMUNICATIONS 6 ■ Activating the Tone Function 1 Confirm that FM mode has been selected on the VFO(s) {page 10}. [AGC/T (SEL)] twice. mode on both VFOs. 7 Press [SPLIT]. 2 Press [AGC/T (SEL)]. ” appears. ” appears. 8 Press [A/B (A=B)] to return to the original reception frequency. -
Page 36: Tone Frequency Id Scan
6 ENHANCED COMMUNICATIONS TONE FREQUENCY ID SCAN This function scans through all tone frequencies to identify the incoming tone frequency on a received signal. You may find this useful when you do not know 8 Turn the MULTI/CH control to select the the tone frequency that the repeater uses. -
Page 37: Cross Tone
ENHANCED COMMUNICATIONS 6 [SCAN (SG.SEL)] or [CLR] to stop scanning while the CTCSS frequency ID scan is active. [SCAN (SG.SEL)] again to resume scanning. Note: Received signals are audible while scanning is in progress. CROSS TONE Use this feature when using different uplink and downlink tones to access a repeater.