Advertisement
GENERAL
The SA-1heating cable controller has been designed
and manufactured for the sole intended use of controlling
heating cables in residential and commercial snow melting
applications such as: sidewalks, driveways, parking
garage entrances and drive-through. The SA-1 uses
microcontroller technology to reduce energy consumption
by energizing the heating cable only when the right
conditions of temperature and snowfall occur.
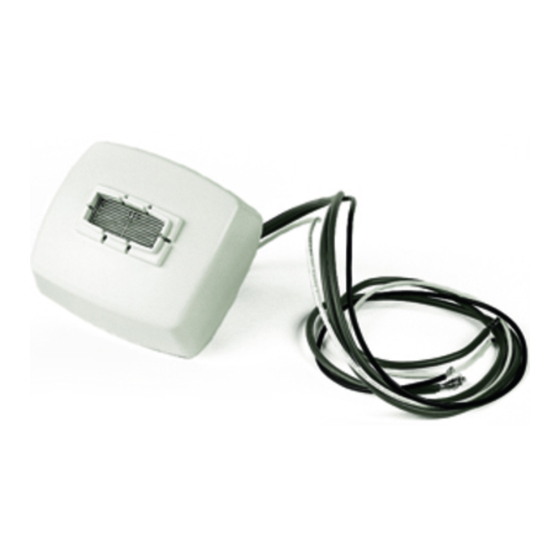
The main components of the SA-1are shown in Fig.1.
The snow and temperature sensors detect snow or ice
conditions and activate, through a power relay, a heating
cable.
Another feature of SA-1 is the LED indicator light. This
light turns red if the snow sensor is dirty and needs to be
cleaned. The red light will switch off automatically when
the snow sensor is cleaned. The LED turns green every
time the power relay is activated and will switch off if the
power relay is off.
Improper installation, use and/or maintenance of the
SA-1 can cause fire, electrical shock and/or result in
snow build-up.
WARNINGS
1. This is not a "do-it-your-self" product. A qualified
electrician must install the SA-1.
2. If after carefully reading these instructions you still
have questions regarding installation, operation or
maintenance of this product, call the numbers listed
for assistance.
3. Prior to installation, check the SA-1 body enclosure or
wires for possible shipping damages. Do not install a
damaged SA-1 controller.
4. All heating cables, controls & associated systems must
be installed in compliance with the latest editions of
all applicable electrical codes and ordinances.
5. These instructions must be saved and made available
to owners or users of this product and/or transferred
to future owners.
6. Any heating cable that is to be connected to the SA-1
US
T. (800) 537-4732 / F. (888) 324-2440
CAN T. (800) 794-3766 / F. (800) 361-4574
©2008 Easy Heat
Automatic Snow/Ice Melting Controller
Installation & Operation Instructions
SA-1
Figure 1
must be installed according to the manufacturer's
instructions.
7. Do not connect more than 16 Amp load to the
SA-1 (See Fig. 2 & 3). Risk of fire, electric shock or
accumulation of snow can result from a larger cable
or from multiple cables being connected.
8. Secure the SA-1 in an area free of obstructions such
as trees, shrubs, etc. to prevent any damages to the
snow sensor.
9. Avoid excessive shock or vibration.
10. Do not touch the surface of the moisture sensor, it is
a hot surface.
www.easyheat.com
Moisture Sensor
SA-1
Enclosure
LED Indicator
Mounting Connector
.5" (12.70mm) NPT
Temperature Sensor
14055-001 Rev. 3
Advertisement
Table of Contents

Summary of Contents for EasyHeat SA-1
- Page 1 7. Do not connect more than 16 Amp load to the have questions regarding installation, operation or SA-1 (See Fig. 2 & 3). Risk of fire, electric shock or maintenance of this product, call the numbers listed accumulation of snow can result from a larger cable for assistance.
- Page 2 Automatic Snow/Ice Melting Controller — Installation & Operation Instructions INSTALLATION INSTRUCTIONS 1. Mount the SA-1 securely in upright position in an 2. The SA-1 can be connected to the building power open space, in direct contact with snowfall pattern supply as per Fig.
- Page 3 SA-1 to turn it off. In wintertime the wind may cover the heated area with snow. The SA-1 can not sense this situations and will not Electrical Junction Box energise the heating cable. Putting snow on the sensor surface can energise the SA-1.
- Page 4 To obtain new products, arrange repair of existing product, or a refund under this warranty, please contact Easy Heat with a description of the defect and proof of purchase at the address noted herein. ATTN: WARRANTY DEPARTMENT: US - EasyHeat Inc, 2 Connecticut South Drive, East Granby, CT 06026 CAN - EasyHeat Ltd, 99 Union Street, Elmira, ON N3B 3L7 DISCLAIMER All information presented in this document was believed correct at the time of printing.
Need help?
Do you have a question about the SA-1 and is the answer not in the manual?
Questions and answers