Table of Contents
Advertisement
Quick Links
Advertisement
Table of Contents

Subscribe to Our Youtube Channel
Summary of Contents for Hudson UBE
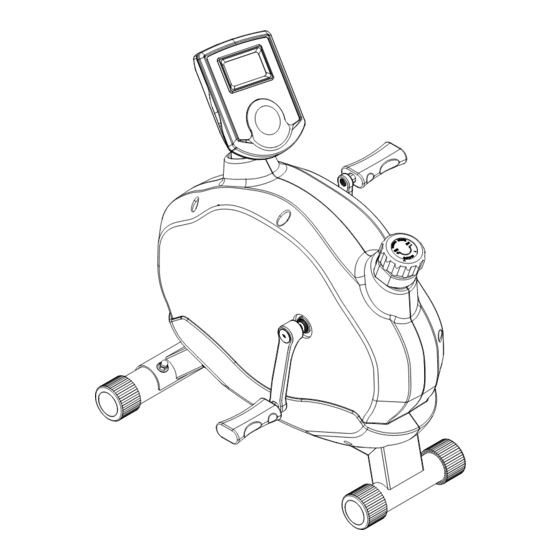
- Page 1 HUDSON UBE OWNER’S MANUAL...
-
Page 2: Table Of Contents
Table of Contents Important Safety Information Before You Start Assembly part List Assembly Instruction 6-10 Console Overview Monitoring Your Heart Rate 12-14 Exploded View Parts List (2011-10-VH0068-K) -
Page 3: Important Safety Information
Important Safety Information WARNING! Before using this unit or starting any exercise program, consult your physician. This is especially important for persons over the age of 35 and/or persons with pre-existing health conditions. The manufacturer or distributor assumes no responsibility for personal injury or property damage sustained by or through the use of this product. -
Page 4: Before You Start
Before You Start Thank you for purchasing this new Hudson UBE. This quality product you have chosen was designed to meet your needs for cardiovascular exercise. Before you start, please read the Owner's Manual and become familiar with the operation of your new unit. -
Page 6: Assembly Part List
ASSEMBLY PART LIST... -
Page 7: Assembly Instruction
Assembly Instruction REMOVE ALL SECURITY TAPE AND WRAPPING BEFORE BEGINNING FIGURE 1 Attach the Rear Foot Tube (44)to Main Frame (1) using : Qty 2 – (46) M8X19mm Washer Qty 2 – (45) M8 Acorn Nut Make sure that the Rear Foot Tube (44) with Foot End Caps (40) are assembled to the rear of Main Frame (1) firmly. -
Page 8: Assembly Instruction
Assembly Instruction FIGURE 2 Step 1: Thread the Right Pedal (41) into the hole of Right Crank (31). Secure in place by turning it clockwise to tighten. Note: Right Pedal (41) is marked with an “R”. Step 2: Thread the Left Pedal (42) into the hole of Left Crank (32). Secure in place by turning it counter-clockwise to tighten. - Page 9 Assembly Instruction FIGURE 3 NOTE: Insert the batteries provided into the back of Monitor (3).
- Page 10 Assembly Instruction FIGURE 4 Step 1: Connect the Sensor Wire (35) to the wire out from Monitor (3). Next secure the Monitor (3) to the monitor bracket (which is welded on the opening section of the Frame (1)) by using the provided screws (4).
- Page 11 Congratulations! You have completed the assembly of your new Hudson UBE -11-...
-
Page 12: Console Overview
Console Overview Auto On/Off When the user starts to exercise, the Display will show the workout value automatically. Once the user stops exercising for over 4 min, the Display will turn off. But the workout value of odometer will be stored. When user starts exercise again, workout value of odometer will accumulate continuously. -
Page 13: Monitoring Your Heart Rate
Monitoring Your Heart Rate Monitoring Your Heart Rate To obtain the greatest cardiovascular benefits from your exercise workout, it is important to work within your target heart rate zone. The American Heart Association (AHA) defines this target as 60%-75% percent of your maximum heart rate. Your maximum heart rate may be roughly calculated by subtracting your age from 220. - Page 14 Monitoring Your Heart Rate Fitness Safety The target heart rate chart indicates average heart rate zones for different ages. A variety of different factors (including medication, emotional state, temperature and other conditions) can affect the target heart rate zone that is best for you.
-
Page 15: Monitoring Your Heart Rate
Monitoring Your Heart Rate -15-... -
Page 16: Exploded View
Exploded View -16-... -
Page 17: Parts List
Parts List ITEM Q’TY ITEM Q’TY PART NAME PART NAME Frame Pulley Belt Tension Bracket Bottom Right Housing Monitor Bottom Left Housing M5X10mm Screw Foot End Cap Spring Ø2.8*93m/m Right Pedal Crank Shaft Nut Left Pedal #6003 Precise Bearing 3.5 x15mm L Screw Idler Pulley Rear Foot Tube M8x12.5x14.9L Spacer...
Need help?
Do you have a question about the UBE and is the answer not in the manual?
Questions and answers