Table of Contents
Advertisement
Quick Links
Advertisement
Table of Contents

Related Manuals for Chef's Choice 720


Summary of Contents for Chef's Choice 720
- Page 1 Professional Meat Grinder Model 720...
-
Page 2: Important Safeguards
IMPortant SafeGuardS When using electrical appliances, basic safety precautions should always be followed, including the following: 1. Read all instructions carefully before using grinder, to maximize results and to avoid injury. 2. To protect against risk of electrical shock, do not immerse motor housing in water or other liquid or operate in wet areas. - Page 3 made a good choice! Congratulations on your selection of the Chef’sChoice Professional Meat Grinder. As an ® owner of a Chef’sChoice grinder, you have the ® finest and easiest-to-use product for grinding meat and other foods and for making your own fresh sausages.
-
Page 4: Parts List
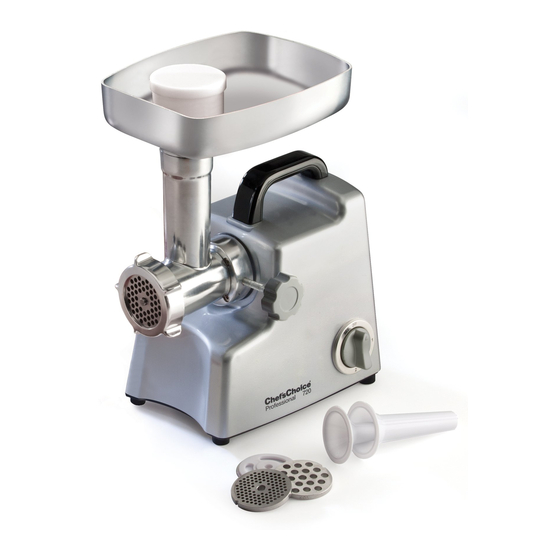
Parts List 1. Locking ring 2. Grinding plate 3. Cutting blade 4. Auger 5. Feed/grinder tube (cylinder) 6. Food pusher 7. Hopper 8. Motor housing 9. Carrying handle 10. Power indicator light 11. Power switch 12. Locking knob 13. Overload/reset switch Grinder assembly Sausage Attachment Kit 15. -
Page 5: Using The Grinder
Assembling the Grinder for the First Time 1. Always make sure the grinder is not plugged in during assembly. 2. Place the motor housing on a clean, dry, smooth, horizontal surface. 3. Insert the assembled grinder assembly (which includes items 1 to 5) into the opening of the motor housing. Make sure the locking knob (12) screw is fully retracted and does not interfere with the insertion. -
Page 6: Clearing Jams
4. Place the food into the hopper, but do not start to feed it into the feed/grinder tube until the unit is turned on. Food should be cut into strips or cubes (see “Tips” on page 7). 5. Turn the switch to the “2” position and the grinder will operate at full speed. Start feeding food into feed tube as soon as possible. -
Page 7: Tips, For Best Results
3. Insert the sausage spacer plate (15) onto the shaft on the front of the auger (see Figure 1). Sausage 4. Place the “sausage tube” (16) in front of the feed/grinder tube. Casing 5. Screw on the locking ring and hand tighten until snug. Tie Knot Sausage Making 1. -
Page 8: Cleaning And Maintenance
used, the marked electrical rating of the extension cord should be at least 10 amperes. The longer cord should be arranged so that it will not hang over the counter top or tabletop where it can be pulled on by children or pets or tripped over. Cleaning and Maintenance Note: Before cleaning or removing any part of the grinder for maintenance, always turn the unit “off”...
Need help?
Do you have a question about the 720 and is the answer not in the manual?
Questions and answers