
Related Manuals for Raymarine RMK-9


Summary of Contents for Raymarine RMK-9
-
Page 1: Installation And Operation
RMK-9 Installation and operation instructions Date: 04-2013 Document number: 81351-1-EN © 2013 Raymarine UK Limited... -
Page 3: Date
Product handbooks The latest versions of all English and translated handbooks are available to download in PDF format from the website www.raymarine.com. Please check the website to ensure you have the latest handbooks. -
Page 5: Table Of Contents
Chapter 6 Operation ..........25 6.1 Keypad controls ........... 26 6.2 Pairing the keypad ..........26 Chapter 7 Technical support ......27 7.1 Raymarine customer support ........ 28 7.2 Viewing product information ........28 Chapter 8 Technical specification...... 29 8.1 Technical specification.......... 30 Chapter 9 Spares and accessories .... - Page 6 RMK–9...
-
Page 7: Chapter 1 Important Information
Directive requires the recycling of waste electrical and electronic equipment. Whilst the WEEE Directive does not apply to some Raymarine products, we support its policy and ask you to be aware of how to dispose of this product. Water ingress... - Page 8 RMK–9...
-
Page 9: Chapter 2 Document And Product Information
Chapter 2: Document and product information Chapter contents • 2.1 Handbook information on page 10 • 2.2 Product information on page 10 Document and product information... -
Page 10: Handbook Information
2.1 Handbook information 2.2 Product information This handbook contains important information regarding your The RMK-9 is a remote control keypad for Raymarine product. multifunction displays. The keypad is a class 1 PoE device and can be powered using a suitable network connection providing... -
Page 11: Chapter 3 Planning The Installation
Chapter 3: Planning the installation Chapter contents • 3.1 Installation checklist on page 12 • 3.2 Parts supplied on page 12 • 3.3 Compatible multifunction displays on page 13 • 3.4 Software updates on page 13 • 3.5 Tools required on page 14 •... -
Page 12: Installation Checklist
3.1 Installation checklist 3.2 Parts supplied Installation includes the following activities: The parts supplied with the keypad are shown below. Installation Task Plan your system. Obtain all required equipment and tools. Site all equipment. Route all cables. Drill cable and mounting holes. Make all connections into equipment. -
Page 13: Compatible Multifunction Displays
• If in doubt as to the correct procedure for updating your product software, refer to your dealer or Raymarine technical support. Caution: Downloading software updates The software update process is carried out at your own risk. -
Page 14: Tools Required
3.5 Tools required 3.6 Warnings and cautions Product installation requires the following tools: Important: Before proceeding, ensure that you have read and understood the warnings and cautions provided in the Item Description Quantity Chapter 1 Important information section of this document. Power drill Pozidrive screwdriver Drill bit of appropriate size*... -
Page 15: General Location Requirements
3.7 General location requirements 3.8 Keypad dimensions Important considerations when choosing a suitable location for your product. This product is suitable for mounting above or below decks. The product should be mounted where it will be: • protected from physical damage and excessive vibration. •... - Page 16 RMK–9...
-
Page 17: Chapter 4 Cables And Connections
Chapter 4: Cables and connections Chapter contents • 4.1 General cabling guidance on page 18 • 4.2 Connections overview on page 18 Cables and connections... -
Page 18: General Cabling Guidance
Raymarine. D12728-1 1. Alternate power connector. • Ensure that any non-Raymarine cables are of the correct quality and gauge. For example, longer power cable runs may 2. Network / power connector. require larger wire gauges to minimize voltage drop along the The alternate power connector is required when connecting to run. - Page 19 4 multifunction displays. If the network does not provide Network connection — Raymarine multifunction displays Power over Ethernet (PoE) then the keypad must be powered separately. Direct connection — gS Series multifunction display D12702-2 1. gS Series multifunction display.
- Page 20 RMK–9...
-
Page 21: Chapter 5 Mounting
Chapter 5: Mounting Chapter contents • 5.1 Flush mounting the keypad on page 22 • 5.2 Surface mounting the keypad on page 22 • 5.3 Fitting the keypad mat on page 23 • 5.4 Removing the keypad mat on page 23 Mounting... -
Page 22: Flush Mounting The Keypad
5.1 Flush mounting the keypad 5.2 Surface mounting the keypad For flush mounting you must rebate the mounting surface to accommodate keypad. D12722-1 1. Check the selected location for the unit. A clear, flat area with suitable clearance behind the panel is required. D12708-1 2. -
Page 23: Fitting The Keypad Mat
5.3 Fitting the keypad mat 5.4 Removing the keypad mat Your keypad is supplied with a portrait and a landscape keypad The keypad mat can be removed from the keypad following the mat. steps below. You should fit the keypad mat which matches your chosen mounting orientation. - Page 24 RMK–9...
-
Page 25: Chapter 6 Operation
Chapter 6: Operation Chapter contents • 6.1 Keypad controls on page 26 • 6.2 Pairing the keypad on page 26 Operation... -
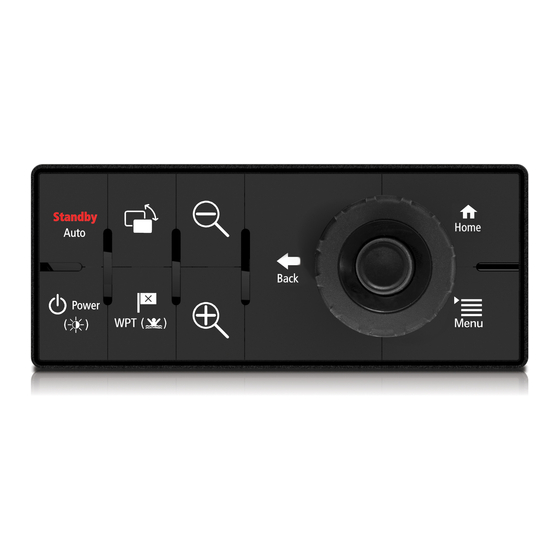
Page 26: Keypad Controls
6.1 Keypad controls 6.2 Pairing the keypad Connecting the keypad allows you to control your multifunction The keypad can control 1 or more multifunction displays. display remotely. Multiple keypads can be connected to a system. Each keypad can be paired with up to 4 multifunction displays. With the keypad connected to the multifunction display: 1. -
Page 27: Chapter 7 Technical Support
Chapter 7: Technical support Chapter contents • 7.1 Raymarine customer support on page 28 • 7.2 Viewing product information on page 28 Technical support... -
Page 28: Raymarine Customer Support
Raymarine provides a comprehensive customer support service. You can view information about your unit from the Diagnostics You can contact customer support through the Raymarine menu on a compatible multifunction display. This option displays website, telephone and e-mail. If you are unable to resolve a information such as product serial number and software version. -
Page 29: Chapter 8 Technical Specification
Chapter 8: Technical specification Chapter contents • 8.1 Technical specification on page 30 Technical specification... -
Page 30: Technical Specification
8.1 Technical specification Power specification PoE class Class 1 Nominal supply 12 / 24 V dc voltage Operating voltage 10.8V dc to 31.2V dc range Power consumption 3.84 W Environmental specification Operating -25 ºC to +55 ºC (-13 ºF to 131 ºF) temperature Storage temperature -30 ºC to +70 ºC (-22 ºF to 158 ºF) -
Page 31: Chapter 9 Spares And Accessories
Chapter 9: Spares and accessories Chapter contents • 9.1 Keypad spares on page 32 Spares and accessories... -
Page 32: Keypad Spares
9.1 Keypad spares Item Part number R70185 Keypad mat spare (includes landscape and portrait keypad mat.) Right angled power cable A06070 Network cables RayNet to RayNet cables Cable Part number 400 mm (1.3 ft) RayNet (F) to A80161 RayNet (F) cable A62361 2 m (6.56 ft) RayNet (F) to RayNet (F) cable... - Page 34 www.ra ym a rin e .c o m...
Need help?
Do you have a question about the RMK-9 and is the answer not in the manual?
Questions and answers