Table of Contents
Advertisement
Quick Links
Advertisement
Table of Contents

Related Manuals for DELLA 1500W STOVE HEATER


Summary of Contents for DELLA 1500W STOVE HEATER
- Page 1 **WARNING: READ THIS INSTRUCTION MANUAL CAREFULLY BEFORE USE. www.dellaproductsusa.com 909. 344. 2588 1500W STOVE HEATER Electric Fireplace Stove with Heater OWNER’S MANUAL Item # 050-HA-50095 Model No. FP203R -T3 INSTRUCTION MANUAL Item No: 050-HA-50095 PLEASE SAVE THESE INSTRUCTIONS ARNING: READ THIS OWNER’S MANUAL CAREFULLY BEFORE USE.
-
Page 2: Table Of Contents
Thank you for choosing a DELLA Infrared Zone Heating System. This owner’s manual will provide you with valuable information necessary for the proper care and maintenance of your new product. Please take a few moments to thoroughly read the instructions and familiarize yourself with all the operational aspects of your new heater. -
Page 3: Important Instructions
IMPORTANT INSTRUCTIONS When using this electric unit, basic safety precautions should always be followed to reduce the risk of fire, electric shock, and injury to persons, including the following: 01. Read ALL instructions before using this unit. 02. CAUTION: Risk of Electric Shock. DO NOT open or try to repair the heater yourself. 03. -
Page 4: Specifications
IMPORTANT INSTRUCTIONS 17. Use only for intended household use as described in this manual. Any other use not recommended by the manufacturer may cause fire, electric shock, or injury to persons. The use of attachments not recommended or sold by unauthorized dealers may cause hazards. 18. -
Page 5: Assembly Instructions
Tools Required for Assembly (not included): Phillips screwdriver ASSEMBLY INSTRUCTIONS ASSEMBLY INSTRUCTIONS Lay stove upside down on a padded surface with the underside accessible. Attach leg to stove by inserting the tab on the top of the leg into the corresponding slot on the bottom of the stove. -
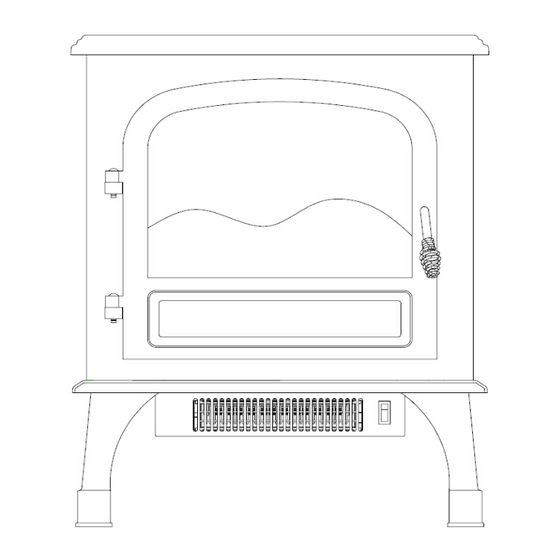
Page 6: Product Diagram
PRODUCT DIAGRAM Display window Carbon bed Handle Air outlet Power switch Remote control... - Page 7 PRODUCT DIAGRAM 1 Power indication light: After electrifying show red, press the power button to display the red light and flame open. 01. Power indication light: After electrifying show red, press the 2 Power button: Powers the display on and off. 3 Flame light power button to display the red light and flame open.
- Page 8 REMOTE CONTROL window automatic blanking, press any key to the window automatically display except for the power button Remote Control Power button: Powers the display on and off. Up button: For setting temperature or time upward Down button For setting temperature or time downward Flame light button: Adjust the brightness of the flame Heater button: Set up the heater mode and turn off Timer button:...
-
Page 9: Operating Your Heater
OPERATING YOUR HEATER Insert 2 AAA batteries into the remote control before using (Batteries Not Included) Place the heater on a firm, level surface and plug into a grounded 120V 60Hz power outlet. and turn on the power switch in the rear of the unit. Only operate heater in upright position with caster wheels attached. - Page 10 OPERATING YOUR HEATER Adjust the brightness of the flame and turn off Adjust the brightness of the flame and turn off 4. Setting timer-power- off 04. SETTING TIMER-POWER- OFF Caution! ONLY under power-on mode can you set timer-power-off function. Caution! ONLY under power-on mode can you set timer-power-off function. When starting the unit, press the timer button on the When starting the unit, press the timer button on the control panel.
-
Page 11: Maintenance
locked, control panel and remote control failed to function. locked, control panel and remote control failed to function. When release is needed, please re-press Temp Up and When release is needed, please re-press Temp Up and Temp Down buttons once for 3 seconds. Release is fulfilled Temp Down buttons once for 3 seconds. - Page 12 OUR BRAND...
-
Page 13: Warranty
(1) year from the date of purchase. 7 Dissatisfaction due to buyer’s remorse. In no event shall DELLA be liable for indirect, con- 8 Normal wear and tear. sequential or incidental damages of any kind. - Page 14 **WARNING: READ THIS INSTRUCTION MANUAL CAREFULLY BEFORE USE. www.dellaproductsusa.com 909. 344. 2588...
Need help?
Do you have a question about the 1500W STOVE HEATER and is the answer not in the manual?
Questions and answers