
Summary of Contents for Benelec BL-2500V
- Page 2 Congratulations! You now have at your fingertips a valuable communications tool: a BENELEC two-way radio! Rugged, reliable and easy to use, your BENELEC radio will keep you in constant touch with your colleagues for years to come, with negligible maintenance downtime.
- Page 3 Important channel frequency data is stored in EEPROM and flash memory on the CPU, and is easily programmable by dealers using a personal computer and the BENELEC VPL-1 Programming Cable and CE47 Software. The pages which follow will detail the many advanced features provided on the BL-2500 transceiver.
-
Page 4: Controls And Connectors
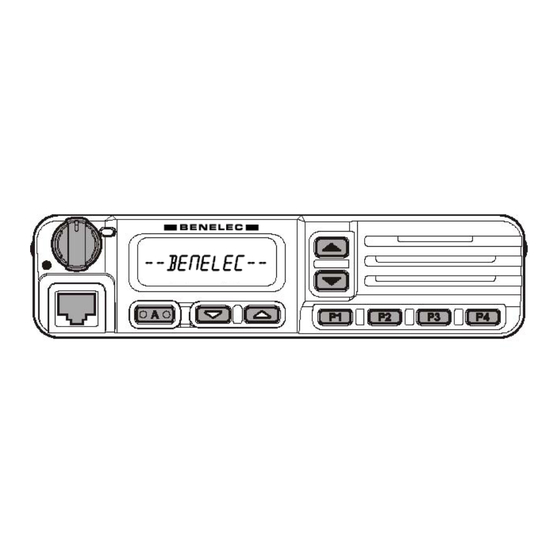
Important! - All buttons located on the Front Panel are Programmable Function ( PF ) Buttons, configured according to your network requirements and programmed by your BENELEC dealer. The instructions below a typically-configured radio. VOL/PWR Knob Turn this control clockwise to turn the radio on and to increase the volume. Turn it counterclockwise into the click-stop to turn the radio off. - Page 5 [ P1 ] - [ P4 ] Buttons (Programmable Function Buttons) These buttons can be set up for special applications, such as High/Low power selection, Monitor, Talk-Around, etc, as determined by your network require- ments and programmed by your BENELEC dealer. LCD Icons & Indicators Talk-Around Enabled Busy Channel (follows Green BUSY/TX indicator).
-
Page 6: Rear Panel
& C ONTROLS ONNECTORS Rear Panel Antenna Socket The 50-Ohm coaxial feedline to the antenna must be connected here, using a type-M (PL-259) plug. 13.8V DC Cable Pigtail with Connector The supplied DC power cable must be connected to this 2-pin connector. Use only the supplied fused cable, extended if necessary, for power connection. -
Page 7: Basic Operation Of The Transceiver
Important! - Before turning on the radio the first time, confirm that the power con- nections have been made correctly and that a proper antenna is connected to the antenna jack. Overview - Your authorized BENELEC Dealer can program your radio for or Conventional format. Switching Power ON/OFF r Turn the VOL/PWR knob turn on the radio. -
Page 8: Automatic Time-Out Timer
ASIC PERATION OF THE RANSCEIVER r If CTCSS or Digital Coded Squelch (DCS) Lockout has been programmed on a channel, the radio can transmit only when there is no carrier being received or when the carrier being received includes the correct CTCSS tone or DCS code. RUNKING YSTEM r Press the PTT switch. -
Page 9: Advanced Operation
Programmable Function (PF) Buttons The BL-2500 includes nine Programmable Function (PF) Buttons. The PF button functions can be customized, via programming by your BENELEC dealer, to meet your communications/network requirements. Some features may require the purchase and installation of optional internal accessories. The possible PF button programming features are illustrated below, and these functions are explained on the pages to follow. -
Page 10: Description Of Operating Functions
DVANCED PERATION Description of Operating Functions YSTEM YSTEM YSTEM ELECTION The VX-2500 is capable of separating its 250 memory groups into any of 32 systems. There is no limit as to the number of groups which may be assigned to each system. The Dealer will have made the system assignment at the time of group programming. - Page 11 DVANCED PERATION The Scanning feature is used to monitor multiple channels programmed into the trans- ceiver. While scanning, the transceiver will check each channel for the presence of a signal, and will stop on a channel if a signal is present. r Press the assigned PF button to activate scanning.
- Page 12 DVANCED PERATION HONE Press the assigned PF button to dial the Dealer pre-programmed Auto-Dial tele- phone number. The DTMF tones sent during the dialing sequence will be heard in the speaker. OWER Press the assigned PF button to set the radio’s transmitter to the “Low Power” mode. Press this button again to return to “High Power”...
- Page 13 Press the assigned PF button to initiate an emergency call. For further details contact your BENELEC dealer. IGHTING Press the assigned PF button to turn off the display lamp. Press the assigned PF button again to turn on the display lamp.
-
Page 14: Arts (Auto Range Transpond System)
DVANCED PERATION ARTS (Auto Range Transpond System) This system is designed to inform you when you and another ARTS-equipped station are within communication range. During ARTS operation, your radio automatically transmits for about 1 second every 25 seconds (the interval is programmed by the Dealer) in an attempt to shake hands with the other station. -
Page 15: Optional Accessories
Availability of accessories may vary; some accessories are supplied standard per local requirements, others may be unavailable in some regions. Check with your BENELEC Dealer for changes to this list. This device complies with Part 15 of the FCC rules.
Need help?
Do you have a question about the BL-2500V and is the answer not in the manual?
Questions and answers