Advertisement
Quick Links
Advertisement

Related Manuals for Work Pro SPS 8


Summary of Contents for Work Pro SPS 8
- Page 1 Paging Station SPS 8 sept 2016...
- Page 2 Content 1 Overview 2 Connections 3 Basic use and configuration 4 Use and advanced settings...
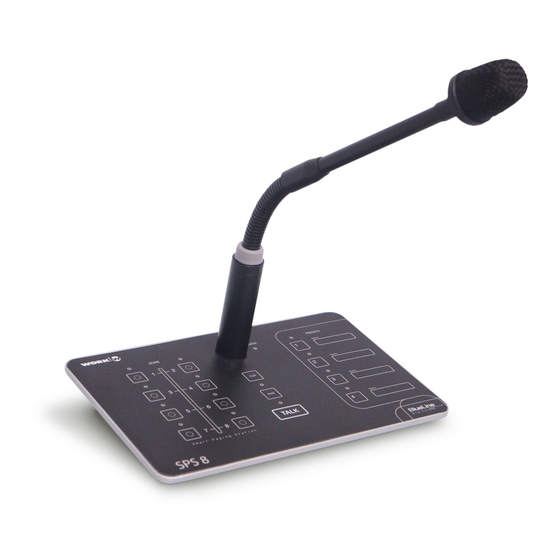
- Page 3 SPS 8 overview The SPS-8 is a paging station designed specifically for the BlueLine system and is compatible with DigiLine. This guide describes the features of the SPS 8 as well as its functionality.. Dimensions: 210 x 40 x 135 mm...
- Page 4 CONNECTIONS SPS 8 connection ports:...
- Page 5 Ethernet port, for the connection of SPS 8 to the local network. It is compatible with PoE, therefore it can be supplied through the Ethernet port, avoiding the need of connecting it to an external power supply. It must be taken under...
-
Page 6: Using & Basic Setup
SPS 8 microphone. It is mandatory to keep it pressed when talking. Once the button is not pressed, every device go back to its previous state. - Page 7 Once the zones have been selected, users have to keep pressed the “Clear” button while pressing the preset button (from 1 to 4) in which we want to save the configuration. SPS 8 will indicate us that the preset has been correctly recorded by turning off every state LED.
- Page 8 In the following updates, it will be possible to configure the buttons as “Push” (to work as a push button) or “Toggle” (to work as a switch). SPS 8’s preset buttons can be configured to interact with different components of an installation, from turning on and...
-
Page 9: Advanced Configuration
Start WorkCAD and select the “Network” tab to see the devices which are connected to the network. When users place the mouse over “SPS 8”, they can see up to 3 different icons: ^: It indicates that the devices is not updated. - Page 10 If you want to obtain information about a device, place the mouse over “i” icon of desired device. Update of a SPS 8 in WorkCAD After the instalation of the BlueLine devices, it is recommended to update all of them to the latest version, with bug-fix and new functionalities.
- Page 11 3.Click on the "^" icon (if shown) in order to update the device. SPS-8 If selecting “Yes” you see an error message, please check that the IP range of the PC and the WorkCAD is the same tan the BlueLine device that you mean to update.
- Page 12 4.Click on “YES” and the update process will start. 5.During the update process, the progress bar will stop for a few seconds when the device is auto-reseting. Please, wait and do not disconnect the device until the process has ended. 6.
- Page 13 2- Right click on the name of the device. Select “Rename” from the list of option that will be shown.
- Page 14 One the name or IP address of a device has been changed, it is highly advisable to restart the device to correctly save the data. Change the IP address of a SPS 8 with WorkCAD 1-Right click on the name of the device. Select “Change static IP” from the list of option...
- Page 15 2- Give a new IP address to the device. Once modified the name or IP address, it is advisable to restart the device in order to save the data correctly Restart of a SPS-8 from WorkCAD 1- Right click on the name of the device. Select “RebootDevice” from the list of option that will be shown 2- WorkCAD will ask users for a confirmation to restart the device.
- Page 16 Selection of the broadcast channel From WorkCAD, we select the channel which is going to Broadcast the SPS 8. In the “BlueLine System” panel, we will choose the “Stand Alone” option to adjust the broadcast channel through the rotatory Switch of the SPS 8 or “Set Source” to adjust the broadcast channel by introducing a specific channel number.
- Page 17 1º-Click over the “Configure button” and select the button you want to assign an specific function to. 2º- We choose whether the command will be triggered on activate or deactivate. 3º-Set the IP address of the device we want to send the message to. If we want to send a message to the whole network, we should introduce: 255.255.255.255.
- Page 18 Then we need to specify the port number. By default, BlueLine Digital System set the port number 3126 for the control pack reception. 4º- Introduce the command (ASCII) that we want to send. Keep in mind that WorkCAD incorporates an “OSC to ASCII” tool in case you need to check any command. Once the command is written, click over “Add”...
- Page 19 However, it is just activated when the sender is assigned to the broadcast channel 0. If the SPS 8 is assigned to channel 0 but you don’t want to make it work with the querier function, this box must be checked.
- Page 20 Alarm management SPS 8 adds an alarm port through a circuit board and Euroblock type. By default, the alarm function hasn’t any function assigned. If users want to assign a function, it is possible to do it using WorkCAD. Users can set advanced functions when the activation of the alarm is done, thus beside triggering the channel priority, it is possible to trigger other commands to interact with doors, signals, sirens…...
- Page 21 Setting the preset keys such as Paging the zone selection keys The SPS-8 has 8 zone selection access keys. It is possible to extend these keys virtually using the 4 Preset keys as a paging mode, being able to have access to the selection of up to 32 zones.
- Page 22 3- We turn off all the LEDs on the preset keys by command: //sps8/selectPreset/[1,2,3,4];i;0; Press "Add" to add the command. 4- We indicate the page that we want to select with that key by means of the command: //sps8/zonePage;i;page number; Page number = 1 to select the zones 1-8 To select zone 9-16...
- Page 23 Press "Add" to add the command and press "Apply" to apply the changes. NOTES: If you have stored a command on some of the zone selection keys, it will be executed regardless of the page you are in. There is no limited number of pages, here it is indicated to choose between the first four pages, however, it is possible to configure an SPS8 for zones 1- 32 and another SPS8 for zones 33-64 and so on.
- Page 24 It is possible to generate a Ding Dong after sending the message. Setting SPS8 to maintain a selected zone By default when the user releases the Push to Talk button after the message, the selected zone is cleared, leaving the SPS8 clean for a new selection. It is possible to configure the SPS8 to keep the selected zone always, even after releasing the "Push to Talk"...
- Page 25 Setting the Push to Talk Button Behavior You can select the behavior of the “Push to Talk” button. By default the button behaves like a "Push button" which means that the user must hold the button pressed to speak. It is possible to configure the "Push to Talk" button to behave like "Toggle" which means that after pressing the button once the microphone will remain active until the "Push to Talk"...
- Page 26 EQUIPSON S.A | Avda El Saler,14 - Pol.Ind. L´Alteró, 46460 - Silla ( Valencia ) Spain Tel: +34 961 216 301 | Fax: +34 961 200 242 | www.work.es | support@work.es...
Need help?
Do you have a question about the SPS 8 and is the answer not in the manual?
Questions and answers