Table of Contents
Advertisement
Advertisement
Table of Contents

Related Manuals for AEG L 61271 BI


Summary of Contents for AEG L 61271 BI
-
Page 1: User Manual
L 61271 BI User Manual Washing Machine L 61470 BI USER MANUAL... -
Page 2: Table Of Contents
15. TECHNICAL DATA....................32 FOR PERFECT RESULTS Thank you for choosing this AEG product. We have created it to give you impeccable performance for many years, with innovative technologies that help make life simpler features you might not find on ordinary appliances. Please spend a few minutes reading to get the very best from it. -
Page 3: Safety Information
ENGLISH SAFETY INFORMATION Before the installation and use of the appliance, carefully read the supplied instructions. The manufacturer is not responsible for any injuries or damages that are the result of incorrect installation or usage. Always keep the instructions in a safe and accessible location for future reference. -
Page 4: Safety Instructions
The appliance must be connected to the water mains • using the new supplied hose sets, or other new hose sets supplied by the Authorised Service Centre. Old hose sets must not be reused. • If the mains power supply cable is damaged, it must •... -
Page 5: Water Connection
ENGLISH to be replaced, this must be carried • This appliance is for household use out by our Authorised Service Centre. only. • Connect the mains plug to the mains • Follow the safety instructions on the socket only at the end of the detergent packaging. -
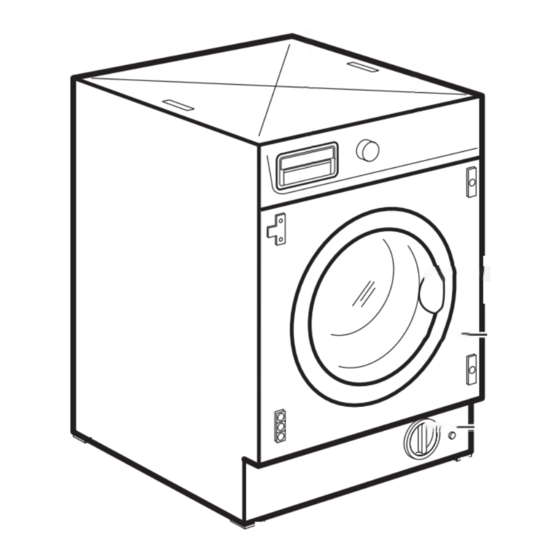
Page 6: Product Description
3. PRODUCT DESCRIPTION 3.1 Appliance overview 1. Detergent dispenser 6. Feet for levelling the appliance 2. Control panel 7. Water drain hose 3. Door handle 8. Mains cable 4. Rating plate 9. Connection for water inlet hose 5. Drain pump filter 10. -
Page 7: Control Panel
ENGLISH 3.4 Installation on suspended mm thick, under the appliance. It should be screwed to at least 2 floor beams and flooring should extend beyond the front feet. Suspended wooden floors are If possible, install the appliance where particularly susceptible to vibration. the floor is more stable. - Page 8 The display shows the following information: Duration of the selected programme • After setting a programme, the duration is displayed in hours and mi- nutes (for example • After the programme has started, the remaining time is updated every minute.
-
Page 9: Programmes
ENGLISH 5. PROGRAMMES 5.1 Programme Chart Programme Maximum load Programme description Temperature range Maximum spin (Type of load and soil level) speed Washing programmes Cottons 7 kg White cotton and coloured cotton. 95°C - Cold 1200 rpm (L 61271 Normal soil and light soil. BI);... - Page 10 Programme Maximum load Programme description Temperature range Maximum spin (Type of load and soil level) speed To rinse and spin the laundry. All fab- Delicate Rinses 7 kg rics, except woollens and very delicate Cold 1200 rpm (L 61271 BI);...
-
Page 11: Consumption Values
ENGLISH Programme options compatibility Programme ■ ■ ■ ■ ■ Cottons ■ ■ ■ ■ Cottons + Prewash ■ ■ ■ ■ ■ Synthetics ■ ■ ■ Easy Iron ■ ■ ■ ■ ■ Delicates ■ ■ Wool/Silk ■ ■ ■... -
Page 12: Options
/ 52 Standard 40°C cotton 0.61 / 52 1) At the end of spin phase. 2) For model L 61271 BI. 3) For model L 61470 BI. Off Mode (W) Left On Mode (W) 0,10 0,98 The information given in the chart above is compliant with the EU Commission regulation 1015/2010 implementing directive 2009/125/EC . -
Page 13: Settings
ENGLISH 7.2 Spin Put the stain remover into compartment When you set a programme, the appliance automatically proposes a 7.4 Extra Rinse default spin speed. Press this button repeatedly to select the desired spin Set this option to add rinsing phases to a speed. -
Page 14: Before First Use
Extra Rinse Rinse button simultaneously until the illuminates/goes off. indicator comes on/goes off. You can activate this option: 8.3 Child Lock • After you press the Start/Pause With this option you can ensure that button: the options and the programme knob are locked. -
Page 15: Setting A Programme
ENGLISH 10.5 Starting a programme with the delay start Always follow the instructions that you find on Set the delay start before starting the the packaging of the programme. detergent products. • After having set all the required options, press the Delay start button 10.3 Setting a programme repeatedly to set the required delay. - Page 16 10.6 Altering an option or a If you cannot open the door but you need to open it, turn the programme dial running programme to Off to switch the appliance off. After a few minutes the door can be opened...
-
Page 17: Hints And Tips
ENGLISH 11. HINTS AND TIPS Special stain removers are available. Use WARNING! the special stain remover that is Refer to Safety chapters. applicable to the type of stain and fabric. 11.1 The laundry load 11.3 Detergents and other treatments • Divide the laundry into: white, coloured, synthetics, delicates and •... -
Page 18: Care And Cleaning
Use the correct quantity of water a water softener. softener. Follow the instructions that you find on the packaging of the product. To find out the water hardness in your area, contact your local water authority. -
Page 19: Cleaning The Drain Filter
ENGLISH 12.6 Cleaning the drain filter WARNING! When the appliance is The pump should be inspected regularly operating and depending and particularly if: on the programme selected • The appliance does not empty and/or there can be hot water in the spin. - Page 20 4. Release the emergency emptying hose, place it in the container and remove its cap cover. 5. When the water stops flowing, unscrew the filter cover by turning it anti-clockwise and remove the filter. Use pliers if necessary. Always keep a rag nearby to dry up any water spillages when removing the cover.
-
Page 21: Emergency Emptying Out
ENGLISH 12.7 Cleaning the inlet hose and the valve filter Remove the inlet hose from the tap and clean Remove the inlet hose from the appliance by its internal valve. loosening the ring nut. 45° 20° Clean the valve filter on the back of the When you reconnect the hose to the back of appliance with a toothbrush. -
Page 22: Troubleshooting
0° C, remove the remaining water from 6. Screw the water inlet hose back on the inlet hose and the drain pump. and re-fit the emergency emptying hose after having put the cap on 1. Disconnect the mains plug from the again. - Page 23 ENGLISH Problem Possible solution The appliance does not • Make sure that the water tap is open. fill with water properly. • Make sure that the pressure of the water supply is not too low. For this information, contact your local water authority. •...
-
Page 24: Installation
After the check, activate the appliance. If the display shows other alarm codes. The programme continues from the Deactivate and activate the appliance. If point of interruption. the problem continues, contact the Service. If the problem occurs again, contact the Authorised Service Centre. - Page 25 ENGLISH Open the door. Remove the polystyrene piece from the door seal and all the items from the drum. Put one of the polystyrene packaging elements on the floor behind the appliance. Carefully put down the appliance with the rear side on it. Make sure not to damage the hoses.
-
Page 26: Positioning And Levelling
Remove the power supply cable and the drain hose from the hose holders. Remove the three bolts. Use the key supplied with the appliance. Pull out the plastic spacers. Put the plastic caps in the holes. You can find these caps in the user manual bag. - Page 27 ENGLISH • The feet may be tight to adjust as they incorporate a self locking nut, but the appliance MUST be level and stable. If necessary, check the setting with a spirit level. Any necessary adjustment can be made with a spanner. Accurate levelling prevents vibration, noise and displacement of the appliance during operation.
-
Page 28: Water Drainage
Do not use an extension hose if the inlet hose is too short. Contact the service centre for the replacement of the inlet hose. 14.4 Water drainage There are different procedures to connect the drain hose: With the plastic hose guide. - Page 29 ENGLISH Without the plastic hose guide. To a sink spigot • Refer to the illustration. Put the drain hose in the spigot and tighten it with a clip. • Make sure that the drain hose makes a loop to prevent particles going into the appliance from the sink.
-
Page 30: Preparation And Assembly Of The Door
Remove the screws of the top cover on the rear of the appliance and install the anti- tilting device as shown in the drawing. Adjust the anti-tilting device so that the distance from the counter is 10mm. Loosen ~10mm the nut counterclockwise with a 3mm wrench. - Page 31 ENGLISH Hinges To mount the hinges it is necessary to drill two holes (dia. 35 mm, depth12.5-14 mm depending on the depth of door furniture) on the inner side of the door. The distance between the hole fixing centres must be 416 mm. The distance from upper edge of the door to the centre of the hole depends on the adjacent furniture's dimensions.
-
Page 32: Technical Data
7 kg Energy Efficiency Class Spin Speed Maximum 1200 rpm (L 61271 BI) 1400 rpm (L 61470 BI) 1) Connect the water inlet hose to a water tap with a 3/4'' thread. 16. ENVIRONMENTAL CONCERNS appliances marked with the symbol Recycle materials with the symbol with the household waste. - Page 33 ENGLISH...
- Page 34 www.aeg.com...
- Page 35 ENGLISH...
- Page 36 www.aeg.com/shop...
Need help?
Do you have a question about the L 61271 BI and is the answer not in the manual?
Questions and answers