Table of Contents
Advertisement
Advertisement
Table of Contents

Summary of Contents for Standard Diagnostics urometer 120
-
Page 2: Table Of Contents
General Information of UroMeter 120 Intended Use Technical Specification & information Name of Components Warnings and precautions System Installation Unpack Connection with PC Components and Functions Keyboard Printer Strip Loading Plate Strip Loading plate Component Changing direction Strip Loading plate... - Page 3 Specific Operation Manual System Initiation System Control System Clock Set System Calibration (Internal Quality Control) System Configuration Printing Paper Loading Registration Measurement Date Base 5.10 DB Block Control How to store after using Daily Check Up Cautions for handling Errors, errors! Error Messages and Troubleshooting Display of Measured Concentration Performance and limitations of use...
-
Page 4: General Information Of Urometer 120
1. General Information of UroMeter 120 Intended Use SD “UroMeter 120” (model number : UM0120) as urine chemistry analyzer give the information on blood, bilirubin, urobilinogen, ketones, protein, nitrite, glucose, pH, specific gravity, leucocytes and ascorbic acid in human urine, in combination with SD Urocolor 11 parameter, urinalysis reagent strips. -
Page 5: Name Of Components
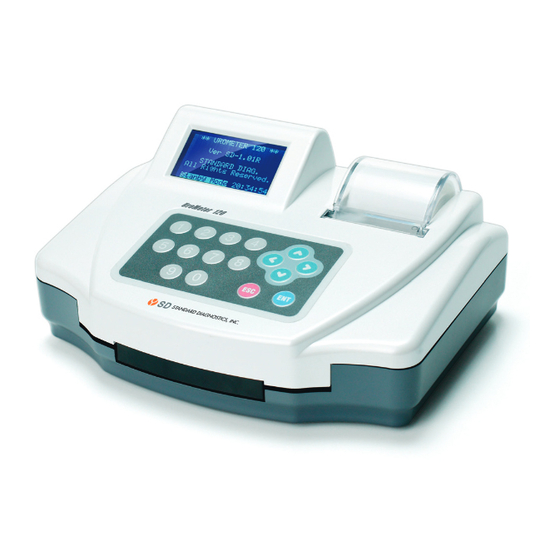
- Altitude up to 2000m - Pollution degree 2 - In storage : Temperature 5℃ to 40℃ Name of Components Printer Key Board Strip Loading Plate [Fig 1.1] View from above [Fig 1.2] View of rear... -
Page 6: Warnings And Precautions
1) If the equipment is used in a manner not specified by the manufacturer, the protection provided by the equipment may be impaired. 2) Read the UroMeter 120’s user manual carefully before installation, operation, maintenance, transportation and storage, so as to ensure proper operation of the analyzer from the outset. -
Page 7: System Installation
2. System Installation Components After opening the packing box of UroMeter 120, check that all the items in the list below are available in the package. Item Quantity 1. UroMeter 120 2. Printing Paper 3. Power Cable & Adapter 4. RS232c Cable 5. -
Page 8: Connection With Pc
2. System Installation Connection diagram between UROMETER120 and Host Computer. [Fig 2.2] Connection with PC... -
Page 9: Components And Functions
3. Components and Functions Keyboard Keyboard consists of 16 keypads. It is used to input data or set up each function. [Fig 3.1] Key Board 1) ENT Key ENT Key is used to initiate testing or select a mode at each step. 2) ESC Key ESC Key is used to terminate testing or escape from each step. -
Page 10: Lcd
[Fig 3.2] LCD Printer UroMeter 120 displays test results by printing. - Setting the ON/OFF printer mode, optionally. - When the printing papers are almost consumed, if a red line around the paper appears, replacement with a new printing paper should be made. -
Page 11: Strip Loading Plate Component
Strip Loading plate Component Left Sensor Right Sensor Sensor Filter Tray [Fig 3.4] Strip Loading plate Component and Name Changing direction Strip Loading plate UroMeter120 is designed both right hand and left hand users. Push the tray right side, change the direction, and put it from left to right. ▶... - Page 12 3. Components and Functions [Fig 3.6] Re-set Tray [Fig 3.7] Strip Loading after set up stray...
-
Page 13: Preparation Of Loading Plate
4. Brief Operating Instruction 1) Turn on the power switch at the rear of UroMeter 120. - System checking and calibration will be performed automatically and standby mode will be shown. 2) System configuration (5.5 System Configuration) - Set up the required environment such as Language, Display unit, Printer enable or not. - Page 14 4. Brief Operating Instruction ▶ [Fig 4.5] [Fig 4.6]...
-
Page 15: Specific Operation Manual
5. Specific Operation Manual System Initiation Turn on Power Stand By Mode, and auto calibration [Fig 5.1] Stand By Mode System Control In Stand by Mode of [Fig.5.1], Press 2 times of "ESC" and then System Control status of [fig. 5.2] will be shown. [Fig 5.2] System Control System Clock Set 1) In System Control Mode of [Fig 5.2], press ①... -
Page 16: System Calibration (Internal Quality Control)
3) After adjusting local time, press ENT key for setting done. Date changes automatically along setting time. System Calibration (Internal Quality Control) 1) The system of UroMeter 120 calibrates automatically, every time you turn power switch on. There is no need to check the system particularly. - Page 17 - Beep Sound Enable (Beep or Silent) If selecting YES, beep will sound while operating UroMeter 120. - Set Baud Rate (PC) The speed rate can be selected while transferring data between UroMeter 120 and PC, each other. At normal condition, 115.2 should be selected.
-
Page 18: Printing Paper Loading
5. Specific Operation Manual Printing Paper Loading Open the cover and put roll paper. [Fig 5.5] Paper Loading 1) Adjust both center projections to each hole of printing paper loading part of instrument, facing a rubber roller. 2) Pull the printer lever at an angle of 90°, facing you. Push the printing paper into the printer head.3) In 2 seconds, the instrument recognizes the printing paper and initiates the paper’s proper position, automatically. -
Page 19: Registration
Registration (Input ID) 1) In System Control Mode of [Fig 5.2], press ③ key and Registration Mode of [Fig 5.7] will be shown as below. You can move to each item by using left/right (◀ / ▶) keys. ◀ ◀ ◀... -
Page 20: Measurement
100 seconds. In Quick Mode, result will be shown immediately. 6) Analyzer will stand by after the measurement. If there is no strip to be tested on the strip loading plate, the UroMeter 120 stops working. 7) Whenever press ENT, STAND BY MODE ▶ Quick Mode ▶... - Page 21 3) Be sure to use fresh urine sample. 4) You must lay one strip on the strip loading plate at a time. 5) As with all diagnostic tests, all results must be considered with other clinical information available to the physician. 6) In Quick Mode, consider reaction time at least 1 minutes 7) Excessive urine probably cause malfunction.
-
Page 22: Date Base
5. Specific Operation Manual ▶ Test time ▶ Patient Name Data’s No ▶ ▶ Instrument Serial No. ▶ Patient’s sample No. ▶ Operator’s ID No. Strip Lot No. [Fig 5.9] Result Sheet Data Base (How to use data base saved) 1) In System Control Mode of [Fig 5.2], press ⑥... -
Page 23: Db Block Control
- Data base can save up to memory of 2,000 test results. When the memory is full, all data will be transferred to main PC automatically if PC and the UroMeter 120 instrument is connected through RS232c cable. If they are not connected, previously saved data will be erased on the “first in first out”... - Page 24 5. Specific Operation Manual 2) You can upload the data of test results to PC through RS232C. The data form uploaded is the same as paper printing style. 3) Uploading mode is for transferring data of the test results to PC in a lump.
-
Page 25: How To Store After Using
6. How to store after using Daily Check Up Separate Strip loading plate from the instrument and wash them in water. Cautions for Keeping 1) Avoid the places subject to high temperature, high humidity, direct sunlight and air containing dusts, salt and sulfur contents. 2) Avoid a slope or vibrating place for keeping. -
Page 26: Display Of Measured Concentration
7. Display of Measured Concentration Performance and limitations of use Urometer 120 prints the results in the following gradation of concentration in combination with Urocolor. To ensure that urinalysis is carried out correctly, read the package insert of Urocolor. Presentation of analytical data... - Page 27 Technical Service : If you have any questions after reading the manual or if you need technical assistance including maintenance or change of consumables, please contact your local Standard Diagnostics, Inc. organization or e-mail (sales@standardia.com) Date Issued : 2007. May...
- Page 28 ** Very Important Cautions ** If there is any burning smell, stop using instrument immediately, and contact the distributor so that specialist can take right service to the unit. If unspecialised technician disassembles and repairs the unit, it can cause severe malfunction and damage.
Need help?
Do you have a question about the urometer 120 and is the answer not in the manual?
Questions and answers