Advertisement
Quick Links
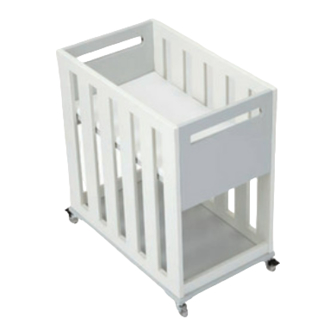
Flex Bassinet
Assembly Instructions
!
WARNING: Failure to follow these
warnings and instructions could
result in serious injury or death
FALL HAZARD- To help prevent falls, do not use this product when infant begins to
push up on hands and knees or has reached manufacturer's recommended maxi-
mum weight of 18 lbs., whichever comes first.
SUFFOCATION HAZARD
• Infants have suffocated:
• In gaps between extra padding and the side of the bassinet.
• On soft bedding.
• Use ONLY the pad provided by The Land of Nod. NEVER add a pillow, comforter,
or another mattress for padding.
• If a sheet is used with the pad, use only the one provided by The Land of Nod or
one from The Land of Nod specifically designed to fit the dimensions of the mat-
tress pad.
To reduce the risks of SIDS, pediatricians recommend healthy infants be placed on
their backs to sleep, unless otherwise advised by your physician.
Strings Can Cause Strangulation!
• Do not place bed near windows where cords from blinds or drapes may strangle
a child.
• Do not place items with a string, cord, or ribbon around a child's neck, such as
hood string or pacifier cords.
• Do not suspend strings over a bassinet or attach strings to toys.
8135 River Drive • Morton Grove, IL 60053 • p: (800) 933-9904 • e: customerservice@landofnod.com • www.landofnod.com
Advertisement

Related Manuals for The Land of Nod Flex Bassinet


Summary of Contents for The Land of Nod Flex Bassinet
- Page 1 • If a sheet is used with the pad, use only the one provided by The Land of Nod or one from The Land of Nod specifically designed to fit the dimensions of the mat- tress pad.
- Page 2 Flex Bassinet Assembly Instructions This page lists the contents included in the box. Please take time to identify the hardware as well as the individual components of the product. As you unpack and prepare for assembly, place the contents on a carpeted or padded area to protect them from damage.
- Page 3 Flex Bassinet Assembly Instructions 1 - Bottom panel 2 - End panels 2 - Side panels 2 - Bottom rails 1 - Fitted sheet 1 - Mattress panel 1 - Mattress pad 8135 River Drive • Morton Grove, IL 60053 • p: (800) 933-9904 • e: customerservice@landofnod.com • www.landofnod.com...
- Page 4 Flex Bassinet Assembly Instructions Attach side panels to mattress panel with 4 small bolts and 4 lock washers as shown. Secure, but do not over tighten, bolts with an Allen wrench. Attach bottom rails to bottom panel with 4 small bolts and 4 lock washers as shown.
- Page 5 Flex Bassinet Assembly Instructions Insert 2 wood dowels into assembly as shown and fit into corresponding holes of end panel. Secure end panel with 2 large bolts and 2 lock washers, using an Allen wrench. Insert 2 wood dowels into assembly as shown and fit into corresponding holes of remaining end panel. Secure end panel with 2 large bolts and 2 lock washers.
- Page 6 Flex Bassinet Assembly Instructions Insert 4 wood dowels into assembly as shown and fit into corresponding holes of bottom panel. Secure bottom panel with 4 small bolts and 4 lock washers, using an Allen wrench. caster locking caster locking caster caster Per diagram above, attach 2 casters and 2 spring washers to bottom panel and secure with a hex wrench.
-
Page 7: Cleaning And Care
Flex Bassinet Assembly Instructions Cover fitted sheet over mattress pad and place into bassinet assembly as shown. Assembly is now complete. CLEANING AND CARE: Clean surfaces with a dry or damp soft cloth. Do not use abrasive cleaners. Periodically check and tighten hardware as necessary. Once the bassinet is in use, periodically check to make sure all bolts are tight, and tighten as necessary. Keep these instructions for future use. - Page 8 Securely tighten loose bolts and other fasteners. DO NOT use crib if any parts are missing, damaged, or broken. Contact The Land of Nod® for replacement parts and instructional literature if needed. DO NOT substitute parts.
- Page 9 Flex Crib Assembly Instructions This page lists the contents included in the box. Please take time to identify the hardware as well as the individual components of the product. As you unpack and prepare for assembly, place the contents on a carpeted or padded area to protect them from damage.
- Page 10 Flex Crib Assembly Instructions Using an Allen wrench, remove 4 bolts, 4 lock washers and 4 wood dowels to release bottom panel of bassinet. Set hardware and components aside until further instructions. Using an Allen wrench, remove 2 bolts, 2 lock washers and 2 wood dowels and release end panel of bassinet. Set hardware and components aside until further instructions.
- Page 11 Flex Crib Assembly Instructions Remove 2 bolts, 2 lock washers and 2 wood dowels and release end panel of bassinet. Set hardware and components aside until further instructions. Attach bottom frame legs and bottom frame rails with 8 small bolts, 8 lock washers and 8 brackets as shown. Secure, but do not over tighten, with an Allen wrench.
- Page 12 Flex Crib Assembly Instructions Attach side panel to end panels with 4 medium bolts and 4 lock washers, using an small Allen wrench. high middle Determine desired height (low, middle, high) for the crib mattress. Insert 1 corner support into each corner of the crib assembly as shown.
- Page 13 Flex Crib Assembly Instructions With assistance of another adult, carefully place mattress support panel into crib assembly and onto corresponding corner supports. Using an Allen wrench, secure each corner support with 1 bolt cap. Turn bolt caps clockwise to secure. 8135 River Drive •...
- Page 14 Flex Crib Assembly Instructions Attach end panel to crib assembly with 4 medium bolts and 4 lock washers as shown, using an small Allen wrench. Note: All components and hardware leftover from bassinet conversion to full size crib should be stored and out of reach of children Note: Some bassinet components may be reused for the rolling bin conversion.
- Page 15 Flex Crib Assembly Instructions CLEANING AND CARE: Clean surfaces with a dry or damp soft cloth. Do not use abrasive cleaners. Periodically check and tighten hardware as necessary. Once the crib is in use, periodically check to make sure all bolts are tight, and tighten as necessary. Keep these instructions for future use. MAINTENANCE Upon completion of assembly, be sure all screws, bolts and fastening devices have been tightened securely. Periodically repeat this check to make sure all screws, bolts and fastening devices are tight.
- Page 16 Flex Rolling Bin Assembly Instructions This page lists the contents included in the box. Please take time to identify the hardware as well as the individual components of the product. As you unpack and prepare for assembly, place the contents on a carpeted or padded area to protect them from damage.
- Page 17 Flex Rolling Bin Assembly Instructions Using an Allen wrench, unfasten 4 bolts and 4 lock washers from bottom panel assembly of bassinet. Set hardware and components aside until further instructions. Using an Allen wrench, unfasten 4 bolts and 4 lock washers from bottom panel and stretcher bars. Set hardware and components aside until further instructions.
- Page 18 Flex Rolling Bin Assembly Instructions Using an Allen wrench, unfasten 4 large bolts and 4 lock washers from end panels of bassinet. Remove 4 wood dowels. Set hardware and components aside until further instructions. Using an Allen wrench, unfasten 4 bolts and 4 lock washers from side panels and mattress panel of bassinet. Set hardware and components aside until further instructions.
- Page 19 Flex Rolling Bin Assembly Instructions Insert 2 wood dowels into assembly as shown and fit into corresponding holes of back panel. Secure back panel with 2 bolts and 2 lock washers. Insert 2 wood dowels into assembly as shown and fit into corresponding holes of front panel. Secure front panel with 2 bolts and 2 lock washers.
- Page 20 Flex Rolling Bin Assembly Instructions Insert 4 wood dowels into assembly as shown and fit into corresponding holes of bottom panel. Secure bottom panel with 8 bolts and 8 lock washers. CLEANING AND CARE: Clean surfaces with a dry or damp soft cloth. Do not use abrasive cleaners. Periodically check and tighten hardware as necessary. 8135 River Drive •...
- Page 21 Securely tighten loose bolts and other fasten ers. DO NOT use crib if any parts are missing, damaged, or broken. Contact The Land of Nod® for replacement parts and instructional literature if needed. DO NOT substitute parts.
- Page 22 Flex Toddler Bed Assembly Instructions This page lists the contents included in the box. Please take time to identify the hardware as well as the individual components of the product. As you unpack and prepare for assembly, place the contents on a carpeted or padded area to protect them from damage.
- Page 23 Flex Toddler Bed Assembly Instructions Note: All components and hardware leftover from full size crib to toddler bed should be stored and out of reach of children Using an Allen wrench, remove 4 bolt caps from mattresss support panel as shown. Set hardware and components aside until further instructions.
- Page 24 Flex Toddler Bed Assembly Instructions Using an Allen wrench, remove 4 large bolts, 4 lock washers and 4 brackets and release bottom frame leg from assembly as shown. Set hardware and component aside until further instructions. Attach headbaord to side rails with 4 large bolts, 4 lock washers and 4 brackets as shown. Secure bolts with an Allen wrench.
- Page 25 Flex Toddler Bed Assembly Instructions Insert 4 corner supports into headboard and footboard as shown. With assistance of another adult, carefully place mattress support panel into toddler bed assembly and onto corre- sponding corner supports. 8135 River Drive • Morton Grove, IL 60053 • p: (800) 933-9904 • e: customerservice@landofnod.com • www.landofnod.com...
- Page 26 Flex Toddler Bed Assembly Instructions Using an Allen wrench, secure each corner support with 1 bolt cap. Turn bolt caps clockwise to secure. Assembly is now complete. CLEANING AND CARE: Clean surfaces with a dry or damp soft cloth. Do not use abrasive cleaners. Periodically check and tighten hardware as necessary. Once the toddler bed is in use, periodically check to make sure all bolts are tight, and tighten as necessary. Keep these instructions for future use.
Need help?
Do you have a question about the Flex Bassinet and is the answer not in the manual?
Questions and answers