Table of Contents
Advertisement
User Instructions
Multi-Channel H.264 HD Multimedia System
Ultra-Compact Media Encoder and Streamer
Z3-SME-01
Model Name:
The Power of ZEUS™
DOC-USR-0070-08
Manual Version 2.41d
Software Version 2.41d
January 20, 2017
Before attempting to connect or operate this product, please read these instructions carefully and save this manual for future use.
Copyright © 2017 Z3 Technology, LLC. All rights reserved.
Z3 Technology and ZEUS are registered trademarks of Z3 Technology, LLC.
This document contains proprietary information of Z3 Technology, LLC ("Z3"). This document may not be used, reproduced, disclosed, or
disseminated to anyone without the prior written approval of an authorized representative of Z3. Z3 reserves the right to change this product at
any time and without notice. All product names, trademarks, trade names, service marks, or service names mentioned in this document are the
property of their respective owners.
Z3 Technology, LLC incorporates HDMI® technology. The terms of HDMI and HDMI High-Definition Multimedia Interface, and
the HDMI Logo are trademarks or registered trademarks of HDMI Licensing LLC in the United States and other countries.
Advertisement
Table of Contents

Summary of Contents for Zeus Z3-SME-01
-
Page 1: User Instructions
Before attempting to connect or operate this product, please read these instructions carefully and save this manual for future use. Copyright © 2017 Z3 Technology, LLC. All rights reserved. Z3 Technology and ZEUS are registered trademarks of Z3 Technology, LLC. This document contains proprietary information of Z3 Technology, LLC ("Z3"). This document may not be used, reproduced, disclosed, or disseminated to anyone without the prior written approval of an authorized representative of Z3. -
Page 2: Revision History
2.35a 06/01/2016 Formatting and grammar updates. Updated screenshots. Added Sections 6.13, Record to USB, and 6.15 regarding MPTS. Updated ZEUS logo with registered symbol. Updates to 2.41d 01/20/2017 available options in Section 10.0. Added TTL information to Troubleshooting appendix. Formatting and grammar updates. -
Page 3: Table Of Contents
6.1 Set up the HD Source ....................12 6.2 Connect and Power Up the Z3-SME-01 ................12 6.3 Find the Z3-SME-01 on the Network using ZFinder............13 6.4 Configure Channel 1 Encode for UDP Streaming .............. 14 6.5 Run VLC to View Stream ..................16 6.6 Streaming RTP/RTSP .................... - Page 4 8.3 Set Decoder Mode ....................38 8.4 Configure and Run Decoder ..................40 8.5 Decoding with Forward Error Correction ............... 41 9.0 PERFORMING OTHER OPERATIONS WITH THE Z3-SME-01 ............42 9.1 Saving Current Settings ................... 42 9.2 Using a Static IP Address ..................43 9.3 Making a Firmware Update ..................
- Page 5 Figure 1 Z3-SME-01 Dimensions ................... 7 Figure 2 Parts Included with the Z3-SME-01 ................9 Figure 3 Front and Rear Panels of the Z3-SME-01 ..............11 Figure 4 Encode Connections for the Z3-SME-01 (Front) ............12 Figure 5 Encode Connections for the Z3-SME-01 (Back) ............12 Figure 6 ZFinder with Z3-SME-01 Selected ................
- Page 6 Figure 48 Setting a Static IP Address within a User Preset ............44 Figure 49 Reboot Reminder for Changing IP Settings ..............44 Figure 50 Z3-SME-01 IP Address Shown in ZFinder ..............45 Figure 51 User Interface Using New IP Address ..............45 Figure 52 Updating the Device Firmware from the Web Interface ..........
-
Page 7: General Description
The ZEUS Z3-SME-01 is a cost-optimized, compact 98 x 81 x 21 mm (3.88 x 3.19 x 0.81 in) system that allows encode of HD video (up to 1080p60) through HDMI input, and encode of SD video through a composite input. -
Page 8: Quick Start Guide
Server for RTMP” on page 62. To use the Z3-SME-01 as a decoder, you can go to Section 8.0, “ RUNNING THE DECODER,” on page 38. The Z3-SME-01 supports Pro-MPEG Forward Error Correction (FEC). Enabling this feature is described in Section 8.5, “Decoding with Forward Error Correction”... -
Page 9: Included Parts List
Serial Cable 5V Power Supply Composite Adapter Cable Gender Changer Figure 2 Parts Included with the Z3-SME-01 *Note: The serial cable and gender changer are included for advanced troubleshooting purposes only and are not needed by the typical user. ___________________________________________________________________________________________ Z3 Technology, LLC ♦... -
Page 10: Features
DOC-USR-0070-08 FEATURES HD resolutions up to 1920x1080 including 1080i, 1080p60 and 720p Standard Definition encoding for ISDB-T, DVB-H, and other standards Video Inputs: HDMI, Composite Video Output: HDMI On-board video scaler provides full screen resizing with all resolutions ... -
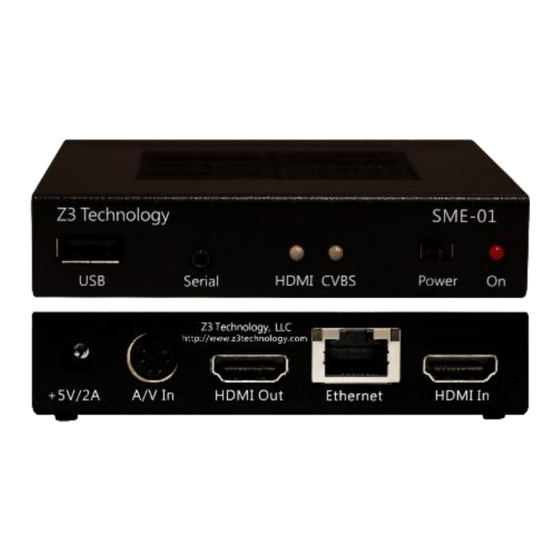
Page 11: Operating Controls
HDMI Output Status Lights GigE Power Switch HDMI Input Figure 3 Front and Rear Panels of the Z3-SME-01 5V Power For advanced troubleshooting purposes only. Not needed by Supports non-HDCP HDMI content only. For example, a Blu-Ray typical users. player cannot be used as a video source. -
Page 12: Getting Started And Running The Encoder
This section gives step-by-step instructions on using the Z3-SME-01 to stream 1080p or 1080i video to VLC media player running on your PC. In addition to the Z3-SME-01, an HD source with HDMI output and a PC are required. Encoding with a composite source is described later in Section 6.11 on page 25. -
Page 13: Find The Z3-Sme-01 On The Network Using Zfinder
Z3 systems connected to the network. In this case, the Z3-SME-01 appears. (7) Click on the Z3-SME-01 entry in the window to select it. This will cause the “Edit Device”, “Open Device” and “Flash LEDs” boxes to activate. -
Page 14: Configure Channel 1 Encode For Udp Streaming
(8) Click on “Open Device.” An Internet browser window is opened (for best results, we recommend using Firefox or Chrome) and the HTTP-based graphical user interface (GUI) appears at the System Setup tab. Figure 7 Z3-SME-01 User Interface System Setup Tab 6.4 Configure Channel 1 Encode for UDP Streaming (9) Click on the CH1 tab. -
Page 15: Figure 8 Ch1 Tab Configuration - Udp
DOC-USR-0070-08 (1) Change to “1920x1080” or “Follow input” (2) Change to UDP (3) Change to IP Address of your PC or multicast address (4) Note “Dest Port” value (6) Click “start” (5) If necessary, click “stop” Figure 8 CH1 Tab Configuration – UDP (14) If the encoder hasn’t already autostarted, click on “start”. -
Page 16: Run Vlc To View Stream
DOC-USR-0070-08 6.5 Run VLC to View Stream (15) Run the VLC media player on your PC (version used in testing at Z3: 2.1.5). (16) Select Media – Open Network Stream. In the box, type “udp://@192.168.0.6:5004”, where “192.168.0.6” matches the values of the computer IP address or multicast address entered for “Dest Address”... -
Page 17: Streaming Rtp/Rtsp
DOC-USR-0070-08 6.6 Streaming RTP/RTSP Once you have UDP streaming running, it is relatively simple to change to RTP/RTSP streaming. You will need to change one setting. To stream using RTP/RTSP, complete the following steps: (19) In the CH1 configuration tab, click on “stop” to stop the current encoding session. (20) Change “Output Format”... -
Page 18: Figure 12 Vlc Open Network Stream Screen For Rtsp
DOC-USR-0070-08 (22) Open VLC. Select “Media – Open Network Stream”. (23) In the “Open Media” box, enter “rtsp://{IP Address}/z3-{ch #}{m}.mp4” for the network URL. a. {IP Address} will be the IP address of your encoder. If your encoder is set to DHCP (This is the default setting when you first receive your encoder.), you can find this in ZFinder or the web browser with your user interface open. -
Page 19: Dynamically Change Bitrate And Frame Rate
DOC-USR-0070-08 6.7 Dynamically Change Bitrate and Frame Rate The Z3-SME-01 includes an “Update” button which allows you to change the bitrate and/or frame rate without stopping and restarting the encoder. To use this feature, complete the following steps: (25) In VLC, click on “Tools” and select “Codec Information.” This brings up a window with four tabs. -
Page 20: Figure 16 Drop In Bitrate After Dynamic Bitrate Change
DOC-USR-0070-08 (27) You should see the quality of the picture in VLC change and the video bitrate drop. Lower video + audio bitrate Figure 16 Drop in Bitrate after Dynamic Bitrate Change (28) If you click on the Status tab in the user interface and click “Refresh,” you will also see the updated bitrate reflected. -
Page 21: Adjusting The Udp Ts Rate
DOC-USR-0070-08 6.8 Adjusting the UDP TS Rate The Z3-SME-01 includes a parameter to adjust the TS rate independent of the video bitrate. This can be found just below “PMT PID” when “UDP” is selected as the output format. Normally, this value is set to 25% to 33% above the sum of the video and audio bitrate. For example, the default value out of the factory is a value of 10Mbps, corresponding to 8Mbps for the video. -
Page 22: Figure 19 Ts Rate And Lower Bitrate Reflected In Vlc
DOC-USR-0070-08 Once you select UDP, the “TS RATE” textbox will appear. Change this value to “1000K”. Click on the “start” button to start encoding. Open VLC to view your UDP stream (Section 6.5) and view the “Statistics” tab (Section 6.7). You will see a lower value for the overall input rate and for the “content”... -
Page 23: Encoding Audio Channels
DOC-USR-0070-08 6.9 Encoding Audio Channels The Z3-SME-01 can support up to four mono channels of audio simultaneously. It can also support up to two stereo pairs. In the “CH1” tab, click “stop”. In the “Audio Info” section, set “Enable” to “yes” using the dropdown menu for each audio channel you desire. -
Page 24: Tuning For Latency
DOC-USR-0070-08 6.10 Tuning for Latency For latency, the key parameters to work with are Maximum Delay and Number of B-frames. Maximum Delay defines the number of milliseconds of buffering the encoder has to work with. The higher this value, the more buffers it has to work with and the more time it has to “smooth things out” for challenging content. -
Page 25: Encoding From Composite In
DOC-USR-0070-08 6.11 Encoding from Composite In The Z3-SME-01 also supports encode of video from a Composite source. Composite input can be used in parallel with the HDMI input. A composite adapter cable, provided with the Z3-SME-01, is needed. To encode Composite, perform the following steps: Find the special composite adapter cable (pictured below). -
Page 26: Figure 25 Ch1 Tab Configuration - Composite Input
DOC-USR-0070-08 The options for a second encode channel appear. Here, you can specify composite through the “Video Source” dropdown menu. Example values for encoding NTSC are displayed below. Click on “start.” Click on “start” Figure 25 CH1 Tab Configuration - Composite Input ___________________________________________________________________________________________ Z3 Technology, LLC ♦... -
Page 27: Encoding Closed Caption Data
DOC-USR-0070-08 6.12 Encoding Closed Caption Data The Z3-SME-01 supports extraction of closed caption data from composite input. This automatically occurs any time composite input with closed caption data included is used. To utilize this feature, complete the following: (1) Connect a composite video source with closed caption data to the composite input (see Figure 23). -
Page 28: Record To Usb
DOC-USR-0070-08 6.13 Record to USB The Z3-DME-04 supports writing encoded video to a storage device connected to the USB port in .ts file format. Connect a USB flash drive or other USB storage device to “USB” on the back of the encoder. *Note: The USB drive must be formatted in either FAT32, VFAT, EXT3, or EXT4 format. -
Page 29: Using The "Aux Ts File" Option
DOC-USR-0070-08 6.14 Using the “Aux TS File” Option When streaming UDP, the TS stream can be simultaneously saved to a file on a USB storage device using the Auxiliary TS File option. (1) Connect a USB flash drive or other USB storage device to “USB” on the back of the encoder. *Note: The USB drive must be formatted in either FAT32, VFAT, EXT3, or EXT4 format. -
Page 30: Using Mpts To Combine Multiple Streams
MPTS plus a 20% margin. (6) Set “Destination 1” to “UDP”. ASI is not supported by the Z3-SME-01 hardware. (7) Set the “IP Address” and “IP Port” for the destination of the stream. In the pictured example, “221.1.2.3”... -
Page 31: Figure 30 The "Start All" Button
DOC-USR-0070-08 (8) Click “Start All” at the bottom of any tab to start encoding. Click here Figure 30 The “Start All” Button Both streams will now be able to be received and viewed using VLC media player. (9) Run VLC on your PC (version used by Z3: 2.1.5). (10) Select Media –... -
Page 32: Streaming Rtmp In Three Different Resolutions
VLC does not support RTMP. The test player within Wowza Streaming Engine is recommended. 7.1 Connect the Encoder (1) Follow steps (1) to (8) in Section 6.0 to connect the Z3-SME-01 for encode and bring up the user interface. 7.2 Configure the Encoder for “Encode 1 to 3” Mode (2) At the “Operating Mode”... -
Page 33: Configure Ch1 For Rtmp Streaming
DOC-USR-0070-08 7.3 Configure CH1 for RTMP Streaming (4) Click on the “CH1” tab. (5) Set “Video Source” to “HDMI”. (6) Set “Video Resolution” to “1280x720”. (7) Set “Video Bit Rate” to “4000K”. (8) Set Output Format to “RTMP.” (9) For “Dest Address”, type “192.168.0.4:1935/live/720”, where “192.168.0.4” is the IP address of the PC with the Wowza server. -
Page 34: Configure Ch2 For Rtmp Streaming
DOC-USR-0070-08 7.4 Configure CH2 for RTMP Streaming (11) Click on the “CH2” tab. (12) Set the “Video Resolution” to “720x480” for D1 video (13) Set “Video Bit Rate” to “2000K”. (14) For “Dest Address”, type “192.168.0.4:1935/live/d1”, where “192.168.0.4” is the IP address of the PC with the Wowza server. -
Page 35: Configure Ch3 For Rtmp Streaming
DOC-USR-0070-08 7.5 Configure CH3 for RTMP Streaming (15) Click on the “CH3” tab. (16) Set set the “Video Resolution” to “352x240” for CIF video. (17) Set “Video Bit Rate” to “1000K”. (18) For “Dest Address”, type “192.168.0.4:1935/live/cif”, where “192.168.0.4” is the IP address of the PC with the Wowza server. -
Page 36: Set Up The Wowza Server
DOC-USR-0070-08 7.6 Set up the Wowza Server (19) Install the Wowza server on a PC on your network (for details on configuring Wowza, please see “APPENDIX A: Configuring the Wowza Server for RTMP” on page 62). *Note: VLC does not support RTMP. The test player within Wowza Streaming Engine is recommended. -
Page 37: Figure 39 Viewing Z3-Sme-01 Content On Wowza
(23) You should see the “Test Players” popup screen. Select the “Adobe RTMP” tab, change the Stream name to “720” (should match one of the directories you are streaming to in the Z3-SME-01), and click “Start”. You will then see the content streamed from the Z3-SME-01. -
Page 38: Running The Decoder
“encode_sme01.ts”. Leave the USB drive connected to the Z3-SME-01. 8.2 Connect the Output (2) Connect an HDMI cable from “HDMI Out” of the Z3-SME-01 to an HD TV or monitor. HDMI Out Figure 40 Connecting the Z3-SME-01 for Decode 8.3 Set Decoder Mode... -
Page 39: Figure 42 System Setup In Decoder Mode
DOC-USR-0070-08 (4) Once you do this, the description at the top right will change from “Encoder” to “Decoder” and settings for Display Mode, Resolution, and Layout will appear in the System Setup Tab. New Settings for Display Appear Figure 42 System Setup in Decoder Mode (5) Click on “Set Display”... -
Page 40: Configure And Run Decoder
DOC-USR-0070-08 8.4 Configure and Run Decoder (6) Click on the “CH1” tab and change the settings to match the output of your encoded stream. For decode of the previously recorded .ts file, use the following configuration example by selecting “TSFILE” as the “Input Interface” and entering “/media/sda1/encode_sme01.ts” for the “Location”. -
Page 41: Decoding With Forward Error Correction
DOC-USR-0070-08 8.5 Decoding with Forward Error Correction The Z3-SME-01 supports decode of TSRTP streams with Pro-MPEG Forward Error Correction (FEC). (1) Verify the unit is in Decoder mode and connected to a display monitor. (2) In the “CH1” tab, select select "TSRTP" as the “Input Interface”. This will cause a "FEC Mode"... -
Page 42: Performing Other Operations With The Z3-Sme-01
9.0 PERFORMING OTHER OPERATIONS WITH THE Z3-SME-01 9.1 Saving Current Settings If you have a specific configuration you’d like to preserve, you can save it so that when the Z3-SME-01 is powered off and back on, it automatically uses those settings. -
Page 43: Using A Static Ip Address
DOC-USR-0070-08 (8) Once your changes have been set in this configuration, click on the “Save” button. Click “Save” Figure 47 Saving New Settings to a User Preset (9) A pop-up window appears to confirm the saving of these settings is complete. Click “OK”. *Note: The very first time settings are saved may take up to 30 seconds. -
Page 44: Figure 48 Setting A Static Ip Address Within A User Preset
DOC-USR-0070-08 Un-check “Use DHCP” Click “Save” Figure 48 Setting a Static IP Address within a User Preset (6) Now that DHCP is no longer set in your configuration (“z3_config1” is pictured) and your network settings have been entered, click on the “Save” button. (7) When you do this, a window appears reminding the user that, for changes to IP Address/ Netmask/ Gateway to take effect, a reboot is required and asking if a reboot is desired. -
Page 45: Figure 50 Z3-Sme-01 Ip Address Shown In Zfinder
(10) A web browser will then open at the IP address of the Z3-SME-01 and you will see the user interface. -
Page 46: Making A Firmware Update
DOC-USR-0070-08 9.3 Making a Firmware Update (1) Access the user interface (Steps (1)-(8) in Section 6.0). (2) Select “update device firmware” from the System Setup tab. Click here Figure 52 Updating the Device Firmware from the Web Interface (3) This brings you to the update image screen. In this screen, click on “Browse…” Figure 53 Updater Screen ___________________________________________________________________________________________ Z3 Technology, LLC ♦... -
Page 47: Using The Password Feature
(7) Your encoder is now updated. 9.4 Using the Password Feature The Z3-SME-01 includes an optional password to prevent unauthorized users from accessing the HTTP- based user interface. The steps for using it are shown below: (1) In the System Setup tab, click on “go” next to “Set Password”: Click here Figure 55 Selecting “Set Password”... -
Page 48: Figure 56 Changing The Password
DOC-USR-0070-08 (2) The change password options appear. Enter the new password twice and click “change.” Enter new password twice Click “change” Figure 56 Changing the Password (3) Wait for the password options to disappear. This indicates that the password has changed. (4) Retype the IP address in the web browser or refresh the page. -
Page 49: Summary Of Options
Notes Local IP Address 192.168.x.y (192.168.81.07) Sets the IP address of the Z3-SME-01. Note that a “save” of these settings and a reboot is needed for changes to this value to take effect. When in DHCP mode, this field is not applicable. -
Page 50: The User Presets Tab
See Section 9.3, “Making a Firmware Update” on page 46. Download device logs Clicking this causes the Z3-SME-01 to extract a set of diagnostic logs that can be sent to Z3 Technology in the event of an issue to be reported. This file is saved on the PC which the GUI is being run from. -
Page 51: The Status Tab
DOC-USR-0070-08 delete Delete a configuration file. export Export current settings to a file. Not supported in this release. import Load settings from a previously exported file. Not supported in this release. reset Reset the user presets. 10.3 The Status Tab Note: This tab may take a few seconds to load. -
Page 52: The Mpts Tab
Destination 1 NONE Used to define where the multiple channels will be routed to after being combined into one stream. “ASI” is not supported by Z3-SME-01 hardware. “UDP” must be selected. Destination 2 NONE An optional second destination for the MPTS streams. - Page 53 DOC-USR-0070-08 mode, the user can select between “HDMI” or “Composite” for CH1 (and CH2/CH3 will match whatever is chosen for CH1). 16:9 Checked For any SD resolutions (NTSC, PAL), checking this forces the aspect ratio to be “16:9” in the output Unchecked (otherwise a default value of 4:3 is used).
- Page 54 DOC-USR-0070-08 Interlace Mode Follow Input This allows the user to specially handle interlaced input. “Follow input” is the default option – it will Progressive leave interlaced input as is. Progressive HQ Interlace “Progressive” will convert the interlaced input to a progressive picture.
- Page 55 DOC-USR-0070-08 supported. ARM AACLC Codec The codec to use for audio. The bitrate range for ARM AACLC MPEG2 AACLC is 32Kbps –384Kbps (though staying above ARM AACHE 64Kbps is recommended for best results). The ARM AACHE V2 bitrate range for AACHE is 32Kbps –64Kbps. ARM MPEG1L2 Bitrate 12Kbps –...
- Page 56 DOC-USR-0070-08 Output Format RTP/RTSP Output format of encoded stream. RTP/RTSP sends an RTP stream to the destination RTMP listed in the user interface. RTSP operates through TSRTP port 554. RTP requires an SDP file for the receiver TSFILE or the use of the RTSP URL (see Section 6.6, “ Streaming RTP”...
- Page 57 DOC-USR-0070-08 Aux TS File Enable True For UDP streaming only. If UDP is being streamed, (UDP Only) this allows the same UDP stream to be saved to a False TS file. The name of the file is specified in “Aux TS File Location.”...
- Page 58 DOC-USR-0070-08 User User name to enter when “Authentication” is enabled. (RTMP Only) Password Password to enter when “Authentication” is enabled. (RTMP Only) Frame Align True This activates frame alignment for a specific channel. This is a valid option for “Enc 1 to 3” False (Enc 1 to 3 Mode mode only.
-
Page 59: The Ch1/Ch2/Ch3 Tab (Decode)
DOC-USR-0070-08 Note 2: If input is interlaced, then Frame Rate Divider will divide the number of fields used. This means, a conversion to progressive is done. This method allows for a reduction in bits needed / processing power without introducing extra jerkiness when there is motion in the video. For example, if the input is 1080i at 60 fields per second (30 frames per second), Frame Rate Divider has the following effect: Frame Rate Divider Output... -
Page 60: Values Appearing At The Bottom Of All Tabs
Can also add more profiles by clicking on “new” in the User Presets tab. Save Click on this to save preset value to what was selected. This selects how the Z3-SME-01 is being used. Operating Mode Encoder Interlaced/Progressive Encode Single Ch No Scale “Encoder Interlaced/Progressive” is the default mode of operation –... - Page 61 DOC-USR-0070-08 Only video decode is supported in this release. Stop All Stop encode on all channels. Start All Start encode on all channels. ___________________________________________________________________________________________ Z3 Technology, LLC ♦ 100 N 8 ST, STE 250 ♦ Lincoln, NE 68508-1369 USA ♦ +1.402.323.0702...
-
Page 62: Appendix A: Configuring The Wowza Server For Rtmp
In this section, configuring Wowza Streaming Engine version 4.1.0 is described. To configure Wowza to work with the Z3-SME-01 RTMP streaming, the following steps are needed: (1) Log in to the Wowza Streaming Engine Manager Home page by typing “http://{localhost}:8088”, where “localhost”... -
Page 63: Figure 59 Wowza Security Settings
“Open” and “Client Restrictions” is set to “No client restrictions.” Then click “Save”: Figure 59 Wowza Security Settings The Wowza server is now configured to work with your ZEUS encoder. *Note: You can also specify “Require password authentication” for “RTMP Publishing.” In this case, “Authentication”... -
Page 64: Appendix B: Troubleshooting
-Is the Ethernet cable plugged in to the Z3-SME-01 solidly (do you see the link light)? -Do the Z3-SME-01 IP address and the PC IP address have the same first two values (or, if netmask is set to 255.255.255.0, the same first three values)? -Do the Z3-SME-01 and the PC have the same netmask? (Default value is 255.255.0.0)
Need help?
Do you have a question about the Z3-SME-01 and is the answer not in the manual?
Questions and answers