
Summary of Contents for Maxxbench MAXX OLYMPIC FLAT BENCH
- Page 1 MAXXBENCH SAFETY ASSEMBLY INSTRUCTIONS MAINTANENCE WARRANTY INSTRUCTIONS AND OWNER’S MANUAL MAXX OLYMPIC FLAT BENCH · MAXX FLAT BENCH MAXX FLAT BENCH MAXX OLYMPIC FLAT BENCH MAXX BENCH WILKES-BARRE PA | WWW.MAXXBENCH.COM page...
-
Page 2: Important Safety Instructions
MAXXBENCH SAFETY ASSEMBLY INSTRUCTIONS MAINTANENCE WARRANTY 1.1 IMPORTANT SAFETY INSTRUCTIONS Before beginning any fitness program, consult your physician and receive a thorough physical examination. • When using exercise equipment, basic precautions should • If you feel any pain or abnormal symptoms, stop your always be taken, including the following: workout immediately and consult your physician. -
Page 3: Service And Personal Safety During Assembly
For information about product operation or service, refer to • Read each step in the assembly instructions and follow the the Maxx Bench web site at www.MaxxBench.com. Should steps in sequence. Do not skip ahead. If you skip ahead, you you need more information regarding customer support... -
Page 4: Table Of Contents
MAXXBENCH SAFETY ASSEMBLY INSTRUCTIONS MAINTANENCE WARRANTY 2.1 TABLE OF CONTENTS 1.1 Important Safety Instructions…………………………………………………………………………..… 1.2 Service and Personal Safety During Assembly……………………………………….…………….… 2.1 Table of Contents…………………………………………………………………………………….…….… 3.1 Before You Begin……………………………………………………………………………….……..…… 3.2 Unpacking the equipment……………………………………………………………………..…….…… 3.3 Preparations…………………………………………………………………………….…………………… 3.4 Required Tools……………………………………………………………………………………………… 3.5 Installation Requirements…………………………………………………………………………………... -
Page 5: Before You Begin
Ask for assistance during the assembly process. • Review the Installation Requirements found on the next page. MAXX OLYMPIC FLAT BENCH • Carefully unpack the pieces and lay them on the floor near the location where you plan to use the equipment. -
Page 6: Preparations
MAXXBENCH SAFETY ASSEMBLY INSTRUCTIONS MAINTANENCE WARRANTY 3.3 PREPARATIONS and installation requirements 3.5 Installation Requirements You must review and follow the instructions in this guide. If you do not assemble and use the Maxx Bench according to Follow these installation requirements when assembling the unit: the following guidelines, you could void the Maxx Bench Limited Warranty. -
Page 7: Assembly Instructions
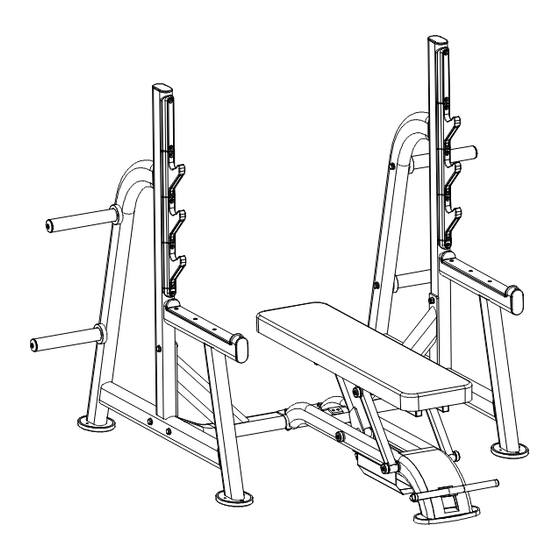
ASSEMBLY INSTRUCTIONS MAINTANENCE WARRANTY 4.1 ASSEMBLY INSTRUCTIONS MAXX OLYMPIC FLAT BENCH · MAXX FLAT BENCH Assembly of the Maxx Bench takes professional installers about 1⁄2 hour to complete. If this is the first time you have assembled this type of equipment, plan on significantly more time. - Page 8 MAXXBENCH SAFETY ASSEMBLY INSTRUCTIONS MAINTANENCE WARRANTY 4.2 ASSEMBLY INSTRUCTIONS MAXX OLYMPIC RACK MAXX BENCH WILKES-BARRE PA | WWW.MAXXBENCH.COM page...
- Page 9 MAXXBENCH SAFETY ASSEMBLY INSTRUCTIONS MAINTANENCE WARRANTY 4.2 ASSEMBLY INSTRUCTIONS Step 1: MAXX OLYMPIC Rack Assemble Upright Frame(1&2) and Cross Frame (3) using Flat Washer Φ13.5*Φ24*2.5(14), Nut M12(16) and Hex Bolt M12*75(18). MAXX BENCH WILKES-BARRE PA | WWW.MAXXBENCH.COM page...
- Page 10 MAXXBENCH SAFETY ASSEMBLY INSTRUCTIONS MAINTANENCE WARRANTY 4.2 ASSEMBLY INSTRUCTIONS Step 2: MAXX OLYMPIC Rack Install Bumper Plate(4), Bar Holder Φ48*2.5*280(5), End Cap Φ8.5*Φ47.5*30(6), Rubber Bushing Φ75*Φ26*Φ48.5*25(8) to Upright Frame (1&2) using Flat Washer Φ13.5*Φ24*2.5(14), Spring Washer Φ12(15), Hex Bolt M12*30(17) and Hex Bolt M8*25(19) as show.
-
Page 11: Attach Bench To Rack
MAXXBENCH SAFETY ASSEMBLY INSTRUCTIONS MAINTANENCE WARRANTY 4.3 ASSEMBLY INSTRUCTIONS MAXX OLYMPIC FLAT BENCH: ATTACH BENCH TO RACK Assemble Main Frame (1) & Bench(2) using Flat Washer Ф13.5*Ф24*2.5(3), Nut M12(4) and Hex Bolt M12*75(5). Part Description Q’ty Main Frame Bench Flat Washer Ф13.5*Ф24*2.5... -
Page 12: Attach Bench To Wheelset
MAXXBENCH SAFETY ASSEMBLY INSTRUCTIONS MAINTANENCE WARRANTY 4.4 ASSEMBLY INSTRUCTIONS MAXX FLAT BENCH: ATTACH BENCH TO WHEELSET Assemble Base Frame(1) & Bench(2) using Flat Washer Ф13.5*Ф24*2.5(3), Nut M12(4) and Hex Bolt M12*75(5). Part No. Description Q’ty Base Frame Bench Flat Washer Ф13.5*Ф24*2.5... -
Page 13: Parts Lists And Exploded Drawings: Maxx Olympic Bench
MAXXBENCH SAFETY ASSEMBLY INSTRUCTIONS MAINTANENCE WARRANTY 5.1 PARTS LIST AND EXPLODED DRAWING MAXX OLYMPIC Bench Part No. Description Q’ty Part No. Description Q’ty Base Frame Rubber Foot 270*113*16 Font Rolling Frame Rubber Bushing 45*35*8 Rear Rolling Frame End Cap 25*50*2 Pad Support Frame End Cap Ф25*3... -
Page 14: Parts Lists And Exploded Drawings: Maxx Olympic Rack
MAXXBENCH SAFETY ASSEMBLY INSTRUCTIONS MAINTANENCE WARRANTY 5.2 PARTS LIST AND EXPLODED DRAWING MAXX OLYMPIC RACK Part Description Q’ty Left Upright Frame Right Upright Frame Cross Frame Inner Frame for Bumper Plate Bar Holder Φ48*2.5*280 End Cap Φ8.5*Φ47.5*30 Protect Board 505*47.5*30 Rubber Bushing Φ75*Φ26*Φ48.5*25... -
Page 15: Parts Lists And Exploded Drawings: Maxx Wheel Set
MAXXBENCH SAFETY ASSEMBLY INSTRUCTIONS MAINTANENCE WARRANTY 5.3 PARTS LIST AND EXPLODED DRAWING MAXX WHEELSET Part No. Description Q’ty Base Frame Rubber Foot 169*129*6 Wheel Ф63*24 Flat Washer Ф9*Ф16*1.6 Nut M8 Hex Bolt M8*15 Hex Bolt M8*45 MAXX BENCH WILKES-BARRE PA | WWW.MAXXBENCH.COM... -
Page 16: Operating Instructions
MAXXBENCH SAFETY ASSEMBLY INSTRUCTIONS MAINTANENCE WARRANTY 6.1 operating instructions Remember to always use a spotter. • To lower bench, press and hold foot pedal down while body weight is on back pad. To raise bench, release foot pedal and remove body weight •... -
Page 17: Maintenance
MAXXBENCH SAFETY ASSEMBLY INSTRUCTIONS MAINTANENCE WARRANTY 6.2 maintenance MAINTANENCE SCHEDULE Item No. Description DAILY WEEKLY MONTHLY YEARLY 5 YEAR Clean and inspect upholstery Inspect pads for wear Clean and inspect equipment frames Check warning and instruction labels for readability Check that all fasteners are properly secured... - Page 18 MAXXBENCH SAFETY ASSEMBLY INSTRUCTIONS MAINTANENCE WARRANTY 6.2 maintenance extended descriptions and definitions Inspect All Fasteners Be sure to check fasteners at bolted joints to make sure the connections are secure. If a fastener is loose but in good condition, retighten it. If you are concerned about the integrity of the fastener, remove it, clean the threads and inspect it for any damage such as cracks, bad threads, corrosion, or rust.
- Page 19 MAXXBENCH SAFETY ASSEMBLY INSTRUCTIONS MAINTANENCE WARRANTY 6.2 maintenance extended descriptions and definitions Check for Excessive Oil Leakage Be sure to check the cylinder cover for excessive oil leakage. Minor amounts of oil leakage (a few drops) is normal over the life of a hydraulic cylinder.
- Page 20 MAXXBENCH SAFETY ASSEMBLY INSTRUCTIONS MAINTANENCE WARRANTY 6.2 maintenance extended descriptions and definitions Check Seat Adjustment and Auto-Return The hydraulic cylinder in your Maxx Bench is pressurized to allow the auto-return feature. If the auto-return is not functioning appropriately, contact a Maxx Bench certified service technician to re-pressurize your cylinder for service.
- Page 21 MAXXBENCH SAFETY ASSEMBLY INSTRUCTIONS MAINTANENCE WARRANTY 6.2 maintenance extended descriptions and definitions Check Drop Speed If the bench drop speeds appears to be different from factory setting (1.5 seconds from maximum height to minimum height with 185 lb person and no added weight), contact a Maxx Bench certified service technician to service your cylinder.
- Page 22 MAXXBENCH SAFETY ASSEMBLY INSTRUCTIONS MAINTANENCE WARRANTY 6.2 maintenance extended descriptions and definitions Inspect and Lubricate Bushings and Pivot Points Maxx Bench uses high quality bearings designed for strength applications and long service life. Each year, do the following to maintain the...
- Page 23 MAXXBENCH SAFETY ASSEMBLY INSTRUCTIONS MAINTANENCE WARRANTY 6.2 maintenance extended descriptions and definitions Inspect and Lubricate Bushings and Pivot Points Cylinder Pivot Point • Maxx Bench designed the pivot point of the cylinder rod and main strut for maximum strength. Lubricate the pivot point by applying a light coat of silicone spray lubricant directly to the pivot point.
-
Page 24: Limited Warranty
This warranty does not cover misuse, negligence, or normal wear. If the equipment has been repaired or tampered with outside of a Maxx Bench repair center, this warranty is void. Sole discretion of this warranty is determined by the manufacturer.. Should you have any questions or concerns, please contact us directly. Telephone: 1.888.232.1914 Email: info@maxxbench.com Warranty Period and Converage Warranty Item No. Description... -
Page 25: Warranty Registration
MAXXBENCH SAFETY ASSEMBLY INSTRUCTIONS MAINTANENCE WARRANTY 7.2 Warranty Registration Thank You and Welcome to Maxx Bench To allow us to serve you better, please take a few moments to complete and return your warranty registration online at: www.maxxbench.com/warranty If you have questions or need additional information, contact your local dealer or call Maxx Bench Customer Support at 1.888.202.1914... -
Page 26: Specifications
MAXXBENCH SAFETY ASSEMBLY INSTRUCTIONS MAINTANENCE WARRANTY 8.1 SPECIFICATIONS • Overall Dimensions (Olympic Flat Bench with Rack): 65”W x 72”D x 55”H • Overall Dimensions (Olympic Flat Bench with Rack): 30”W x 54”D x 19.5”H • Back Pad Dimensions: 12” x 48” x 2”...
Need help?
Do you have a question about the MAXX OLYMPIC FLAT BENCH and is the answer not in the manual?
Questions and answers