Table of Contents
Advertisement
Quick Links
Alarm Clock Radio CD Player
GCDR1896
Instruction Manual
For improvement purposes, specification and design are subject to change without notice.
Goodmans Product Information Helpline 0870 873 0080
IMPORTANT SAFEGUARDS
PRE FITTED MAINS PLUGS
For your convenience a mains plug has been fitted to this appliance. For your safety please
observe the following information.
1. Should the fuse in the plug remove the plug from the wall socket and replace the fuse with a 3
Amp ASTA approved to BS 1362 fuse.
2. Never use the plug without the fuse cover fitted. Replacement fuse covers are available from
your dealer or most electrical retail outlets.
3. If the mains plug is cut off the cable, rewire the replacement plug in accordance with
instruction given in this manual.
4. CAUTION: Under no circumstances should the discarded plug be inserted mains socket. To
prevent a shock hazard carefully dispose of the discarded plug. Do not leave the plug lying
around where children might see it.
WARNING:
To prevent fire or shock hazard do not expose this unit to rain or moisture.
CAUTION: DANGEROUS VOLTAGES EXIST INSIDE THIS UNIT, DO NOT REMOVE COVER
(OR BACK). NO USER SERVICEABLE PARTS INSIDE. REFER SERVICING TO
QUALIFIED SERVICE PERSONNEL. DISCONNECT FROM MAINS SUPPLY
WHEN NOT IN USE.
PLUG WIRING DETAILS
E
L
BLUE
FUSE
BROWN
N
CORD
GRIP
WARNING: UNDER NO CIRCUMSTANCES MUST THE LIVE OR NEUTRAL WIRES BE
CONNECTED TO THE EARTH TERMINAL IN A 3-PIN MAINS PLUG.
This symbol means that this unit is double insulated.
An earth connection is not required.
HELPLINE PHONE NUMBER 0870 873 0080
The wires in this mains lead are coloured in
accordance with the following wiring codes:
Blue................................................. Neutral
Brown................................................... Live
The wires in this mains lead must be
connected to the terminals in the plugs as
follows:
Blue Wire..................................... N or Black
Brown Wire..................................... L or Red
Only a 3 Amp fuse should be fitted in the plug
or a 5 Amp fuse at the distribution board.
Advertisement
Table of Contents

Related Manuals for Goodmans GCDR1896


Summary of Contents for Goodmans GCDR1896
- Page 1 This symbol means that this unit is double insulated. An earth connection is not required. HELPLINE PHONE NUMBER 0870 873 0080 For improvement purposes, specification and design are subject to change without notice. Goodmans Product Information Helpline 0870 873 0080...
- Page 2 CAUTION IMPORTANT NOTES CLASS 1 LASER PRODUCT Use of Controls or adjustments or performance of procedures other than those specified herein may result in hazardous radiation exposure. Your hearing is very important to you and to us so please take care when operating LASER SAFETY this equipment.
- Page 3 TABLE OF CONTENTS 1. POWER SOURCES SAFETY PRECAUTIONS Power Sources ..........1 1. As the laser beam used in this compact Power Connection Player Maintenance..........2 disc player is harmful to the eyes, do not attempt to disassemble the casing. Disc Cleaning , Power failure....
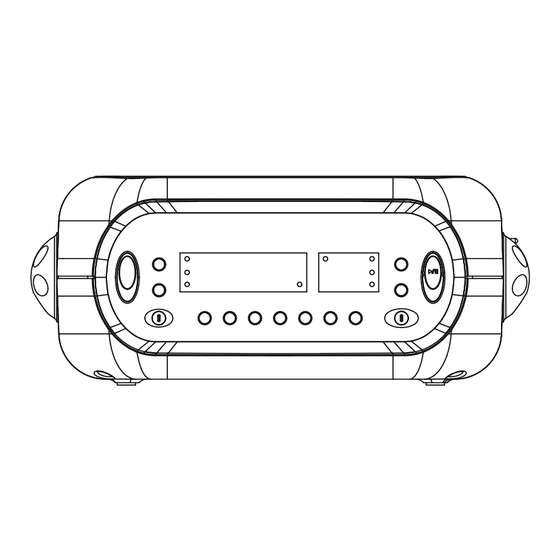
- Page 4 3. DISC CLEANING, POWER FAILURE 4. LOCATION OF CONTROLS Cleaning the Disc 1. CD DOOR 2. CD DOOR OPEN BUTTON 1. To handle a disc use only one of the two 3. ALARM/SLEEP OFF BUTTON manners illustrated. 4. PM INDICATOR 5.
- Page 5 5. RADIO OPERATION 6. LISTENING TO A COMPACT DISC RADIO OPERATION 1. Set the CD/RADIO switch to CD FUNCTION FUNCTION Slide the CD/RADIO switch to the position. RADIO RADIO RADIO position. 2. Press the Open button to open the CD 2.
- Page 6 7. PROGRAMME PLAY OPERATION 8. REPEAT PLAY OPERATION Single track repeat Programme play To repeat the SAME track over and over Up to 20 tracks can be programmed for again, do the following. playback in any order or the same track PROG.
- Page 7 10. WAKE UP TO RADIO, CD, ALARM 9. TO SET CLOCK/ALARM TIME Wake to radio To set clock time 24 hours BAND VOLUME TUNING FUNCTION TIME RADIO FM ST. 1. Turn radio on (slide Band switch to MW 1. Press and hold Time button. or FM or FM ST.
- Page 8 11. SNOOZE FUNCTION 12. PRODUCT SPECIFICATIONS PICK-UP Snooze System Compact disc digital audio system Laser diode material: GaAIAs To sleep an extra 7 minutes when the Properties Wavelength: 780nM Radio/Buzzer/CD comes on, lightly touch the Emission duration: continuous Snooze button, the radio or alarm or CD will Laser output level 44.6uW SNOOZE stop for 7 minutes and come on again.
Need help?
Do you have a question about the GCDR1896 and is the answer not in the manual?
Questions and answers