Advertisement
Quick Links
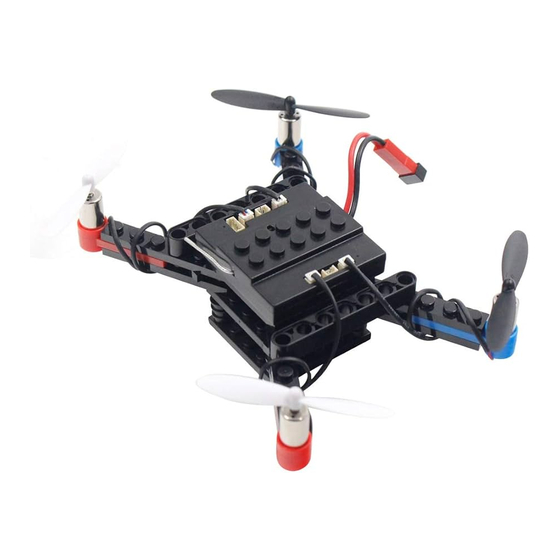
DIY Build N' Fly Drone
4 in 1!
Up/down, left / right, forward / backward
Headless mode
6-axis gyro
Battery: 3.7V 900 lithium polymer
Product Size: 17.5 x 14.5 x 1.5 cm
Charging time: 30~90 minutes (depending on adaptor)
WARNING: Read the manual thoroughly before flying.
Do not fly without understanding the contents of
this manual.
www.FlyBlocks.com
1.CAUTIONS:
This products is not a toy, it is a precise device which requires accurate assembly
and debugging to avoid potential accidents. It should be operated in accordance with
the User manual. it is the user's responsibility to fly and operate this drone
responsibly keeping far away from people or property.
(1) Not suitable for children under 14 and without model operating experience and
adult supervision
(2) Please respect any local regulations
(3) We will not be responsible for any damage caused by improper operation
(4) For any technical support and after-sale service, please contact your local
distributor
2.WARNINGS:
The drone can cause harm. Please keep do not operate near people, crowds or
property. Proper assembly of the drone is essential. Improper assembly, poor control
or being unfamiliar with operations, may cause harm. Please be cautious.
(1) Keep away from people, high-rise buildings, high-voltage lines. Avoid flying in high
winds or stormy weather to ensure safety
(2) Keep away from humid conditions to avoid malfunction
(3) Keep away from the blades to avoid danger and damage
(4) Keep away from heat to avoid deformation or damage by high temperature. Store
in a cool, dry area
(5) Safely operate the drone according to your own flying skills.
(6) Ensure the blades are installed correctly, or it will not fly.
3.ATTENTION BEFORE FLIGHT:
(1) Please fly the drone in an open space
(2) Please make sure the battery is fully charged
(3) Please make sure the accelerator stick in the lowest position before turn on the
controller
(4) Please check the connection of the battery and motor parts before flying.
4.BATTERY WARNINGS:
(1) Do not over discharge
(2) Do not overcharge
(3) Please keep the drone with 60% power if you do not play it for a long time.
recharge for every 4 or 5 months
(4) If you notice swelling or significant over heating of the battery please do not use.
(5) Research proper disposal in your area for any old or unwanted batteries.
Advertisement

Summary of Contents for Fly Blocks DIY Build N' Fly Drone 4 in 1
- Page 1 1.CAUTIONS: This products is not a toy, it is a precise device which requires accurate assembly and debugging to avoid potential accidents. It should be operated in accordance with the User manual. it is the user’s responsibility to fly and operate this drone responsibly keeping far away from people or property.
-
Page 2: List Of Components
LIST OF COMPONENTS MODEL 1 DRONE ASSEMBLY (4 AXIS) Building block with 6 holes X14 Rubber band X2 Building block with 1 holes X20 Motor Base X9 Square building block X3 Building block with 8 holes X1 Receiver box X1 Plode honge X1 Blade X12 Motor X6... - Page 3 MODEL 1 DRONE ASSEMBLY (4 AXIS) MODEL 2 DRONE ASSEMBLY (4 AXIS) Battery base Install Motor With Install Motor With Red&Blue Cables Black&White Cables ATTENTION: Must install the motors correctly. Failure do do so will result in a crash or render the drone Install Motor With inoperable.
- Page 4 MODEL 2 DRONE ASSEMBLY (4 AXIS) MODEL 3 DRONE ASSEMBLY (6 AXIS) Battery base Install Motor With Install Motor With Red&Blue Cables Black&White Cables ATTENTION: Must install the motors correctly. Failure do do so will result in a crash or render the drone Install Motor With Install Motor With...
- Page 5 MODEL 3 DRONE ASSEMBLY (6 AXIS) MODEL 4 DRONE ASSEMBLY (6 AXIS) Battery base Install Motor With Install Motor With Red&Blue Cables Black&White Cables Head Install Motor With Black&White Cables Install Motor With Red&Blue Cables ATTENTION: Must install the motors correctly. Failure do do so will result in a crash or Install Motor With...
- Page 6 MODEL 4 DRONE ASSEMBLY (6 AXIS) MODEL 4 DRONE ASSEMBLY (6 AXIS) L Blade S Blade S Blade L Blade L Blade S Blade Bind the battery to the drone with rubber band Battery base BATTERY INSTALLATION AND CHARGING INSTRUCTIONS Install Motor With Install Motor With Red&Blue Cables...
- Page 7 DRONE BATTERY INSTALLATION BEGINNER/ HEADLESS MODE SETTING When the headless mode is on, regardless of the orientation (direction your drone is facing). Using the right control stick; Install fully-charged battery into the drone battery forward is forward, left is left and right goes right and down will base,then connect battery plug with drone's.
- Page 8 FLYING CONTROL MICRO ADJUSTMENT Forward / Backward micro-adjustment If the drone is drifting or appears mildly unstable, you can correct by Inclined to the ahead side using the trim for micro adjustments. After take off,when you feel the drone is drifting backwards (towards you), press the trim forward to make micro adjustments.
- Page 9 PARTS INDEX Please do not release ACCESSORIES the throttle immediately when flying high, The drone should keep about 1m otherwie,it would fall away from the ground down abruptly and causing damage to parts DONT use it with too much obstaces avoid unnecessary losses of it.
Need help?
Do you have a question about the DIY Build N' Fly Drone 4 in 1 and is the answer not in the manual?
Questions and answers