
Summary of Contents for Babybee Prams Comet
- Page 1 Please keep in a safe place for future reference Contact babybee prams by emailing support@babybeeprams.com.au www.babybeeprams.com.au...
- Page 2 Please refer to page 14 for further information. Keep in touch We love nothing more than seeing our customers with the Comet in action so we hope you connect with us soon via one of our social media channels!
-
Page 3: Table Of Contents
Using your Comet What’s in the box................04 Get to know your Comet - Terminology.......... 05 Step 1: Install the brake and wheels..........06 Collapsing the frame................. 07 Step 2: Attach/release bassinet to the frame........ 08 Step 3: Attach the canopy............... -
Page 4: What's In The Box
What’s in the box please note: depending on your order, you may recieve 2 boxes Frame/chasis Push-bar organiser Foot muff Bassinet & seat frame Bassinet base board Seat liner Canopy Seat fabric Bassinet mattress Front swivel wheels Rear wheels Bassinet & seat belly bar Brake Rain cover and mosquito net Bassinet apron... -
Page 5: Get To Know Your Comet - Terminology
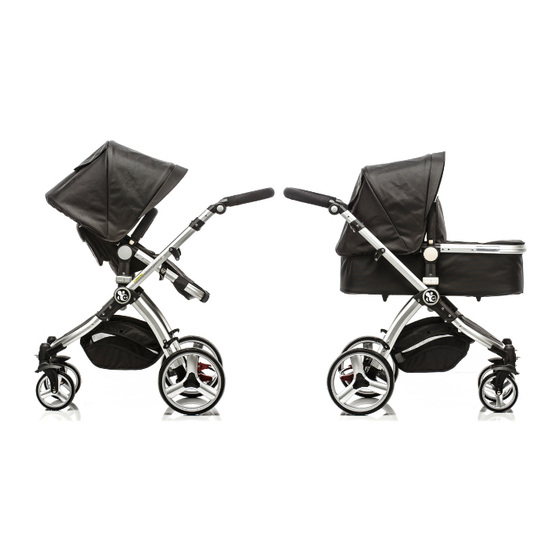
Get to know your new Comet – Terminology Canopy with magnetic peekaboo Bumper bar 5 point safety harness Seat liner Seat frame (same as o) Front swivel wheel lock Front swivel wheel Bassinet/Seat frame release Seat recline buttons Frame release clips (to release from folded position) -
Page 6: Step 1: Install The Brake And Wheels
Step 1: Install the brake and wheels To release the frame from the folded position, simultaneously pull back on the black frame release clips and lift. These clips can be found either side of the frame. When the frame is fully open you will hear a “click”. At the rear of the frame, take the brake attachment section and attach this to the frame. -
Page 7: Collapsing The Frame
Practice collapsing the frame from this position Hold the push-bar against your body for support. To fold the frame, pull up on the 2 black frame collapse levers located on both sides of the frame while pressing the safety button underneath (only on the right lever). -
Page 8: Step 2: Attach/Release Bassinet To The Frame
Step 2: Attach/release the bassinet to the frame Select which direction you’d like the bassinet to face and simply click it on to the side frame connectors. To release simply push the grey bassinet frame release buttons, in the direction of the arrow, and off it pops! Step 3: Assemble your bassinet Place the bassinet base board into the bottom of the bassinet, and secure with the velcro tabs at each end. -
Page 9: Step 3: Attach The Canopy
Step 3: Attach the canopy Your canopy should come pre-assembled. To attach it to the frame, first secure the bottom side of the connector to the frame, then pull and clip the topside over and into place. Repeat on other side. Make sure the connectors are as close to the middle of the frame as they can be (as shown in the pictures below, there should be no gap between the bumper bar and the canopy connectors). -
Page 10: Rear Brake, Front Swivel Wheels And Adjusting The Push-Bar
Please take note of the following 3 features before you get going Rear brake When stopping, use the brake at all times by pressing down on the black bar with your foot until you feel it click into place. To start travelling again, lift the bar up with your foot and off you go! Front swivel wheels When travelling along straight surfaces the front wheels may spin or... -
Page 11: Switching From Bassinet To Stroller Seat
Switching from bassinet to stroller seat There’s no set age when your little one should go from bassinet to stroller, however, they should be able to sit up unaided. To get started, remove the bassinet fabric from the frame entirely. Push the grey seat recline buttons to adjust the frame and also note that the metal knobs on either side of the frame should be at the bottom. -
Page 12: Seat Position And 5 Point Safety Harness
Attach the bumper bar Attach the canopy, in the same way you did with the bassinet (page 9) when attached to the seat, ensure the two velcro tabs on the canopy, are secured to the velcro tabs that are located on the back of the seat. -
Page 13: Setting Up Your Bassinet
Setting up your bassinet Note: The front of the bassinet (where you baby’s feet will lie) will be the side of the frame with the two small metal knobs that jut out. The front of the bassinet fabric is the side that has the zipper edge. - Page 14 Attach the two Velcro straps to the back of the frame. Place the bassinet base board into the bottom of the bassinet, and secure with the velcro tabs at each end. Once secured, simply place bassinet mattress ontop. Zip on the bassinet apron, the zip may seem a little stiff at first, this will soften over time.
-
Page 15: Setting Up The Canopy
Setting up the canopy Thread the two canopy rods through the inserts of the canopy fabric. Connect the canopy rods to the canopy connectors. Note the L and R marked on each so you know which is left and right Please note: the canopy won’t extend correctly if the canopy connectors are on the wrong sides and damage may be caused to the canopy rods, resulting in your canopy becoming unusable, please... -
Page 16: Maintainence And Cleaning
Maintaining your travel system Your travel system requires regular maintenance. Regularly inspect the locking devices, brakes, harness, catches, joints and fixtures to ensure they are secure and in fully working order. The brakes and wheels are subject to normal wear and should be replaced if necessary. -
Page 17: Warranty
Faulty or incorrect assembly; Using a part or accessory that is not compatible with the product and/or not manufactured by babybee prams; Tyre punctures; Damage to handlebar grips or fabrics as a result of normal handling and daily use;... -
Page 18: Safety Warnings
SAFETY WARNINGS The babybee Comet is designed and tested to comply with AS/ NZS2088:2013. The ACCC has identified several hazards associated with prams and strollers which could result in serious injury or even death: The pram or stroller rolling away from the carer’s control. We •... - Page 19 Supervision Never leave your child unattended and always keep you child in view while the travel system is in use. Do not allow your child to climb unassisted into the travel system. The travel system should only be used under adult supervision. Safety harness Please ensure that your child correctly wears the fitted and adjusted harness at all times.
- Page 20 Do not use replacement parts or accessories, e.g. child seats, bag hooks, rain covers, etc. other than those approved or supplied by babybee prams. Maximum weight limits: • Maximum weight for a child in the bassinet is 9kg •...
- Page 21 Contact babybee prams support@babybeeprams.com.au www.babybeeprams.com.a babybee prams @babybeeprams Version: March, 20 babybee prams Version March 2016...
Need help?
Do you have a question about the Comet and is the answer not in the manual?
Questions and answers