Table of Contents
Advertisement
Quick Links
Advertisement
Table of Contents

Subscribe to Our Youtube Channel
Summary of Contents for Elektron Octatrack MKII
- Page 1 Octatrack MKII More than a sampler User Manual...
-
Page 2: Legal Disclaimer
Elektron may also make improvements and/or changes in the products and programs described in this document at any time without notice. In no event shall Elektron be liable for any special, indirect, or consequential damages or any damages whatsoever resulting from loss of use, data, or profits, whether in an action of contract, negligence, or other action, arising out of or in connection with the use or performance of this information. - Page 3 7. Do not install near any heat sources such as radiators, heat registers, stoves, or any other equipment (including amplifiers) producing heat. 8. Do not put the PL-2 Protective Cover (Elektron accessory) on the unit while the unit is powered on. 9. Make sure there is sufficient air circulation in the room where the unit is kept.
-
Page 4: Table Of Contents
2. THE BACKGROUND OF THE OCTATRACK MKII ....... . . - Page 5 TABLE OF CONTENTS 6.1.4 RECORDING A PATTERN USING GRID RECORDING ........22 6.1.5 RECORDING A PATTERN USING LIVE RECORDING .
- Page 6 TABLE OF CONTENTS 9.1.3 RECORDING SETUP 2 MENU ............. .46 9.2 TRACK RECORDER SAMPLING METHODS .
- Page 7 TABLE OF CONTENTS 12.3 RECORDING MODES ..............65 12.3.1 GRID RECORDING MODE .
- Page 8 16.3 OCTATRACK MKII PROCESSING LIVE INSTRUMENTS ........
- Page 9 17.5 THE OCTATRACK MKII AS AN EFFECTS PROCESSOR ....... . .
-
Page 10: Introduction
A tip that will make it easier for you to interact with the Octatrack MKII. Octatrack MKII User Manual. This manual is copyright © 2017 Elektron Music Machines MAV AB. All reproduction, digital or printed, without written authorization is strictly prohibited. The information in this manual may change without notice. -
Page 11: The Background Of The Octatrack Mkii
- The Elektron Team 2.1 SUGGESTED APPLICATIONS OF THE OCTATRACK MKII The flexibility of the Octatrack MKII makes it a very powerful device suited to a wide range of tasks. Here a few of them are presented. 2.1.1 LOOPER DEVICE The Octatrack MKII is ideal for DJ’s and live performers. -
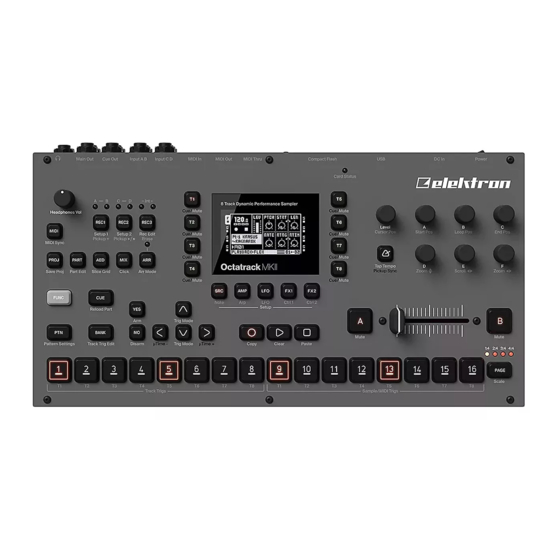
Page 12: Panel Layout And Connectors
3. PANEL LAYOUT AND CONNECTORS 3.1 FRONT PANEL The Octatrack MKII front panel. For a more comprehensive list of key combinations, please see “19. SUM- MARY OF KEY COMBINATIONS” on page 113. 1. [REC1], [REC2] keys are used for real-time sampling through the external inputs. There is one key per audio input pair. - Page 13 3. PANEL LAYOUT AND CONNECTORS 11. The crossfader interpolates between the parameter values of scene A and scene B. 12. [STOP] key. Stops the playback of a pattern or arrangement. [FUNC] + [STOP] performs a paste command. 13. [PLAY] key. Starts playback of a pattern or arrangement. Pressing [PLAY] a second time pauses play- back.
-
Page 14: Rear Connectors
3.3 OCTATRACK MKII ACCESSORIES 3.3.1 RACK MOUNT KIT The Octatrack MKII can be rack mounted in a standard 19” rack, using the Octatrack MKII rack mount kit which can be ordered separately. The Octatrack MKII occupies four standard height units plus additional space, usually about 1 HE, which is needed to accommodate cables plugged into the unit. -
Page 15: Compact Flash Card Specifications
2. Connect the main out L/R from the Octatrack MKII to your mixer or amplifier. 3. If you want to use MIDI, connect MIDI OUT from the Octatrack MKII to the MIDI IN of the device you wish to send data to. Connect the MIDI IN of the Octatrack MKII to the MIDI OUT of the device you wish to receive data from. -
Page 16: Overview Of The Octatrack Mkii Structure
4.1 SETS A set is the top level structure of the Octatrack MKII. It can contain a near unlimited amount of projects plus one audio pool. The number of samples in the audio pool, as well as the number of projects, are limited only by the size of the Compact Flash card. -
Page 17: Flex And Static Sample Slot Lists
128 Static samples streamed from the Compact Flash card. A single Static sample can be as big as 2 gigabytes. Thru machines are used to listen to the inputs of the Octatrack MKII. They can be used to affect incoming audio with filtering and effects. -
Page 18: How Information Is Handled
RELOAD command. For more information, please see “8.4.1 PROJECT” on page 31. Never turn off the Octatrack MKII while the <CARD STATUS> LED is blinking. It indicates data is being written to the Compact Flash card and disrupting this process may corrupt data. -
Page 19: The User Interface
5. THE USER INTERFACE 5. THE USER INTERFACE The screen is the information center of the Octatrack MKII editing. The main interface screen is shown below: 1. Track icons that shows the machine assignments and status of the tracks. The active track is highlighted. -
Page 20: Parameter Editing
5. THE USER INTERFACE All windows can be closed using the [NO] key. Keys or knobs not used by an active menu retain their original function. For example, the TEMPO menu makes use of the LEVEL knob, but you can still use the DATA ENTRY knobs to control the parameters of the track in focus. - Page 21 5. THE USER INTERFACE While keeping [FUNC] pressed use the [ARROW] keys to navigate to the character you want to insert. Once there, release [FUNC] to insert the character. When naming projects, sets and samples there are two extended pop-up menu pages of characters to choose from.
-
Page 22: Quick Start
6.1 DEMO MODE In demo mode, the Octatrack MKII can play back a set of 16 demo patterns without needing to have a Compact Flash card inserted. Demo mode is a great way to get acquainted with the basics of the Octatrack MKII. -
Page 23: Using Parameter Locks
6.2 MOUNTING A SET AND LOADING A PROJECT A set needs to be mounted for the Octatrack MKII to be able to load projects and populate the Flex and Static sample slot lists with samples. The Compact Flash card that came shipped with your Octatrack MKII contains a set called “PRESETS”. -
Page 24: Loading A Project
6. QUICK START After a set has been mounted the menu where projects are loaded is automatically opened. 6.2.2 LOADING A PROJECT After a set has been mounted a project should be loaded. The Compact Flash card that came shipped with the unit contains one project, named “PRESETS”. -
Page 25: Assigning A Sample To A Machine
6. QUICK START 3. Select the machine you want to assign from the list of machines. Press [YES] to assign it to the track. Note that only Flex and Static machines can play samples. Press the [RIGHT] arrow key to enter the sample slot list for the assigned machine. -
Page 26: Sets
• An audio pool, where the samples shared by the projects of the set are stored. A set needs to be mounted in order for the Octatrack MKII to be able to load a project belonging to the set. A mounted set and a loaded project is required for the Octatrack MKII to work as intended. For more infor- mation, please see “8. -
Page 27: Audio Pool
7.2.1 ADDING CONTENT TO THE AUDIO POOL To add content to the audio pool the Octatrack MKII should preferably be connected to a computer. 1. Connect the Octatrack MKII to a computer using a USB cable. -
Page 28: Projects
All changes made to an active project are automatically cached on card. This means you can work on a project, switch off the Octatrack MKII, switch it on and start working exactly from where you left off. It is possible to save a project by performing a project SAVE command though. This is only necessary if you want to be able to revert the project to a specific state. -
Page 29: Loading Samples To The Sample Slots
8. PROJECTS 2. Press [YES] to open a list of the projects available to the set. Below the header of the menu the name of the active set is visible. The currently active project is indicated by inverted graphics. 3. To load a new project, select one from the list and load it by pressing [YES]. The currently active proj- ect will automatically be synced to card, meaning all settings and assignments will be saved to the card, before the new project is loaded. -
Page 30: Loading From The Src Setup Menu
8. PROJECTS It is possible to copy, paste and clear sample slots while in the QUICK ASSIGN menu. Copying a sample slot will copy all its attributes, slices and trim settings. Select a sample in the Flex/Static sample slot list and press [FUNC] + [BANK] to edit it in the audio editor. -
Page 31: The Project Menu
If the file is too big to be loaded, or if the file is incompatible with the Octatrack MKII audio engine, the smiley will look sad. Samples with an unsupported sample rate, like 48 kHz, will make the smiley look indifferent, indicating the sample will be played back albeit at the wrong speed. -
Page 32: System
Enables the USB connection. Connect the Octatrack MKII to a computer using a USB cable, select USB DISK MODE and press [YES] to make the Compact Flash card appear as an external mass storage device to the computer. When the Octatrack MKII is connected to a computer via USB audio pools can... -
Page 33: Os Upgrade
This is an alternative to the EARLY STARTUP menu method of OS upgrading. When upgrading the OS in this way an Octatrack MKII OS file, with the file extension .bin, needs to be placed in the root of the Compact Flash card. Select OS UPGRADE and press [YES]. A prompt will appear asking if you want to continue with the OS upgrade. -
Page 34: Card Tools
8. PROJECTS DISABLE YES/NO ARM will when checked disable the one shot trig arming and disarming when simply pressing [YES] or [NO]. Note that when this arm/disarm functionality is disabled, the same functionality can be achieved by pressing [FUNC] + [YES] or [FUNC] + [NO]. Read more about one shot trigs in section “12.4.5 ONE SHOT TRIGS”... -
Page 35: Status
8. PROJECTS the workspace to and press [TRACK] keys 1-4. The same procedure applies for assigning a location workspace 2, but [TRACK] keys 5-8 are used instead. Once workspaces have been assigned, jump to workspace 1 by pressing [TRACK] keys 1-4 and to workspace 2 by pressing [TRACK] keys 5-8. The files belonging to the project are located in the folder with the same name as the project. -
Page 36: Input
8. PROJECTS TRACK 8 offers two settings. Only one setting can be activated at a time. • MASTER will when active turn track 8 into a master track. The track effects of track 8 will then affect all the other tracks as well as any audio coming from the external inputs. •... -
Page 37: Midi Sequencer
CC DIRECT CONNECT is activated/deactivated by pressing [YES]. Two settings exist. • ON will, when the Octatrack MKII MIDI mode is activated, route MIDI CC messages straight to the MIDI output port. When MIDI mode is enabled and LIVE RECORDING mode is active, specified CCs in the CTRL 1 and CTRL 2 SETUP pages can also be recorded by the sequencer. -
Page 38: Memory
8. PROJECTS 8.6.5 MEMORY Contains settings related to sample bit depth and the track recorder memory distribution. Use the LEVEL knob or the [LEFT]/[RIGHT] arrow keys to change the settings. The total amount of RAM memory available to a project is 85,5 MB. This memory is shared by Flex RAM, which is used when loading Flex samples, and track recorder memory, which is used when sampling. -
Page 39: Metronome
Octatrack MKII songs are possible. 8.6.6 METRONOME Configures the Octatrack MKII metronome. A click track is very useful when for example inputting sam- ple trigs or note trigs while in LIVE RECORDING mode. Note that the metronome will only sound when the sequencer is running. -
Page 40: Sync
PROG CH SEND will when checked send out program change MIDI messages when the active pat- tern on the Octatrack MKII is changed. Which channel the messages are sent on is dictated by the setting below. CHANNEL sets which channel the Octatrack MKII should send program change messages on. The LEVEL knob is used to change this setting. -
Page 41: Channels
MIDI bandwidth by up to 10x. This increases the accuracy of MIDI clock signals as well as the timing of CC messages. Note that Octatrack MKII MIDI IN/OUT must be connected to the MIDI OUT/IN of the turbo protocol compatible device for the Turbo mode negotiation to function. -
Page 42: Mixer Menu
A +63 setting will boost the signal by 12 dB. AB/CD DIR offers parameters that will make the Octatrack MKII act like a very basic mixer. It simply routes audio coming from the A/B and C/D inputs to the main outputs. An AB/CD DIR setting of 0 will not send any incoming audio to the main outputs. -
Page 43: Tempo Menu
When the key is released the BPM will revert back to the original setting. This functionality is very handy when manually syncing your Octatrack MKII to a turntable or an external sound source. Note that you do not need to be in the TEMPO menu to perform this tempo shift. -
Page 44: Track Recorders And Pickup Machines
9. TRACK RECORDERS AND PICKUP MACHINES There are two ways to sample with the Octatrack MKII. Either by using track recorder sampling, which can be performed manually or by using recorder trigs, or by using specialized machines called Pickup machines, which essentially work like loopers. -
Page 45: Recording Edit Menu
9. TRACK RECORDERS AND PICKUP MACHINES recorders are directly linked to the tracks, the track whose track recorder you wish to edit must be active. Pressing [FUNC] + [PLAY] while inside the RECORDING SETUP menus will clear the recorder buffer of the active track recorder from any audio content. -
Page 46: Recording Setup 2 Menu
9. TRACK RECORDERS AND PICKUP MACHINES • C makes the recorder sample from input C. The captured sample will be in stereo even though only one input is used. • D makes the recorder sample from input D. The captured sample will be in stereo even though only one input is used. -
Page 47: Track Recorder Sampling Methods
9. TRACK RECORDERS AND PICKUP MACHINES FIN applies a fade in when starting the recording. The value is expressed in sequencer steps. Applying a very short fade in can be used to avoid clicks that otherwise might occur when a recorded sample loops. -
Page 48: Recorder Trig Sampling
When sampling using recorder trigs the captured sample will be assigned the same BPM as the current BPM setting of the Octatrack MKII. In the ATTRIBUTES menu of the audio editor the BPM assignment of the sample can be changed. For more information, please see “13.2.4 ATTRIBUTES”... -
Page 49: Pickup Machine Sampling
9.3.1 MASTER AND SLAVE PICKUP MACHINES The first Pickup machine that records a loop acts as the master. The BPM of the Octatrack MKII will automatically change according to the calculated BPM of the recorded loop. If Pickup machines are assigned to other tracks, the loops they record will be slave loops. -
Page 50: Controlling The Pickup Machines
TROLLING THE PICK UP MACHINES WITH A MIDI FOOT CONTROLLER” on page 105. 9.3.2 SEQUENCER TO PICKUP SYNC The Octatrack MKII sequencer can be tempo synchronized to a Pickup machine recording. This is useful if you want to mix pre-progammed tracks with Pickup machine loops and don’t want the sync of the sequencer to drift. - Page 51 If no Pickup machine is playing, the sequencer will start playing immediately when [PLAY] is pressed. If the Octatrack MKII sequencer is playing, use the QPL setting, found in the RECORDING SETUP 2 menu, to start playing the Pickup machines in sync with the pattern.
-
Page 52: Banks, Parts And Scenes
• Scene locks. 10.1 BANKS An Octatrack MKII project consists of 16 banks. Each bank hosts 16 patterns. Patterns in bank 1 are labeled A01-A16, patterns in bank 2 B01-B16 and so on. Select a bank by pressing the [BANK] key plus one of the [TRIG 1–16] keys. [BANK] + the first [TRIG] key will access the first bank, pressing [BANK] + [TRIG] key 2 will select the second bank and so on. -
Page 53: Part Edit
10. BANKS, PARTS AND SCENES 10.2.2 PART EDIT Use the [ARROW] keys to select the part that should be edited and then press [FUNC] + [PART] to open the PART EDIT pop-up menu. RENAME makes it possible to give each part a unique name. After selecting this option and pressing [YES] a naming window will appear. -
Page 54: Scene Volume Locking
10. BANKS, PARTS AND SCENES To quickly see which tracks and TRACK PARAMETER pages that contain scene locks, press and hold a [SCENE] key. The [TRACK] keys of all tracks containing scene locks will turn half-bright green and/or start to blink. Selecting one of these tracks will show half-bright green and/or blinking [TRACK PARAM- ETER] keys. -
Page 55: Tracks
11. TRACKS The Octatrack MKII sequencer can control 8 audio stereo tracks and 8 MIDI tracks at the same time. This chapter will deal with the audio tracks. For an explanation of the MIDI tracks, see the section “15. THE MIDI SEQUENCER”... -
Page 56: Assigning Machines In The Src Setup Menu
11. TRACKS 11.2.2 ASSIGNING MACHINES IN THE SRC SETUP MENU Select the track you want to assign the machine to by pressing the corresponding [TRACK] key. Press [FUNC] + [SRC] to open the SRC SETUP menu. If the track contained a Flex machine with an assigned sample the Flex sample slot list will be opened. -
Page 57: Track Parameter
This parameter controls the volume of the main outputs. Use this key and knob combination to quickly adjust the main volume of the Octatrack MKII. When STUDIO mode is activated, LEVEL and [CUE] + LEVEL control the sound sent to the two output pairs. -
Page 58: Amp Main
11. TRACKS 11.4.5 AMP MAIN Access the AMP MAIN page by pressing [AMP]. Here settings affecting the amplitude and the stereo positioning of the track are found. Hold Hold Attack Release Attack Release Trig Trig TIME TIME Hold Hold Attack Release Attack Release... -
Page 59: Lfo Main
• TTRG will make the envelope attack start from the current envelope level when a sample or a trigless trig is activated. SYNC sets if the amplitude envelope should be synced to the Octatrack MKII BPM or not. ATCK sets how the attack of the envelope should behave. -
Page 60: Lfo Setup
11. TRACKS SPD1 sets the speed of LFO1. The higher the value the faster the LFO runs. For LFO speed syn- chronised to straight beats, try settings of 16, 32 or 64. Note that the MULT settings in the LFO SET- UP menu affect the LFO speed settings. -
Page 61: Lfo Designer
11. TRACKS DEP sets the amount of modulation applied to the target parameter. Setting DEP to 127 allows for modulating a parameter to and from any extreme value. For example, if the target parameter is set to 64 a saw wave LFO DEP setting of 64 is sufficient for modulating the target value to its minimum (0) and maximum (127) values. -
Page 62: Direct Track Muting
Tracks and audio inputs can be routed to either the main outputs or the cue outputs. Tracks and audio inputs are routed to the main outputs by default. Read more about different routing scenarios in section “16. OCTATRACK MKII SETUP EXAMPLES” on page 95. -
Page 63: Main Output Routing
11. TRACKS 11.6.1 MAIN OUTPUT ROUTING This is the default setting. All tracks and inputs are routed to the main outputs. 11.6.2 CUE OUTPUT ROUTING Pressing [CUE] + [TRACK] will route the selected track to the cue outputs. A cued track will still be au- dible from the main outputs. -
Page 64: Patterns
12. PATTERNS 12. PATTERNS The sequencer of the Octatrack MKII is incredibly powerful and plays an extremely important role in pro- cessing sounds and samples. The sequencer stores information in patterns. Patterns consist of information about how the eight audio tracks and eight MIDI tracks should be played back. -
Page 65: Recording Modes
[PLAY] is pressed the pattern chain will start playing from the beginning. If [STOP] has been pressed, pressing [STOP] again will unlink all patterns in the chain. 12.3 RECORDING MODES The Octatrack MKII offers two main modes of inputting trigs when creating a pattern, GRID RECORDING mode and LIVE RECORDING mode. 12.3.1 GRID RECORDING MODE GRID RECORDING is a method of composing where trigs are added by using the 16 [TRIG] keys. -
Page 66: Trig Types
A trig is a sequencer event that you can place when you want the sequencer to perform an action. The Octatrack MKII sequencer accommodates a number of different trig types. Trigs can be entered while being in GRID or LIVE RECORDING mode and are, depending on the type of trig, indicated by red, green or yellow [TRIG] keys colors. -
Page 67: Swing Trigs
12. PATTERNS ing by simply pressing [YES] and [NO] can be disabled in the PERSONALIZE menu. For more informa- tion, please see “8.5.4 PERSONALIZE” on page 33. If GRID RECORDING mode is not active, all one shot trigs, both recorder and sample variants, of all tracks will be re-armed when pressing either [YES] or [FUNC] + [YES]. -
Page 68: Trig Modes
12. PATTERNS 12.7 TRIG MODES The various TRIG modes affect how the 16 [TRIG] keys are used when no RECORDING mode is active. Select which TRIG mode that should be active by pressing [FUNC] + [UP] or [DOWN]. The currently active TRIG mode is indicated in the lower right part of the screen, to the left of the scene assignment graphics. -
Page 69: Slots
12. PATTERNS 12.7.3 SLOTS This mode gives quick access to the samples of the Flex and Static sample slot lists. Depending on the machine assigned to the active track, pressing a [TRIG] key when no RECORDING mode is active will trig a specific sample in either the Flex or Static sample slot list. -
Page 70: Sequencer Copy, Paste And Clear Operations
12.8 SEQUENCER COPY, PASTE AND CLEAR OPERATIONS To make it easier and quicker to compose using the Octatrack MKII, a number of different copy, paste and clear operations are available. To avoid accidentally overwriting or deleting data, paste and clear operations can be undone. -
Page 71: Track Clear
12. PATTERNS performed. A message saying “UNDO TRACK” will be shown in the display. If the track copy operation is performed when the TRACK TRIG EDIT menu is open, only trigs will be copied. Read more about this menu in section “12.9 TRACK TRIG EDIT MENU” on page 72. -
Page 72: Trig Lock Clear
12. PATTERNS 12.8.10 TRIG LOCK CLEAR Instead of removing parameter locks one by one from a trig you can use the clear trig locks command. First make sure you are in GRID RECORDING mode. If not, press [RECORD]. Hold and press the [TRIG] key of the trig whose content you want to clear. Then press [PLAY] to clear the trig. -
Page 73: Swing
12. PATTERNS For a parameter value to slide between two trigs, it needs to be locked on one of the trigs. A locked parameter value will slide to the unlocked value and vice versa. To make the parameter value slide, place a slide trig on the same sequencer step as trig you want to slide from. -
Page 74: Pattern
12. PATTERNS the header of the menu. The settings and choices of the main alternatives are accessed by selecting a main alternative and pressing the [RIGHT] arrow key. 12.10.1 PATTERN Contains settings related to the patterns. Change the various settings by selecting them and either pressing [YES] or turning the LEVEL knob. -
Page 75: Micro Timing
12. PATTERNS track 1 is the chosen track, then track 1 of the previous pattern will continue to sound until a trig oc- curs on track 1 of the currently active pattern. This setting overrides the SILENCE TRACKS setting. • YES will make the track of a previous pattern linked to a different part stop making sound once the currently active pattern starts playing. -
Page 76: Conditional Locks
FILL mode is active. 12.13 FILL MODE FILL mode can be used to create a temporary variation, such as a drum fill, to a pattern. The trig condition FILL is affected depending on if the OCTATRACK MKII is in FILL mode or not. -
Page 77: Scale Setup
2X will make the pattern play at twice the BPM. Double speed is useful for increasing the base reso- lution of the step sequencer to 32nd notes. Three quarter-speed is useful when the Octatrack MKII is playing alongside other instruments set to the same BPM and you want the Octatrack MKII to play triplets. - Page 78 It is used to define the overall time signature of the pattern, which affects MIDI clock if sent out by the Octatrack MKII. When an Octatrack MKII ar- rangement is being controlled from an external MIDI device, the song pointer position will be affected as well.
-
Page 79: The Audio Editor
13. THE AUDIO EDITOR 13. THE AUDIO EDITOR The audio editor is where editing of imported or recorded samples takes place. A number of tasks can be carried out here. 13.1 ACCESSING THE AUDIO EDITOR Press [AED] to access the audio editor. The audio editor can also be accessed in a number of other ways. 13.1.1 ACCESS FROM THE QUICK ASSIGN MENU Open the QUICK ASSIGN menu by double-clicking a [TRACK] key. -
Page 80: Slice
Once a sample has been sliced, individual slices can be played back by using the [TRIG] keys or the Octatrack MKII sequencer. Slices does not need not be linked to samples, the default behavior is for them is instead to be linked to sample slots. - Page 81 13. THE AUDIO EDITOR Pressing [FUNC] + [BANK] or [YES] opens the SLICE EDIT menu. Different options will appear, depend- ing on whether the SLICE EDIT menu is opened while a slice is highlighted or not. ADD SLICE HERE adds a slice. The marker must be on a non-sliced area of the waveform for this alternative to appear.
-
Page 82: Edit
13. THE AUDIO EDITOR 13.2.3 EDIT Access by pressing [LFO] while in the audio editor. Here various sample editing commands can be per- formed. For Static samples, considerably less menu options are available. The A and C knobs are used to select the section of the audio file that will be edited. The selection does not alter any set start or end points set in the TRIM or SLICE menus. -
Page 83: Attributes
13. THE AUDIO EDITOR Please note it is not possible to paste audio which overlaps with the copied data. The paste operation can work in different ways depending on the CHANGE PASTE MODE setting. DUPLICATE SELECTION -> will copy the selected section and paste it right after the end of the selection. - Page 84 0.5 or 2.0. The ”normal” BPM range the Octatrack MKII uses to make its initial BPM guess is 85 BPM-170 BPM. If you have loops with tempos outside this range, it might be a good idea to put the BPM value in the file- name.
-
Page 85: File
13. THE AUDIO EDITOR • DIRECT will make the sample play back immediately once it is trigged. This is the default option. • PAT.LEN will, after the sample has been trigged, start sample playback once the pattern has played its full length. •... -
Page 86: The Arranger
Pressing [STOP] stops the playback and another press moves the position pointer to the beginning of the arrangement. The Octatrack MKII arranger both sends and receives MIDI song pointer position. 14.1 THE ARRANGER MENU Press [ARR] to open the ARRANGER menu. Here the current arrangement can be edited and various ar- rangement operations carried out. - Page 87 14. THE ARRANGER arrangement is currently playing when you select another row, you will see two hollow arrows on each side of the newly selected row. They indicate that the selected row will start playing once the current row finishes playing. When playing the arrangement the header of the menu will display a counter indicating how many bars and beats have played.
-
Page 88: Rename
14. THE ARRANGER Copy, paste, clear and undo functions are available in the ARRANGEMENT EDIT menu. 14.1.2 RENAME Selecting this command and pressing [YES] will bring up a naming window where it is possible to re- name the arrangement. 14.1.3 CHANGE Selecting this command and pressing [YES] will bring up a menu where all the arrangements of the proj- ect are visible. -
Page 89: The Midi Sequencer
15. THE MIDI SEQUENCER The Octatrack MKII MIDI sequencer consists of 8 dedicated MIDI tracks. It is used to control external, MIDI equipped, gear. Each MIDI track can trigger a chord of up to 4 notes with adjustable velocity and length, control pitch bend and aftertouch as well as 10 freely assignable control change parameters. -
Page 90: Midi Mode Live Recording And Parameter Locking
“8.7 MIDI” on page 39. To add MIDI notes and MIDI parameter locks on the Octatrack MKII sequencer on a per trig basis, select the track you want to input data to, keep a [TRIG] key pressed and send the note data or CC messages to the auto channel or the MIDI channel of the active track. -
Page 91: Note Setup
15. THE MIDI SEQUENCER NOTE sets the root note that should be sent by the MIDI track. When pressing and holding a [TRIG] key a mini-keyboard will appear in the lower part of the screen. Turning knob A while holding the [TRIG] key pressed will visualize the root note on the keyboard. -
Page 92: Arpeggiator Setup
15. THE MIDI SEQUENCER • DOWN will play the notes in a descending order, from the highest note to the lowest, on a per octave basis. • CYCL will play the notes first in an ascending order, then in an descending order. •... -
Page 93: Ctrl 1 Main
15. THE MIDI SEQUENCER The MIDI LFO designer waveforms are only available to the MIDI tracks. 15.4.7 CTRL 1 MAIN Here pitch bend, after touch and the values of up to four assignable CC commands are set. The default value of the parameters is OFF, meaning they are disabled and won’t send out any data. Holding [FUNC] and pressing the DATA ENTRY knobs will enable them. -
Page 94: Ctrl 2 Setup
15. THE MIDI SEQUENCER CC5-CC10 controls the values that should be sent for the CC commands specified in the CTRL 2 SETUP page. 15.4.10 CTRL 2 SETUP Here the CC commands whose values are controlled in the CTRL 2 MAIN page are selected. Settings in this menu are adjusted just like when in CTRL 1 SETUP. -
Page 95: Octatrack Mkii Setup Examples
16. OCTATRACK MKII SETUP EXAMPLES The flexibility of the routing of the Octatrack MKII makes it easy to integrate the machine in a lot of various studio and live setups. Here are a few examples of how it can interact with external audio sources. -
Page 96: Thru Machines Method
We assume the Machinedrum is being connected to input AB and the Monomachine to input CD. 2. Connect a MIDI cable from MIDI OUT of the Octatrack MKII to MIDI IN of the Machinedrum. Connect a MIDI cable from MIDI THRU of the Machinedrum to the MIDI IN of the Monomachine. Make sure the Machinedrum and Monomachine listen to external MIDI clock and that they respond to external transport commands. -
Page 97: Octatrack Mkii With External Effects
The Octatrack MKII output pair is connected to an external effects device. The outputs of the external ef- fects are connected to input pair AB. The input pair is routed to the Octatrack MKII main out. Cueing a track will send it to the external effects and the affected signal can then be treated further by the Octatrack MKII. -
Page 98: Octatrack Mkii Processing Live Instruments
16.3 OCTATRACK MKII PROCESSING LIVE INSTRUMENTS Four mixer aux sends are connected to the inputs of the Octatrack MKII. Each aux send sends a different signal. The Octatrack MKII applies effects, reconstructs the incoming audio and sends back the real-time... -
Page 99: Octatrack Mkii As A Dj Mixer And Sampler
1. Connect four aux sends from the mixer to the four inputs of the Octatrack MKII. The guitar is being sent to input A, the bass to input B, the synth to input C and the vocals to input D. Connect the Octatrack MKII main outputs to the mixer. -
Page 100: Dj Mixing Using The Thru Method
16.4.2 DJ MIXING USING THE THRU METHOD 1. Connect the first DJ deck to Octatrack MKII input pair AB. Connect the second DJ deck to input pair CD. 2. Open the MIXER menu by pressing [MIXER]. Make sure DIR for AB and CD is set to 0. This will make incoming sound available to only Thru machines. -
Page 101: Octatrack Mkii As A Midi Control Center
16.5 OCTATRACK MKII AS A MIDI CONTROL CENTER The MIDI OUT of an external synthesizer is connected to the Octatrack MKII MIDI IN. The Octatrack MKII MIDI OUT is connected to the MIDI IN of the synthesizer. A synth module is connected to the MIDI THRU of the synthesizer. - Page 102 8. Now it is time to set the CC messages that will be possible to record and lock by the Octatrack MKII MIDI sequencer. In this tutorial the filter cutoff parameter of the synthesizer will be set so it is record- able by turning the cutoff knob of the synthesizer directly.
-
Page 103: Octatrack Mkii Tutorials
1. If you are sampling from the external inputs, make sure audio from an external device is being sent to the Octatrack MKII inputs. The <REC> LEDs indicate the strength of the signal sent to the inputs. If you hear sound but see no LED activity, try increasing the volume of the external audio by either increasing the GAIN parameter in the MIXER menu or by increasing the volume on the external device itself. -
Page 104: Playback Of Captured Recorder Samples
17. OCTATRACK MKII TUTORIALS 5. Make sure GRID RECORDING mode is active. If not, press [RECORD] to activate it. Place out a recorder trig by pressing a [TRIG] key. Note that the sequencer while in the RECORD SETUP menus only reflects recorder trigs. -
Page 105: Controlling The Pick Up Machines With A Midi Foot Controller
17.1.5 CONTROLLING THE PICK UP MACHINES WITH A MIDI FOOT CONTROLLER Using a MIDI foot controller to control the Pickup machines is great when using the Octatrack MKII in a hands-free way. In this tutorial we assume we are going to sample a guitar connected to input A. -
Page 106: Loop Remixing
Move to track 2 by pressing pedal 5. Move back to track 1 by pressing pedal 4. If you want to sync the Octatrack MKII sequencer to a Pickup machine loop and make it start playing the next time the loop starts over, press pedal 3. -
Page 107: Loop Remixing Using The Crossfader
17. OCTATRACK MKII TUTORIALS 5. Double press the [SRC] key to open the SRC SETUP menu. Set SLIC to ON. This will activate the slice playback functionality. 6. Press [TRACK 1] + [BANK] to open the sample in the audio editor. Open the TRIM menu by pressing the [SRC] key. -
Page 108: Preparing Loops And Samples
17.3 PREPARING LOOPS AND SAMPLES To make a sample stay in sync when the BPM of the Octatrack MKII is changed its original BPM of the sample must be set correctly. To make it easier to sync the sample, its start point should also be placed at a relevant position. -
Page 109: The Octatrack Mkii As A Dj Deck
SAVE SAMPLE SETTINGS command found in the FILE menu. 17.4 THE OCTATRACK MKII AS A DJ DECK The Octatrack MKII can function as a complete DJ setup, eliminating the need for both DJ decks and a DJ mixer. 1. Connect a pair of headphones to the Octatrack MKII headphones output. -
Page 110: The Octatrack Mkii As An Effects Processor
In this example an external sound source will be affected by up to eight track effects. 1. Connect an external sound source to input pair AB of the Octatrack MKII. Make sure the <REC> LEDs indicate an audio signal is being sent to the input pair. -
Page 111: Startup Menu
18.4 SEND UPGRADE With this option you can send the OS installed in your Octatrack MKII to a friend’s unit. Press the [TRIG 4] key to choose this option. -
Page 112: Exit
Press the [TRIG 5] key to exit the STARTUP menu. For faster OS updates, utilize the speed of the Elektron TurboCharge protocol. You will need to have the MIDI IN port of the receiving machine connected to the MIDI OUT port of the transmitting machine and vice versa for this to function. -
Page 113: Summary Of Key Combinations
[FUNC] + [RECORD] performs a copy command. The content that will be copied depends on the currently active menu or mode of the Octatrack MKII. [FUNC] + [PLAY] performs a clear command. The content that will be cleared depends on the currently active menu or mode of the Octatrack MKII. - Page 114 19. SUMMARY OF KEY COMBINATIONS [PAGE] + [PLAY] clears the active pattern page. [PAGE] + [STOP] pastes a copied pattern page to the active pattern page. [SCENE A/B] + [TRIG] assigns a scene to the selected scene slot. [TRACK] + [PLAY] trigs the sample assigned to the machine of the track. [TRACK] + [STOP] stops playback of the sample assigned to the machine of the track.
-
Page 115: Technical Information
Digital S/N ratio: 106 dB (20–20,000 Hz) PHYSICAL SPECIFICATIONS Sturdy steel casing Unit power consumption: 7 W typical Dimensions: W 340 × D 184 × H 63 mm Compatible Elektron power supply: PSU-3b (13.3” × 7.2” × 2.5”) (including knobs, jacks, and rubber feet) Weight: approximately 2.3 kg (5 lbs) Maximum recommended ambient operating temperature: +40˚C (+104˚F) -
Page 116: Appendix A: Machine Reference
A.1 THRU MACHINE Thru machines are utility machines, very handy in live setups when using the Octatrack MKII to re-route and affect external audio signals. Thru tracks need to be trigged for them to start passing through sound. Thru machine playback can be stopped by pressing [TRACK] + [STOP]. -
Page 117: Flex Machine
Flex machines offer the most extensive sound manipulation possibilities. A sample used by a Flex machine is loaded to the RAM memory of the Octatrack MKII. From there it can be twisted, stretched and reassem- bled in multiple ways. Flex machines are unbeatable sound processors. -
Page 118: Static Machine
APPENDIX A: MACHINE REFERENCE A.3 STATIC MACHINE Static machines are perfect for handling extremely large samples. Samples assigned to Static machines are streamed from the Compact Flash card, thus their size can be in the order of gigabytes. They can of course still be time stretched and pitch scaled as needed. -
Page 119: Neighbor Machine
APPENDIX A: MACHINE REFERENCE A.4 NEIGHBOR MACHINE Neighbor machines listen to the output of the preceding track. Multiple tracks with Neighbor machines can form extremely powerful effects chains. Neighbor machines cannot be assigned to track 1 or 5. NEIGHBOR MAIN NEIGHBOR SETUP No main parameters are available. -
Page 120: Pickup Machine
APPENDIX A: MACHINE REFERENCE A.5 PICKUP MACHINE Pickup machines are specialized for recording loops. A Pickup machine is hard-linked to both the track recorder and the recorder buffer of the track it is assigned to. The function of the [REC1/2] keys change for tracks to which Pickup machines are assigned. -
Page 121: Appendix B: Effects Reference
APPENDIX B: EFFECTS REFERENCE APPENDIX B: EFFECTS REFERENCE In this appendix, the Octatrack MKII effects are explained. The individual effect parameters are presented for reference. B.1 NONE The none effect is a blank effect. Use it if you don’t want to affect the audio of the track whatsoever. -
Page 122: 12/24Db Multi Mode Filter
APPENDIX B: EFFECTS REFERENCE B.2 12/24DB MULTI MODE FILTER The resonant 12/24dB lo/hi/band-pass filter gives control of both the low and high filter cutoffs. Its flexibility can make it function as a variable gap bandpass filter as well. MULTI MODE FILTER MAIN MULTI MODE FILTER SETUP BASE sets the base cutoff frequency of the filter. -
Page 123: 2-Band Parametric Eq
APPENDIX B: EFFECTS REFERENCE B.3 2-BAND PARAMETRIC EQ The parametric EQ is useful for shaping the timbre of a sound. Two frequency bands can be attenuated or amplified. PARAMETRIC EQ MAIN PARAMETRIC EQ SETUP FRQ1 sets the center frequency the first band of the TYP1 sets how the first band of the filter will op- EQ will affect. -
Page 124: Dj Style Kill Eq
APPENDIX B: EFFECTS REFERENCE B.4 DJ STYLE KILL EQ This EQ variant is somewhat of a cross-breed between a filter and an EQ. It is a three band EQ, capable of completely filtering out the bands. DJ EQ MAIN DJ EQ SETUP LS F sets the frequency of the low shelf filter. -
Page 125: 2-10 Stage Phaser
APPENDIX B: EFFECTS REFERENCE B.5 2-10 STAGE PHASER The phaser applies sweeping effects to sounds. It can also be used to make sounds appear wider. PHASER MAIN PHASER SETUP CNTR selects the center phase of the phase mod- NUM selects the number of stages that should be ulation. -
Page 126: Flanger
APPENDIX B: EFFECTS REFERENCE B.6 FLANGER A flanger is a modulation effect sharing similarities with the phaser. The main difference is the notches being evenly spread out in the frequency spectrum. FLANGER MAIN FLANGER SETUP DEL controls the amount of delay of the flanged No setup parameters are available. -
Page 127: 2-10 Tap Chorus
APPENDIX B: EFFECTS REFERENCE B.7 2-10 TAP CHORUS The variable tap stereo chorus is great for enhancing the stereo image of a sound and for making it appear softer and smoother. CHORUS MAIN CHORUS SETUP DEL controls the delay time of the taps. TAPS sets the number of chorus taps that should be used. -
Page 128: Spatializer
APPENDIX B: EFFECTS REFERENCE B.8 SPATIALIZER The spatializer effect is suitable for affecting the stereo image in various ways, for example by widening it. It is also capable of generating a psuedo-stereo image from a mono sample. SPATIALIZER MAIN SPATIALIZER SETUP INP adjusts the gain of the dry signal. -
Page 129: Comb Filter
APPENDIX B: EFFECTS REFERENCE B.9 COMB FILTER The comb filter introduces metallic sounding, pitch tuned, resonant overtones to sounds and samples. COMB FILTER MAIN COMB FILTER SETUP PTCH controls the resonant frequencies of the No setup parameters are available. comb filter. TUNE changes the pitch by up to 2 semitones up or down. -
Page 130: Dynamix Compressor
APPENDIX B: EFFECTS REFERENCE B.10 DYNAMIX COMPRESSOR The Dynamix processor can be used for increasing the overall sound level of a track or pattern. It can also be used to enhance or reduce transients. COMPRESSOR MAIN COMPRESSOR SETUP ATK sets the attack time from 0.5 ms to 100 ms. RMS adjusts the way the compressor works. -
Page 131: Lo-Fi Collection
APPENDIX B: EFFECTS REFERENCE B.11 LO-FI COLLECTION The lo-fi collection consists of several effects dedicated to making sounds grittier and more abrasive. These effects are not for the faint-hearted! LO-FI MAIN LO-FI SETUP DIST controls the signal overload distortion. AMPH sets the start phase of the amplitude mod- ulation. -
Page 132: Echo Freeze Delay
APPENDIX B: EFFECTS REFERENCE B.12 ECHO FREEZE DELAY The delay adds echoes to the affected signal. The special echo freeze functionality makes it possible to repeat a portion of a sound. DELAY MAIN DELAY SETUP TIME controls the delay time of the delay loop. The X sets if the delay will act as a ping-pong delay or actual delay time is relative to the current tempo, not. -
Page 133: Gatebox Plate Reverb
APPENDIX B: EFFECTS REFERENCE B.13 GATEBOX PLATE REVERB The Gatebox plate reverb adds reverberation to the signal. The effect has many uses thanks to the imple- mented gating possibilities. PLATE REVERB MAIN PLATE REVERB SETUP TIME controls the decay time, i.e. how long time the GVOL sets the threshold volume of the gated signal. -
Page 134: Spring Reverb
APPENDIX B: EFFECTS REFERENCE B.14 SPRING REVERB This effect is based on a classic spring reverb. It adds a grungy and “twangy” reverberation to the incoming signal. SPRING REVERB MAIN SPRING REVERB SETUP TIME sets the decay time of the springs. TYPE sets the type of spring going from slightly transparent to more springy in three steps. -
Page 135: Dark Reverb
APPENDIX B: EFFECTS REFERENCE B.15 DARK REVERB The dark reverb provides lush, wide stereo reverberation with long decay times. It is good for adding a spacey ambience to a sound. DARK REVERB MAIN DARK REVERB SETUP TIME sets the decay time of the reverberated signal. PRE adjusts the length of a short delay before the signal reaches the reverberator. -
Page 136: Appendix C: Midi Control Reference
It is also possible to trig tracks, samples and track recorders as well as to play samples chromatical- ly from an external MIDI device. Which tracks responding to which MIDI channels are configured in the PROJECT>MIDI>CHANNELS menu. C.1 NOTE MAPPING The Octatrack MKII responds to MIDI Note as follows: OCTAVE (NOTES) FUNCTION (0-11) -
Page 137: Ctrl Change Mappings
APPENDIX C: MIDI CONTROL REFERENCE ACTION NOTE SRC3 rec D# (63) Pickup Play/Stop E (64) Multiply F (65) Mute active track F# (66) Cue active track G (67) Active track up G# (68) Active track down A (69) Toggle Seq sync A# (70) Toggle Seq B (71) -
Page 138: Midi Mode Ctrl Change Mappings
APPENDIX C: MIDI CONTROL REFERENCE HEX DEC CTRL PARAMETER $2D 45 FX2 param #6 $2E 46 Track level $2F 47 Cue level $30 48 Crossfader $31 49 Track Mute [0]=Unmuted, [1-127]=Muted $32 50 Track Solo [0]=No solo, [1-127]=Soloed $33 51 Track Cue [0]=Not Cued, [1-127]=Cued $34 52 Track Arm [0]=Trk disarm, [1-127]=Arm... - Page 139 APPENDIX C: MIDI CONTROL REFERENCE HEX DEC CTRL PARAMETER $16 22 Amp param #1 (Transpose) Amp param #2 (Legato) $18 24 Amp param #3 (Mode) $19 25 Amp param #4 (Speed) $1A 26 Amp param #5 (Octave Range) $1B 27 Amp param #6 (Arp Note Length) $1C 28 MIDI LFO param #1 (Speed 1)
-
Page 140: Index
INDEX INDEX ACCESSORIES 14 EARLY STARTUP MENU 111 Carrying bag and protective lid 14 EFFECTS Rack mount kit 14 Effects reference 121 Track effects 61 ELECTRICAL SPECIFICATIONS 115 Amp main 58 Amp setup 58 EMPTY RESET 111 ARPEGGIATOR 91 Setup 92 FILE BROWSER 30 ARRANGER 86 FILL MODE 76... - Page 141 INDEX MIDI LFO main 92 PICKUP MACHINES 44 MIDI LFO setup 92 Sampling 49 Note main 90 PROJECT MENU 31 Note setup 91 Control 35 MIXER 42 System 32 MUTE PROJECTS 28 Scene 54 Change project 32 MUTE TRACKS Loading and creating 28 Direct mute 62 Mixer 42 Mixer mute 42...
- Page 142 INDEX Performance hub 95 Track 68 Processing live instruments 98 TRIGS 66 With external effects 97 Lock trigs 66 SLICES 69 One shot trigs 66 SLIDE TRIGS 67 Recorder trigs 67 SOLO TRACKS 42 Sample trigs 66 Slide trigs 67 SRC main 57 Swing trigs 67 SRC setup 57...
- Page 143 INDEX...
Need help?
Do you have a question about the Octatrack MKII and is the answer not in the manual?
Questions and answers