
Related Manuals for Ilsco IDT-12-N

Summary of Contents for Ilsco IDT-12-N
- Page 1 INSTRUCTION MANUAL IDT-12-N Hydraulic Crimping Tool Read and understand all of the instructions and safety information in this manual before operating or servicing this tool. 99945282 REV 6 © 2009 Ilsco Corporation Q.F.5.4.55 2/09...
-
Page 2: Table Of Contents
Operation ..............6–7 Periodic Pressure Relief Valve Check......8 Safety Maintenance ..............8 Safety is essential in the use and maintenance of Ilsco Troubleshooting .............. 9 tools and equipment. This manual and any markings on Air Purging and Oil Filling Procedure ......10 the tool provide information for avoiding hazards and Illustration .............. -
Page 3: Important Safety Instructions
IDT-12-N Hydraulic Crimping Tool IMPORTANT SAFETY INFORMATION SAFETY ALERT Electric shock hazard: This tool is not insulated. When using SYMBOL this unit near energized electrical lines, use proper personal protective equipment. This symbol is used to call your attention to hazards Failure to observe this warning could or unsafe practices which could result in an injury or result in severe injury or death. - Page 4 IDT-12-N Hydraulic Crimping Tool IMPORTANT SAFETY INFORMATION An incomplete crimp can cause a fire. Keep hands away from the crimping tool head when crimping. • Use proper connector and cable combinations. Improper combinations can result in an incomplete Failure to observe this warning could crimp. result in severe injury or death. • The relief valve sounds to indicate a completed crimp.
-
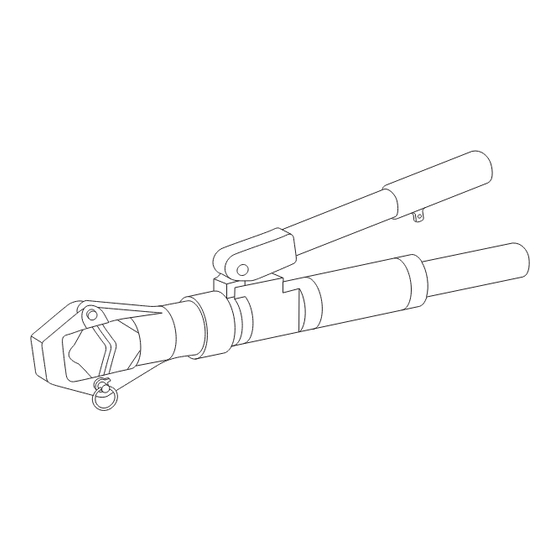
Page 5: Identification
IDT-12-N Hydraulic Crimping Tool Identification Release Trigger Ram Die Die Head Movable Pin Unit Specifications Crimping Tool Length ......................673 mm (26.5") Width ......................26.3 mm (2.87") Mass/Weight ....................7.5 kg (16.5 lb) Hydraulic Oil ....................198 cc (12 in Crimping Capacities Crimping Range Copper Connectors ........25 mm to 500 mm (#4 AWG to 1000 Kcmil) Aluminum Connectors ...... -
Page 6: Operation
IDT-12-N Hydraulic Crimping Tool Operation Electric shock hazard: An incomplete crimp can cause a fire. This tool is not insulated. When using • Use proper connector and cable combinations. this unit near energized electrical Improper combinations can result in an incomplete lines, use proper personal protective crimp. -
Page 7: Operation
Preparation 4. Align the tool with the alignment mark (for lugs) or center stop (for sleeves) as shown. 1. Select a proper size and type of connector to corre- spond with the wire or cable. LONGER LUG 2. Strip the cable to an appropriate length. Follow the instructions in the Ilsco stuffer sheet. TANG Note: Apply an oxide inhibitor, if required. Refer to the Ilsco stuffer sheet. Crimping 1. Insert the cable fully into the connector. ALIGNMENT 2. Position the connector in the crimping head. -
Page 8: Periodic Pressure Relief Valve Check
IDT-12-N Hydraulic Crimping Tool Periodic Pressure Relief Valve Check Maintenance Test the crimping tool periodically to ensure that the • After using the tool, remove any dirt, grit, or oxide pressure relief valve activates at the proper pressure. inhibitor from the tool. Order a crimping tool test kit, Ilsco part number • Occasionally lubricate moving parts. 50328913. • Store the tool in its case with the ram fully retracted. •... -
Page 9: Troubleshooting
IDT-12-N Hydraulic Crimping Tool Troubleshooting Problem Probable Cause Probable Remedy Ram does not advance. Air in the hydraulic system. Refer to “Air Purging and Oil Filling Procedure.” Check valve or release mechanism. Return tool to Ilsco. Ram advances slowly. Air in the hydraulic system. Refer to “Air Purging and Oil Filling Procedure.” Check valve or release mechanism. Return tool to Ilsco. Ram advances erratically. Air in the hydraulic system. Refer to “Air Purging and Oil Filling Procedure.” Ram retracts partially with Air in the hydraulic system. Refer to “Air Purging and Oil Filling Procedure.”... -
Page 10: Air Purging And Oil Filling Procedure
IDT-12-N Hydraulic Crimping Tool Air Purging and Oil Filling Procedure Fill the reservoir with Exxon Univis J26 all temperature ® 5. Unscrew the reservoir handle from the crimping hydraulic oil only. tool. Remove the plug (25) from the reservoir. Do not fill the hydraulic reservoir with any other type of fluid (such as brake fluid, glycerine, castor oil, etc.). Filling the reservoir with anything other than hydraulic fluid will damage the tool and void the warranty. Reservoir Plug (25) 1. Clamp the tool into a vise with jaw protectors so the handles are upward, as shown. Vise with Jaw Protectors 6. Retract the ram fully. -
Page 11: Illustration
IDT-12-N Hydraulic Crimping Tool Illustration Ilsco Corporation 4730 Madison Rd. • Cincinnati, OH 45227-1426 • 800/776-9775... -
Page 12: Parts List
IDT-12-N Hydraulic Crimping Tool Parts List Part No. Description 50014501 Handle, reservoir.................1 50356895 Grip, reservoir handle .................1 50014480 Handle unit, pump (includes items 3–11) ...........1 50356887 Grip, rubber ..................1 50014498 Handle, pump ..................1 90510488 Pin, roll, .125 x .625 ................1 90534751 Pin, roll, .156 x 1.375 ................2 50356984 Rod, pressure release .................1 90504585 Pin, roll, .125 x .375 ................1 50034278 Trigger, release ..................1 10 50033344 Spring, torsion, .187 x .280 x .312 .............1...
Need help?
Do you have a question about the IDT-12-N and is the answer not in the manual?
Questions and answers