
Subscribe to Our Youtube Channel
Summary of Contents for MAXTEK 79004
- Page 1 HD Camera Bike Light MODEL NUMBER: 79004 USER GUIDE After Sales Support UK/N.IRELAND HELPLINE N 01270 508538 REP.IRELAND HELPLINE N 1800 995 036 WEBSITE: www.quesh.co.uk EMAIL: enquiries@quesh.co.uk...
-
Page 2: Table Of Contents
Contents Welcome Section General Information & Safety Instructions Contents & Features Layout & Controls Charging Mounting The Camera • Standard Seat Pole Fitting • Aeroseat Pole Fitting Turning On/Off • Turning The Camera On • Turning The Camera Off • Beep Alerts •... -
Page 3: Welcome Section
Welcome Section Congratulations! You have made an excellent choice with the purchase of this quality MAXTEK product. ® By doing so you now have the assurance and peace of mind which comes from purchasing a product that has been manufactured to the highest standards of performance and safety, supported by the high quality standards of Quesh Ltd. -
Page 4: General Information & Safety Instructions
General Information & Safety Instructions Battery Care To get the best out of the battery, fully charge and use until flat for the first 5-6 times. Then use until flat and fully charge at least once a month. Prolonged storage without charge may cause damage to the battery and result in poor to no charge. -
Page 5: Contents & Features
Contents & Features Contents 1 x HD Camera bike light 1 x 8GB Micro SD card (Class 10) 1 x Charge cable 2 x Velcro straps 1 x Aeroseat adaptor 1 x wedge Features • Auto recording • 100° Wide angle lens •... -
Page 6: Layout & Controls
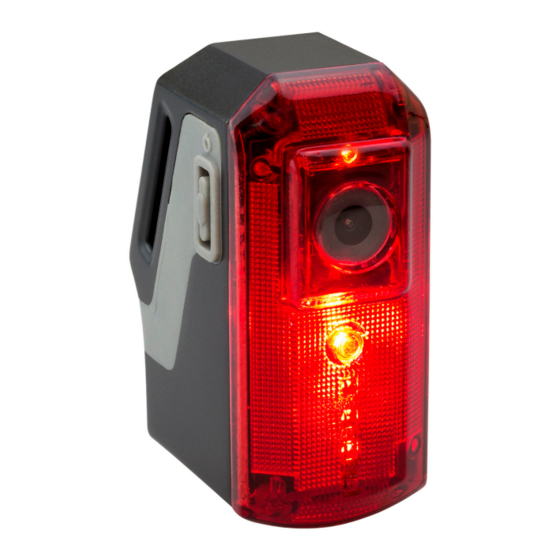
Layout & Controls Camera Dimmer Micro SD Charge LED/ Card Port Reset Micro USB Port Rubber Dust Cover On/Off Mounting /Mode Wedge Mounting Loop Speaker/ Microphone After Sales Support UK/N.IRELAND HELPLINE N 01270 508538 REP.IRELAND HELPLINE N 1800 995 036 WEBSITE: www.quesh.co.uk EMAIL:... -
Page 7: Charging
Charging Before using the camera please make sure it is fully charged. Connect the supplied charge cable to the micro USB port and a suitable power supply between 3.7V/500mAh and 5V/1A maximum. A PC or Laptop USB port is preferable. When the camera is charging a red LED will light up and then go out once fully charged. -
Page 8: Mounting The Camera
Mounting The Camera Standard Seat Pole Fitting To mount the camera to a standard seat pole, thread the velcro strap through the mounting loop. Place the camera in to the preferred position on the seat pole, thread the strap through the loop and secure firmly with the velco. -
Page 9: Turning On/Off
Turning On/Off Turning The Camera On Press and hold the button for 3 seconds until you hear a beep(s). This will turn the camera on and start it recording as well as the light depending on the last setting used. The beeps heard will indicate the current power level of the battery. -
Page 10: Micro Sd Card
Micro SD Card Installing The Card To install a micro SD card, lift up the dust cover to reveal the micro USB port and the micro SD card slot. Insert the card contact side first with the contacts facing the light. Push the card down to just below the edge of the port until it clicks and lock into position. -
Page 11: Recordings
Recordings Access Video Files There are two ways to access the files recorded on the micro SD card. • Connect the micro USB cable to the port on the camera and the other end to a PC/Laptop. Once connected you can access the files in the ‘DCIMA’... -
Page 12: Setting Date/Time
Setting Date/Time Setting The Date And Time Windows OS system only: You can set the date and time for the camera via a ‘txt’ file in the root directory of the micro SD card. These files will automatically be transferred when the card is inserted, including brief instructions. -
Page 13: Reset
Reset Resetting The Camera Under the dust cover there is a reset pin hole. When the camera is on, insert a paperclip to depress and hold the reset button for 10 seconds and release. This will reset the camera. Specification HD Camera Bike Light Solution: Jieli... -
Page 14: After Sales Support
Warranty Certificate Warranty This product is warranted to be free from defects in workmanship and parts for a period of 36 months from the date of purchase. Defects that occur within this warranty period, under normal use and care, will be repaired, replaced or refunded at our discretion, solely at our option with no charge for parts and labour. - Page 15 Warranty Card HD Camera Bike Light Model Number: 79004 Please keep your purchase receipt together with your warranty card Name: Address: Date of purchase: Location of purchase: Fault Description: Office Use: Repaired Replaced Other We recommend that you attach a photocopy of your receipt, showing the date of purchase, to this warranty card and keep it for your reference.
Need help?
Do you have a question about the 79004 and is the answer not in the manual?
Questions and answers