
Subscribe to Our Youtube Channel
Summary of Contents for MAXTEK 79007
- Page 1 Dictaphone MODEL NUMBER: 79007 USER GUIDE After Sales Support UK/N.IRELAND HELPLINE N 01270 508538 REP.IRELAND HELPLINE N 1800 995 036 WEBSITE: www.quesh.co.uk EMAIL: enquiries@quesh.co.uk...
-
Page 2: Table Of Contents
Contents Welcome Section General Information & Safety Instructions Contents & Features Layout Checking The Adaptor • Adaptor Information Charging • Charging The Dictaphone On/Off/Auto Off • Turning On/Off • Auto Off 7-14. Using The Dictaphone • Recording • Playback • Deleting A File •... -
Page 3: Welcome Section
Welcome Section Congratulations! You have made an excellent choice with the purchase of this quality MAXTEK product. ® By doing so you now have the assurance and peace of mind which comes from purchasing a product that has been manufactured to the highest standards of performance and safety, supported by the high quality standards of Quesh Ltd. -
Page 4: General Information & Safety Instructions
General Information & Safety Instructions This dictaphone is powered by a 300mAh rechargeable Li-Ion battery. Do not dispose of batteries in your household waste. Please contact your local authority for details on safe disposal. • Never throw batteries into a fire or expose to excessive heat sources. •... -
Page 5: Contents & Features
Contents & Features Contents 1 x Dictaphone 1 x Charge Cable Features • Up to 12 hours play time • Variable sensitivity microphone • External microphone port • Music playback • Multi audio storage folders • Supports WAV and MP3 formats •... -
Page 6: Layout
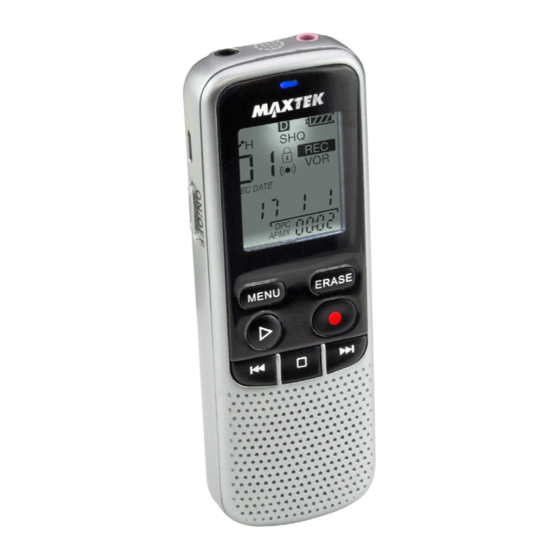
Layout Headphone Built in Microphone Port Microphone Port Micro USB Port LCD Screen Volume + On/Off Volume - Switch Menu Erase Play/Select Record Skip Back Skip Forward Stop/Lock Speaker After Sales Support UK/N.IRELAND HELPLINE N 01270 508538 REP.IRELAND HELPLINE N 1800 995 036 WEBSITE: www.quesh.co.uk... -
Page 7: Checking The Adaptor
Checking The Adaptor Adaptor Information Before using a USB mains adaptor please check the “Output” information on the plug face label. For this device 5V/1A or 5V/1000mAh is the maximum output required to charge the battery. Using a stronger output can damage the battery and/or product. -
Page 8: Charging
Charging Charging The Dictaphone Connect the charge cable (supplied) to the micro USB port on the dictaphone and the other end in to a PC, laptop or 5V/1A USB mains adaptor. The LCD screen will display the type of connection used. A full charge will take up to 2 hours approximately and the screen will show ‘FULL’... -
Page 9: Using The Dictaphone
Using The Dictaphone Recording Once the dictaphone is turned on press the record button to begin recording. The dictaphone will flash ‘pause’ for a few seconds before recording. Press the record button to pause the recording or press the stop button to stop and save the recording. The LED will show red when the dictaphone is recording and the LED will flash red when the recording is paused. -
Page 10: Deleting A File
Using The Dictaphone Deleting A File Use the skip forward and back buttons to cycle through the recorded files. Press and hold the ‘ERASE’ until ‘DEL’ shows on the screen and press ‘ERASE’ to confirm to delete the file or ‘MENU’ to cancel. -
Page 11: Adjusting The Volume
Settings Adjusting The Volume Use the ‘+’ or ‘-’ button on the right hand side to raise or lower the playback volume on dictaphone. Folders You can record to one of the five separate files in the dictaphone. The file selected is indicated by the square and letter icon. Press and hold the ‘MENU’... -
Page 12: Recording Type
Settings Recording Type To change the sensitivity of the recording, repeatedly press the menu button so ‘REC TYP’ appears on the screen. Use the skip forward or back buttons to change the setting to ‘H’ for high for recording at a distance or ‘L’ for low for recording at a personal distance. -
Page 13: Light
Settings VOR (Voice Operating Recording) This option will allow the dictaphone to automatically start recording when the microphone detects sound. Use the skip forward or back buttons to turn on or off this feature. Press play to confirm your selection and press stop to go back. Light This option controls how long the dictaphone screen is illuminated after it has been interacted with. -
Page 14: Setting The Date And Time
Settings Setting The Date And Time The next 7 screens are to do with setting the date and time. As you cycle through the setting options with menu button, you will see ‘TIME SE’ this is the start of the settings. The next 6 screens are options for the year, month and day, then hours, minutes and seconds. -
Page 15: Media File Size
Settings Media File Space This screen will show the available storage space left on the internal memory of the dictaphone in minutes. Auto Off This option will allow the dictaphone to turn itself off after a predetermined time in minutes. The light ranges from 00 to 30 in multiples of 5. -
Page 16: Reset
Settings Reset This option will restore the dictaphone to default settings. Repeatedly press ‘MENU’ until ‘RESET’ appears on the screen. Use the skip forward and back buttons to choose your option and press play to confirm. Selecting ‘ON’ will return the dictaphone to it’s default settings. -
Page 17: Data Transfer
Data Transfer Transferring Files Connect a micro USB cable to the dictaphone and the other end to a USB port on a Windows OS based PC or laptop. Access as well as drag and drop files to and from the dictaphone as you would a normal USB storage device through file explorer. - Page 18 Warranty Certificate Warranty This product is warranted to be free from defects in workmanship and parts for a period of 36 months from the date of purchase. Defects that occur within this warranty period, under normal use and care, will be repaired, replaced or refunded at our discretion, solely at our option with no charge for parts and labour.
-
Page 19: Warranty Card
Warranty Card Dictaphone Model Number: 79007 Please keep your purchase receipt together with your warranty card Name: Address: Date of purchase: Location of purchase: Fault Description: Office Use: Repaired Replaced Other We recommend that you attach a photocopy of your receipt, showing the date of purchase, to this warranty card and keep it for your reference.
Need help?
Do you have a question about the 79007 and is the answer not in the manual?
Questions and answers