Table of Contents
Advertisement
Advertisement
Table of Contents

Subscribe to Our Youtube Channel
Summary of Contents for Jay-tech 9903
-
Page 2: Table Of Contents
CONTENT 1. Introduction....................2 2. Appearance Description................4 Front End ....................6 Bottom View ..................... 7 Right View ....................8 Left View ....................8 Back View ....................8 3. Start of Use....................9 3.1 Battery Charging ................9 3.2 Use of SD Card .................. 9 3.3 Switch On and Off the Device............ -
Page 3: Introduction
1. Introduction The introduction and relevant information in the manual are just for reference. It is hereby explained that it is subject to the latest official materials once there are some changes. Safety Application Prevention Measures The service life of the computer will be prolonged when abiding by the following safety prevention measures. - Page 4 Safe temperature: the computer is only applied to the environment with surrounding temperature from 5°C to 40°C. Input power: refer to the power logo at the bottom of computer to ensure the adapter of your computer complies with the demonstrated power. Transportation Prevention Before transporting your computer, you shall shut down power and power off all the peripheral equipments to avoid damaging connector.
-
Page 5: Appearance Description
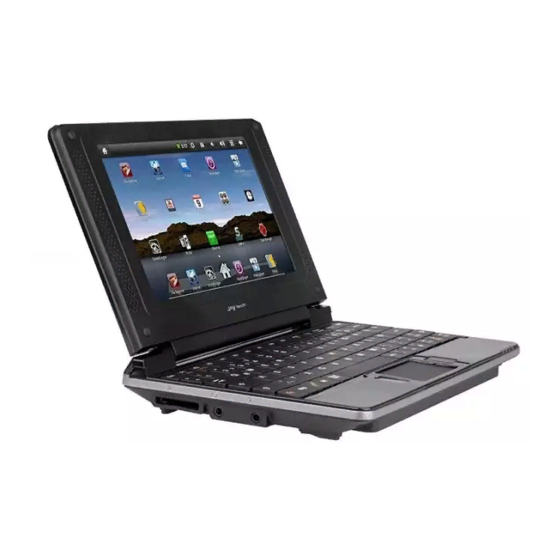
2. Appearance Description... - Page 6 USB Mainframe Port (OTG) Touch Pad and Buttons Network Port (RJ-45) Battery Charging Indicator DC IN Power Indicator LCD Display NUM Lock Indicator Speakers CAPS Lock Indicator Keyboard Reset Button Power Button Battery Pack Memory Card Slot USB Port Earphone Jack USB Port Microphone Jack...
-
Page 7: Front End
Front End Liquid Crystal Display Screen The function of the liquid crystal display is the same as that of the desktop computer. The compute uses LCD liquid crystal display screen, which provides the perfect visual effect that is the same as liquid crystal display of desktop computer. -
Page 8: Bottom View
Gallery Music Player Volume Down Volume Up Touch Pad and Button The touch pad and button is set by pointing device and has the same function with the mouse of desktop computer. Battery Charging Indicator After the AC power is connected, the red light indicates that the battery is being charged and off of the light indicates that the battery is fully charged. -
Page 9: Right View
Reset Button (Emergent Condition) In case that your operation cannot switch off or restart the computer normally, you can use a pin or paperclip to press the reset button to restart the computer. WARNING: The bottom of Netbook may get hot. The user must be careful when the computer is under operation or near the operation status. -
Page 10: Start Of Use
this jack. The computer is powered and the built-in battery is charged through this jack. Please use the power adaptor normally in order to prevent the damage to the computer and the battery. WARNING: It may become hot from the warm state. Please make sure whether DC socket connects the adaptor well and is far away from your body. -
Page 11: Switch On And Off The Device
Browse files in SD card: Open “My Pad” and select “SD”; browse the content of files after opening. Pull out SD card: Close all files opened in the card and select MENU>Setting>SD card and storage device (SD card). Click to remove SD card. The system prompts that “SD card is safely removed”. - Page 12 Right click on the pop out menu on the desktop to select “Setting”, or shortcut key F1 for Ethernet and F2 for Wi-Fi. Select static IP and input IP address, Gateway, Netmask and DNS according to the following prompt. Exit the interface after setting is completed. Wireless Network: Right click on the menu popped out on the desktop and select “Setting”.
-
Page 13: Input Operation
NOTES: The setting for “Encryption”, “Authentication” and “Network Key” must match with the setting of the wireless router that you will connect with. Otherwise, the network connection will be rejected. Some routers may not be connected after a period of use. The former connection needs to be deleted and search wireless network again and conduct corresponding wireless connection setting. -
Page 14: Desktop
5. Desktop 5.1 Status Bar The uppermost part of the screen is the status bar and displays SD card, network, battery status, time and volume increase or decrease. 5.2 Main Interface The main interface program page of flat palm computer includes two types of modes: desktop tool mode and application program icon mode. - Page 15 Click the button on the shortcut bar to enter interface of application program icon mode. The interface of application program icon mode is shown in the following figure. Click icon to enter the desktop small tool interface.
-
Page 16: Shortcut
5.3 Shortcut In the main interface of desktop small tool mode, the shortcut menu will pop out by pressing the menu button or clicking menu chart on the status bar on the top. The menu items include: Add Application, Wallpaper, Notifications and System Setting. -
Page 17: Use Of Desktop Small Tool
After adding to the main screen, click the shortcut icon on the main screen to perform the corresponding shortcut operation. Window Widgets To add window widgets to main screen, please press menu-add-window widgets on the window small tool interface and select “window widgets” to add to the main screen. -
Page 18: Web Browsing
6. Web Browsing Users can connect to internet through the browser. Single clicks on the icon of browser to open the network for web browsing. 7. Introduction to Typical Application Software 7.1 E-mail Click the E-mail icon to enter E-mail and conduct the following operation: •... -
Page 19: File Browse
7.2 File Browse Click icon My Pad to enter file browse interface. Move, copy, rename and delete files according to menu icon. File installation If you want to install and use the file browser, click the installation file with extension name .APK to pop out the installation prompt window. Select installation and the software are installed to equipment. -
Page 21: Individualized Setting
8. Individualized Setting Click the desktop setting icon of shortcut menu to conduct individualized setting. 8.1 Wireless and Network Connection for wireless internet access. To set and manage wireless connection point, please enter [Menu > System Setting > Wireless and Network > Wi-Fi Settings]. Please refer to chapter 2.4 for connection to wireless internet access in shortcut setting. -
Page 22: Application Program
Silent Mode To set other sounds as quiet but media and clock, please enter [Menu > System Setting > Sound and Display > Silent Mode]. Audio Volume To set the volume of music and video, please enter [Menu > System Setting >... -
Page 23: Sd Card And Device Memory
Manage Application Programs To manage and delete the installed application program, please enter [Menu > System Setting > Application Program > Manage Application Program]. Running Service To check and control the service that runs currently, please enter [Menu > System Setting > Application Program > Running Service]. 8.4 SD Card and Device Memory Check the available memory space. - Page 24 Device Memory To check device memory, please enter [Menu > System Setting > SD Card and Device Storage] and check under the directory of equipment memory.
-
Page 25: Language And Keyboard
8.5 Language and Keyboard To setting language zone (language and zone), input and User Dictionary options. Select Language Zone To select language and zone, please enter [Menu > System Setting > Language and Keyboard > Select Locale]. Android Keyboard To conduct Android keyboard setting, please enter [Menu > System Setting >... -
Page 26: Date And Time
8.6 Date and Time To set date, time, time zone, time system and format, please enter [Menu > System Setting > Date and Time]. -
Page 27: About Device
8.7 About Device Check equipment state and software version. To check battery status, battery level, Wi-Fi MAP address and uptime, please enter [Menu > System Setting > About Device > Status]. 9. Prompts and Tips As the equipment has large screen, it consumes a great deal of electricity. You can reduce the use frequency of the following functions to prolong the endurance of battery. -
Page 28: Troubleshooting
10. Troubleshooting 10.1 Close Application Program As the opened program occupies some memory of the equipment, more activated programs will affect the operation performance of the device. Therefore, the unused program should be closed in time to reduce memory use so that the equipment operates normally. To close application program, please click the icon on desktop shortcut bar to enter the system setting interface and select Application... -
Page 29: Force Shutdown
10.2 Force Shutdown Long press on the Power button for about 5 seconds will force to switch off the Netbook. 10.3 Reset the Device If buttons or touch pad of Netbook has no response, RESET button on the back side of this device can be pressed. Netbook will conduct reset shutdown. - Page 30 The product complies with the protective requirements of European Directives 2004/108/EC. The conformity declaration for this product is available under www.jay-tech.de. Directive 2002/96/EC on Waste Electrical and Electronic Equipment (WEEE) This symbol on the product or in the instructions means that your electrical and electronic equipment should be disposed at the end of its life separately from your household waste.
Need help?
Do you have a question about the 9903 and is the answer not in the manual?
Questions and answers