Table of Contents
Advertisement
Available languages
Available languages
A La-Z-Boy Company
®
4310 Regency Drive, Suite 101
High Point, NC 27265
336-294-5233
www.leaindustries.com
Assembly Instructions
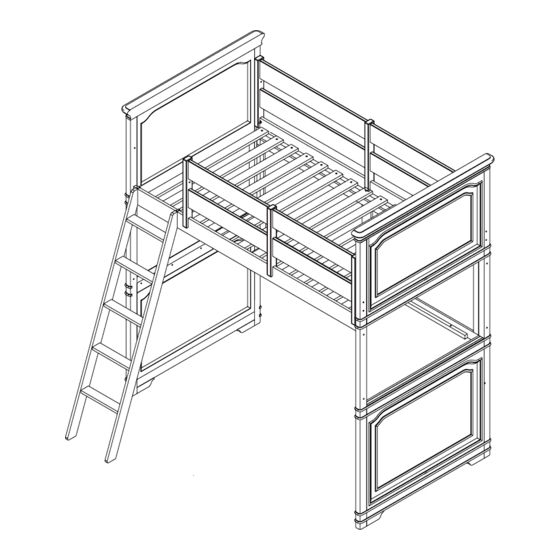
3/3 Loft Bed
4/6 Loft Bed
Thank you for purchasing furniture by Lea Industries. We are
honored that you have chosen our furniture to compliment
®
your home. Every effort has been made to ensure your
furniture is of the finest quality. If you find that your
furniture has a missing or damaged part, contact your local
Lea dealer. Thanks again for making Lea Industries a part of
your home.
Model Number:
816-964R, 816-984R
Page 1
Advertisement
Table of Contents

Subscribe to Our Youtube Channel
Summary of Contents for Lea 816-964R
- Page 1 Every effort has been made to ensure your furniture is of the finest quality. If you find that your furniture has a missing or damaged part, contact your local Lea dealer. Thanks again for making Lea Industries a part of your home. A La-Z-Boy Company ®...
- Page 2 Replacement parts, including additional guardrails, may be obtained from any of our Lea Industries dealers. Identifying the Parts Use the illustrations below to correctly identify each of the parts for your bed...
- Page 3 Page 3 Identifying the Hardware Identify the hardware using the illustrations below Carton 2 ID # 5/16" X 4-1/2” Connecting Bolt ID # ID # Barrel Nut Connecting Bolt 5/16”x2-1/2” ID # ID # Connecting Bolt 5/16” x 2” Connecting Nut 1/4”x17mm ID # ID # 5mm Hex Wrench...
- Page 4 Page 4 Step 1. Insert the Barrel Nuts (G) into the holes in each Bed Rail as shown in Figure 1 . Make sure the slot on top of the Barrel Nut (G) is aligned with the hole in the end of the rails ( Figure 2 ).
- Page 5 Page 5 Step 1. With the help of another person, line up the Cork Panel and install two Connecting Bolts B ( ) through a Loft Bed End and into the Cork Panel Figure 2. Attach the Cork Panel to the other Loft Bed End using two Connecting Bolts...
- Page 6 Page 6 Step 1. Attach the Bed Rails to the Loft Bed Ends as shown using the Long Connecting Bolts ( ). 2. Please note the Barrel Nuts G ( ) may have to be turned slightly to start the bolts threading. 3.
- Page 7 Page 7 Step 1. Position the Long Guard Rail onto the Bed Rail as shown. 2. Use a Hex Wrench D ( ) to tighten the Connecting Bolts H ( ) to each end of the Long Guard Rail and into the Bed Ends Figure 1 3.
- Page 8 Page 8 Step 1. Select the Ladder and attach the Ladder Hooks L ( ) to each end at the top of the Ladder using two ( ) for each ( ) as illustrated ( 3/4” Wood Screws F Ladder Hook L Figure 1 2.
- Page 9 Page 9 BEDDING SPECIFICATION UPPER BUNK MATTRESS DIAGRAM GUARD RAIL Minimum distance from top of guard 5" rail to top of mattress GUARD RAIL MATTRESS 11” Maximum Thickness SIDE RAIL SLAT MATTRESS SIZES... Upper Bed Mattress Specifications: * Only use a mattress that is 74” - 75” long and 37-1/2” - 38-1/2” wide on the upper bunk of the 3/3 Twin size bed.
- Page 10 Nous avons mis tous nos efforts pour vous fournir un meuble de la meilleure qualité possible. S’il s’avère qu’une partie est endommagée ou manquante, veuillez contacter le distributeur Lea le plus proche. Merci encore d’avoir choisi Lea Industries pour é faire partie de votre vie quotidienne.
- Page 11 à, des crochets, des ceintures, ou cordes à sauter. Les pièces de rechange, y compris les barres de côté, sont disponibles chez tous les vendeurs de Lea Industries. Identification des Pièces Utiliser les dessins ci-dessous pour identifier chacune des pièces du lit...
- Page 12 Page 3 Identifier la Quincaillerie Identifiez la quincaillerie en utilisant la liste ci-dessous Carton 3 Qté ID # Vis Longue 5/16” x 4-1/2” Qté ID # ID # Qté Ecrou Cylindrique Vis Longue 5/16” x 2”-1/2” Qté ID # ID # Qté...
- Page 13 Page 4 Etape 1. Insérer un Ecrou Cylindrique (G) dans chacun des trous des COTES comme montré schéma 1 . Vous assurer que le trou de chaque Ecrou Cylindrique (G) est aligné avec le trou à l’extrêmité des barres ( Schéma 2) .
- Page 14 Page 5 Etape 1. Avec l’aide d’une autre personne, aligner Le Panneau de Liège et mettre deux Vis Longues à travers l’ Extrêmité du Lit et le Panneau de Liège Schéma 1 2. Fixer le Panneau de Liège à l’autre extrêmité avec deux Vis Longues (B) .
- Page 15 Page 6 Etape 1. Attacher les Barres de Lit Pied et à la Tête de Lit, utilisant les Vis Longues (A 2. Noter que les Ecrous Cylindriques (G) peuvent avoir besoin d’être vissés légèrement pour démarrer. 3. Installer le paquet de lattes avec les lattes touchant bien les taquets de support des côtés. 4.
- Page 16 Page 7 Etape 1. Installer la Longue Barre de Sécurité sur la Barre de Lit comme montré ci-dessous. 2. Utiliser la Clé Alène (D) pour serrer les Vis Longues (H) aux extrêmités de la Longue Barre de Sécurité Pieds de Lit Schéma 1 3.
- Page 17 Page 8 Etape 1. Fixer les Crochets (L) en haut de l’ ECHELE avec deux Vis à Bois ¾” (F) pour chacun des Crochets (L) de chaque côté, comme montré sur le Schéma 1. 2. Accrocher l’ ECHELE en place sur la BARRE DE LIT à...
- Page 18 Page 9 INSTRUCTIONS POUR LA MATELASSERIE MATELAS POUR LE LIT DU HAUT Barre de Cote (Distance minimum entre le haut de la 5" barre de côté et le dessus du matelas.) Barre de Cote 11” Matelas Epaisseur maximum Barre de Cote Traverse DIMENSION DES MATELAS…...
- Page 19 Todo esfuerzo se ha hecho para asegurar la mejor calidad de mueblería. Si encuentras partes no incluidas o dañadas, llame a su agencia local. Gracias por hacer Lea Industries parte de su hogar. Compania de La-Z-Boy ®...
- Page 20 Peligro de Estrangulación Nunca debes colgar artículos en la cama que no son diseñadas para el uso de la cama como por ejemplo ganchos, fajas y cuerdas. Partes para reponer, incluyendo barandas adicionales pueden ser obtenidos por las agencias de Lea Industries. Identificando las Partes Utilice los dibujos siguientes para reconocer las partes de su cama Cartón #1 (Requerido para el Desván)
- Page 21 Página 3 Identificando Las Partes Identifique las partes utilizando los dibujos siguientes Cartón 2 Pzs. ID # Tornillo Conector 5/16" X 4-1/2” ID # Pzs. ID # Pzs. Tuerca Barril Tornillo 5/16”x2-1/2” Pzs. ID # ID # Pzs. Tornillo 5/16” x 2” Tuerca 1/4”x17mm ID # Pzs.
- Page 22 Página 4 Paso Tuerca Barril (B) Riel de Cama 1. Insertar la dentro de cada agujero en el como en la Figura 1 Tuerca Barril B . Asegurarse que la ranura encima de la ( ) quede alineada con Figura 2) Destornillador Plano el agujero al final de los rieles.
- Page 23 Página 5 Paso Panel de Corcho Tornillos 1. Con la ayuda de otra persona, alinear los agujeros del con los dos Conectores (B) Panel de Corcho Cama Figura 1 para unir el con la Panel de Corcho Cama Tornillos Conectores (B). 2.
- Page 24 Página 6 Paso Rieles de Cama Cama Tornillos Conectores Largos (A). 1. Unir los a la usando los Tuercas Barriles (G) 2. Por favor notar que las talvez necesiten quedar volteadas un poco antes de empezar a enroscar. Tablillas Riel 3.
- Page 25 Página 7 Paso Baranda Larga Riel de la Cama 1. Colocar la sobre el como el dibujo. Llave Hex (D) Tornillos Conectores (H) Baranda Larga 2. Usar la para ajustar los de la Pie de la Cama Figura 1 Baranda Corta Riel de la Cama 3.
- Page 26 Página 8 Paso Escalera Ganchos de la Escalera (L) Escalera 1. Unir la y los en la parte de arriba de la Roscas de Madera ¾” (F Gancho de la Escalera (L) usando dos ) para cada como es visto Figura 1 en la Escalera...
- Page 27 Página 9 ESPECIFICACIONES DE CAMA Diagrama del Colchón de la Cama Camarote Baranda (Distancia Mínima desde la parte superior de la baranda a la parte de arriba del colchón es de 5”) Baranda Colchón de Ancho Máximo Baranda Tablilla TAMAÑO DEL COLCHÓN… Especificaciones del Colchón de Arriba Usar solamente un colchón de 74”-75”...
- Page 28 Every effort has been made to ensure your furniture is of the finest quality. If you find that your furniture has a missing or damaged part, contact your local Lea dealer. Thanks again for making Lea Industries a part of your home. A La-Z-Boy Company ®...
- Page 29 Page 2 READ THESE INSTRUCTIONS CAREFULLY BEFORE ATTEMPTING TO ASSEMBLE THIS BED Identifying the Parts Use the illustrations below to correctly identify each of the parts for your bed (1) Hardware Bag & Instruction Booklet Identifying the Parts Identify the hardware using the illustrations below Use Existing Hardware ID # ID #...
- Page 30 Page 3 Step 1. Use the ( ) to attach the to the bottom of the . Use Bolts C Support Panel Desk Panel Hex Wrench D ( ) to tighten the Bolts C ( ). See Figure 1 Figure 1 Hardware Used In This Step ID # ID #...
- Page 31 Page 4 Step 1. Using the Hex Wrench D ( ) remove the Connector Bolts K ( ) from the interior of the loft bed as shown. ( Note: Keep the Connector Bolts K ( ) for the next step.) See Figure 1 2.
- Page 32 Page 5 Step 1. With the help of another person, attach the Desk Panel to the Cork Panel and both sides of . Use the ( ) to tighten the ( ) from Loft Bed Ends Hex Wrench D Connector Bolt C under the Desk Panel .
- Page 33 Nous avons mis tous nos efforts pour vous fournir un meuble de la meilleure qualité possible. S’il s’avère qu’une partie est endommagée ou manquante, veuillez contacter le distributeur Lea le plus proche. Merci encore d’avoir choisi Lea Industries pour é faire partie de votre vie quotidienne.
- Page 34 Page 2 LIRE ATTENTIVEMENT LES INSTRUCTIONS SUIVANTES AVANT DE COMMENCER LE Identifier la Quincaillerie (1) Sac de Quincaillerie et Livret d’Instructions Identifier la Quincaillerie Identifier la Quincaillerie Existante ID # ID # Ecrou 1/4”x17mm Vis 1/4”x18mm ID # ID # Vis 5/16”x18mm Vist 5/16”x18mm Cette Quantité...
- Page 35 Page 3 Etape 1. Pour fixer le Support Plateau du Bureau , utiliser les Vis longues (C) . Vous servir de la Clé Alène (D) pour serrer les Vis longues (C) . Voir schéma 1 Schéma 1 Quincaillerie Utilisée Dans Cette Etape ID # ID # Clé...
- Page 36 Page 4 Etape 1. Avec la Clé Alène (D) enlever les Vis (K) situées à l’intérieur du lit, comme montré ci-dessous. ( Noter Vis (K) schéma 1. Mettrer les de côté pour l’étape suivante. Voir 2. Avec la Clé Alène (D) enlever les Vis (I) et les...
- Page 37 Page 5 Etape 1. Avec l’aide d’une tierce personne, Fixer Plateau de Bureau Panneau de Liège à chaque extrêmité du . Avec la Clé Alène (D) serrer les Vis (C) sous le Plateau de Bureau. Voir schémas 1 2. Avec la Clé...
- Page 38 Todo esfuerzo se ha hecho para asegurar la mejor calidad de mueblería. Si encuentras partes no incluidas o dañadas, llame a su agencia local. Gracias por hacer Lea Industries parte de su hogar. ®...
- Page 39 Página 2 de 5 LEER LAS INSTRUCCIONES CUIDADOSAMENTE ANTES DE INTENTAR ARMAR ESTA CAMA Identificando las Partes Utilice los dibujos siguientes para reconocer las partes de su cama (1) Hardware Bag & Instruction Booklet Identificando las Partes Identifique las partes utilizando los dibujos siguientes Utlizando Partes Existentes ID # ID #...
- Page 40 Página 3 de 5 Paso 1. Usar los para unir el Panel de Apoyo en la parte de abajo del Panel del Tornillos (C) Escritorio. Usar la Llave Hex (D) para ajustar los Tornillos (C). Figura 1. Figura 1 Partes Utilizadas en Este Paso ID # ID # Llave Hex 5mm...
- Page 41 Página 4 de 5 Paso 1. Usando la Llave Hex (D) remover el Tornillo Conector (K) de la parte interior de la cama como ilustrado. ( Nota: Guarde el Tornillo (K) para el siguiente paso). Ver Figura 1. 2. Usando la Llave Hex (D) remover el Tornillo Conector (I)
- Page 42 Página 5 de 5 Paso 1. Con la ayuda de otra persona, unir el Panel del Escritorio Panel de Corcho y a ambos lados de la Usar la para ajustar el por debajo Cama. Llave Hex (D) Tornillo Conector (C) Panel del Escritorio.
Need help?
Do you have a question about the 816-964R and is the answer not in the manual?
Questions and answers