Table of Contents

Related Manuals for ThermoTex TT4-S

Summary of Contents for ThermoTex TT4-S
- Page 1 Operating manual for TT4-S - Translated version of the original operating manual - ThermoTex Nagel GmbH Schutterstraße 14, D-77746 Schutterwald Tel.: +49 (0)781/9616-0, Fax: +49 (0)781/9616-50 info@thermo-tex.de, www.thermo-tex.de GBTT4SBA.002...
-
Page 2: Table Of Contents
Contents Product description ......................3 General description, intended purpose ......................3 Scope of supply............................. 3 Technical data ............................... 4 Parts of the printer ............................4 Properties of the thermo print head ......................5 Instructions for the lithium battery ......................... 5 Declaration of conformity .......................... -
Page 3: Product Description
The use of a high-speed 32 bit Coldfire processor with a clock speed of 266MHz and the main memory of 64 MB produce printing results in a matter of seconds, even for very large labels (up to 2000 mm long). The TT4-S... -
Page 4: Technical Data
Product description 1.3 Technical data Electrical data Operating voltage: 230 V / 50 Hz Power: 200 W Dimensions Height: 274 mm Width: 242 mm Depth: 446 mm Weight: 9 kg Printing unit Resolution: 300 dpi (standard) Max. printing width: 105.6 mm Printing speed: 75...250 mm/s (adjustable) Ink ribbon... -
Page 5: Properties Of The Thermo Print Head
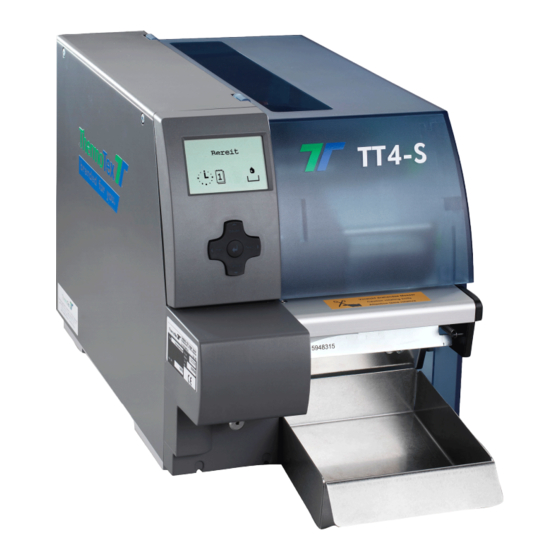
Product description 1 Lid 2 Core adapter 76mm (option) 3 Roll guide 4 Roll holder 5 Display 6 Navigator pad 7 Transfer film deflector 8 Printing roller 9 Print head 10 Film winder 11 Film unwinder Fig. 1-2 - Parts of the printer 1.5 Properties of the thermo print head The thermo print head is the most delicate part of your printer. -
Page 6: Declaration Of Conformity
Product description 1.7 Declaration of conformity CE Declaration of Conformity Manufacturer: ThermoTex Nagel GmbH Schutterstraße 14 D-77746 Schutterwald Device description: Type: TT4-S Production status: December 2009 The device fulfils the health and safety requirements of the following EC directives: • Low voltage directive 2006/95/EC... -
Page 7: Safety Instructions
Safety instructions 2 Safety instructions The following warning symbols are used on the machine and in this operating manual: Hazard Warning Warning, dangerous electrical voltage Warning of cutting injuries Disconnect from the power supply Always comply with the following safety instructions to avoid personal injuries or damage to the printer. -
Page 8: Initial Commissioning
Initial commisioning 3 Initial commissioning 3.1 Power connection The printer is equipped with a wide-range power unit (100...240V~) so that it can be operated from a power supply of both 230V~/50Hz and 115V~/60Hz without having to interfere with the printer. Before connecting your printer to the power supply, make sure that the power switch (1) is in the "0"... -
Page 9: Inserting Labels
ThermoTex rolls of labels are on the outside, i.e. the side being printed is on the outside. Exception: ThermoTex fix plastic film: this is on the inside. -
Page 10: Inserting The Ink Ribbon
Initial commisioning 1 Setscrew 2 Sliding press-on tappet 3 Lever for locking the print head 4 Ink ribbon defector Fig. 3-4 - Print head support 1. Turn lever (3) clockwise to lock the print head. 2. Use hex key to loosen the setscrew (1) at the outer tappet (2). 3. - Page 11 In Fig. 3-5, the continuous line applies to rollers with coated side on the inside, and the dotted line for rollers with coated side on the outside. ThermoTex ink ribbons have the coating on the outside. 6. Turn the winder (1) counter-clockwise to make the film run smoothly and tautly.
-
Page 12: Mounting The Cutting Device
Initial commisioning 3.6 Mounting the cutting device • Disconnect the printer from the power supply before mounting or dismounting the cutting device! • A tear-off plate (article no. 15986) must be mounted on the printer. This makes sure that the label tape is guided properly through the blades of the cutting device. Fig. -
Page 13: Operation
Operation 4 Operation 4.1 Control panel 1 Display 2 Navigator pad Fig. 4-1 - Control panel The control panel consists of a graphic display (1) and the navigator pad (2) with four integrated buttons. The control panel display constantly shows information about the system status of the printer and the processing status of the current print job. -
Page 14: Button Functions
Operation 4.4 Button functions Button Status Function menu ready to the offline menu Feed ready feed of an empty label pause ready repeat print of the last label print label interrupt print job printer goes to pause status continue print job pause printer goes to print label status fault which can be remedied... -
Page 15: Configuration Menu
Operation 4.5 Configuration menu The configuration menu, also called offline menu, has several levels with possibilities for adjusting device and print parameters, for accessing test and service functions and for handling the memory cards. Go to the menu by pressing menu in the ready status. 1st menu level 2nd menu level access... -
Page 16: Settings
The complete "Settings" menu can be protected from unauthorised access by a code number (PIN). PIN "0000" is adjusted as standard code number for TT4-S. 1. Press menu in the "ready" state to go to the offline menu. - Page 17 Settings Fault – reprint Choice of reprinting a faulty label after eliminating the fault Pause – reprint Possibility of printing more labels after the end of the job by pressing pause Barcode error Printing interrupted for faulty barcode contents ON/OFF Wide monitor mode Definition of printing area for monitor mode test function Automatic Settings - Interfaces...
-
Page 18: Test Functions
Test functions 6 Test functions The printer has a series of test functions under the "Test" menu of the offline menu. 1. Press menu to go from "ready" to the offline menu. 2. Press to select "Test". Press for the level of the test functions. to select the required test function and press ↵... - Page 19 Test functions Fig. 6-1 - Status printout Fig. 6-2 - Fonts list Fig. 6-3 - Devices list Fig. 6-4 - Example label "normal" printing Fig. 6-5 - Example label in monitor mode Page - 19 GBTT4SBA...
-
Page 20: External Keyboard
External keyboard 7 External keyboard All MF-2 compatible USB keyboards supporting code set 3 can be used. The keyboard is connected to the corresponding socket on the back of the printer. 7.1 Keyboard configuration The printer is adjusted to the corresponding national keyboards using the settings of the configuration parameter "Country". - Page 21 External keyboard When using a scanner, make sure that it is adjusted to the same character set as the printer. Special button functions [F1] Goes to the label contents directory of the memory card [F2] Repeats the last printed label [F3] Repeats the last print job with another query about the variable data [F8]...
-
Page 22: Troubleshooting
Troubleshooting 8 Troubleshooting When faults occur, a message appears in the print display. It also shows whether the fault can be remedied, allowing for the print job to continue (e.g. textile tape end), or whether this is a fault which entails cancelling the print job. - Page 23 Troubleshooting Label format stated in software does not Change label format in software correspond with actual label format Continuous material inserted in printer but Change software to continuous material software changed over to labels No link Network link missing Check network cable and connector Inform network administrator No SMTP server Printer configured to SMTP and no SMTP...
- Page 24 Troubleshooting Troubleshooting Problem Cause and solution Ink ribbon pleated Incorrect setting ink ribbon deflector Incorrect setting print head press-on system Ink ribbon too wide. Change ink ribbon to just a few mm wider than label material Smears or blanks in print image Print head soiled.
-
Page 25: Cleaning
Cleaning 9 Cleaning Disconnect the printer from the power supply before cleaning the printer! 9.1 General cleaning It is possible for dust particles to gather during printing, particularly around the print mechanism. Remove these particles with a soft brush or vacuum cleaner. Use a multi-purpose cleaning agent to clean the outer surfaces of the printer. -
Page 26: Cleaning The Label Light Barrier
Cleaning 9.4 Cleaning the label light barrier During printing, the label light barrier is exposed to soiling particularly from dust. In the worst case, this can cause problems with detecting the start of the label. The label light barrier must then be cleaned. 1 Lever for locking print head 2 Sensors 3 Stopper spring... -
Page 27: Cleaning The Cutting Device
In this case, clean the blades and the print roll at shorter intervals • If necessary, lubricate the cylindrical surface (see arrow) of the blade with high performance grease. Fig. 9-2 - Cutting device 10 Spare parts list Designation ThermoTex Article No. Cutting device 14076 Perforation scissors 14308 External rewinder...
Need help?
Do you have a question about the TT4-S and is the answer not in the manual?
Questions and answers